Brother International 5234PRW Users Manual - English and Spanish - Page 31
Troubleshooting
 |
View all Brother International 5234PRW manuals
Add to My Manuals
Save this manual to your list of manuals |
Page 31 highlights
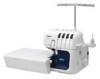
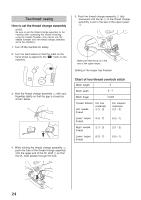
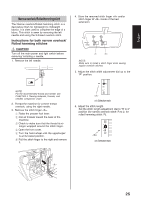
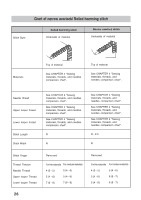
English CHAPTER 6 TROUBLESHOOTING This sewing machine is designed for trouble-free operation. However, the following chart indicates trouble which may occur if basic adjustments are not made properly. Trouble 1. Does not feed 2. Needles break 3. Threads break 4. Skipped stitches 5. Stitches are not uniform 6. Fabric is puckered Cause Presser foot pressure too loose 1. Needles bent, or needle tip blunt 2. Needles incorrectly installed 3. Material pulled forcibly Remedy Turn the pressure adjustment screw clockwise to increase the presser foot pressure. (See page 7.) Replace with new needle. (See page 11.) Install needles correctly. (See page 11.) Do not press or pull material too hard when sewing. 1. Improper threading Thread correctly. (See pages 13-18.) 2. Thread tangled Check spool pin, thread holders, etc. and remove tangled thread. 3. Thread tension too tight 4. Needles incorrectly installed 5. Wrong needle used 6. The tip of the thread change assembly is not in the eye of the upper looper. 1. Needle bent, or needle tip blunt 2. Needle incorrectly installed 3. Wrong needle used Adjust the thread tension. (See pages 8-10.) Install needles correctly. (See page 11.) Use correct needle Schmetz 130/705H - suggested (See page 11.) Put the tip of the thread change assembly in the eye of the upper looper. (See page 24.) Replace with new needle. (See page 11.) Install needle correctly. (See page 11.) Use correct needle. Schmetz 130/705H - suggested (See page 11.) 4. Improper threading 5. Presser foot pressure too loose 6. The tip of the thread change assembly is not in the eye of the upper looper. Thread tensions are not adjusted properly Thread correctly. (See pages 13-18.) Turn the pressure adjustment screw clockwise to increase the presser foot pressure. (See page 7.) Put the tip of the thread change assembly in the eye of the upper looper. (See page 24.) Adjust the thread tension. (See pages 8-10.) 1. Thread tension too tight Decrease thread tension when sewing lightweight or fine material. (See pages 8-10.) 2. Improper threading or thread tangled Thread correctly. (See pages 13-18.) 27
-
 1
1 -
2
-
3
-
4
-
5
-
6
-
7
-
8
-
9
-
10
-
11
-
12
-
13
-
14
-
15
-
16
-
17
-
18
-
19
-
20
-
21
-
22
-
23
-
24
-
25
-
 26
26 -
 27
27 -
 28
28 -
 29
29 -
 30
30 -
 31
31 -
 32
32 -
 33
33 -
 34
34 -
 35
35 -
 36
36 -
37
-
38
-
39
-
40
-
41
-
42
-
43
-
44
-
45
-
46
-
47
-
48
-
49
-
50
-
51
-
52
-
53
-
54
-
55
-
56
-
57
-
58
-
59
-
60
-
61
-
62
-
63
-
64
-
65
-
66
-
67
-
68
-
69
-
70
-
71
-
72
-
73
-
74
-
75
-
76
-
77
-
78
-
79
-
80
 |
 |
