Brother International CP-2000 Owners Manual - English - Page 10
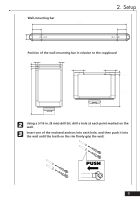
Wall mounting, Attaching the wall-mounting bar
 |
View all Brother International CP-2000 manuals
Add to My Manuals
Save this manual to your list of manuals |
Page 10 highlights
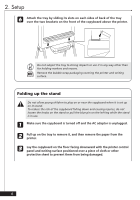
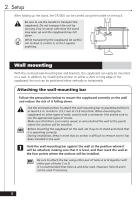
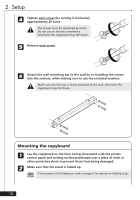
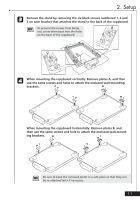
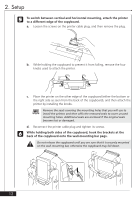
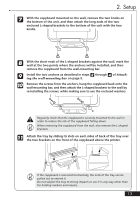
2. Setup After folding up the stand, the CP2000 can be carried using the handle on the back. a bc Be sure to use the handle to transport the copyboard. Do not transport the unit by carrying it by its stand, otherwise the stand may open up and the copyboard may fall down. While transporting the copyboard, be careful not to drop it, scratch it, or hit it against anything. Wall mounting With the enclosed wall-mounting bar and brackets, the copyboard can easily be mounted on a wall. In addition, by installing the printer on either a short or long edge of the copyboard, the unit can be positioned either vertically or horizontally. Attaching the wall-mounting bar Follow the precautions below to mount the copyboard correctly on the wall and reduce the risk of it falling down. a + Use the enclosed anchors to attach the wall-mounting bar to plasterboard that is at least 0.5 in. to 0.63 in. (12.7 mm to 15.9 mm) thick. When mounting the copyboard on other types of walls, consult with a contractor first and be sure to use the appropriate types of screws. Make sure that there is no metal, wood, or wires behind the wall at the points where the anchors will be installed. Before mounting the copyboard on the wall, set it up on its stand and check that it is operating correctly. During installation, keep in mind that an anchor is difficult to remove once it has been installed in the wall. 1 Hold the wall-mounting bar against the wall at the position where it will be attached, making sure that it is level, and then mark the wall at the four points where the anchors will be installed. + Be sure to attach the bar using either pair of holes A or B together with either pair of holes C or D. It is recommended that holes A and D be used. However, holes B and C can be used if necessary. 8
-
 1
1 -
2
-
3
-
4
-
 5
5 -
 6
6 -
 7
7 -
 8
8 -
 9
9 -
 10
10 -
 11
11 -
 12
12 -
 13
13 -
 14
14 -
 15
15 -
16
-
17
-
18
-
19
-
20
-
21
-
22
-
23
-
24
-
25
-
26
-
27
-
28
-
29
-
30
-
31
-
32
-
33
 |
 |
