Brother International CP-2000 Owners Manual - English - Page 12
Mounting the copyboard, Lay the copyboard on the floor facing downward with the printer
 |
View all Brother International CP-2000 manuals
Add to My Manuals
Save this manual to your list of manuals |
Page 12 highlights
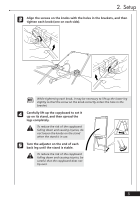
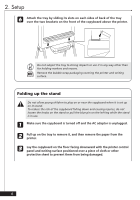
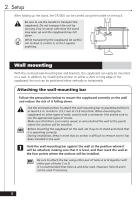
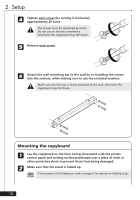
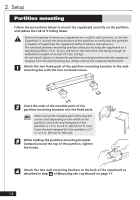
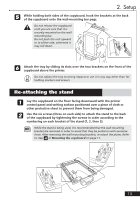
2. Setup 4 Tighten each screw (by turning it clockwise) approximately 20 turns. a The screws must be tightened by hand. Do not use an electric screwdriver, otherwise the copyboard may fall down. 5 Remove each screw. 6 Attach the wall-mounting bar to the wall by re-installing the screws into the anchors, while making sure to use the enclosed washers. a Make sure that the bar is firmly attached to the wall, otherwise the copyboard may fall down. Mounting the copyboard 1 Lay the copyboard on the floor facing downward with the printer control panel and writing surface positioned over a piece of cloth or other protective sheet to prevent them from being damaged. 2 Make sure that the stand is folded up. + If the stand is still folded out, refer to page 6 for details on folding it up. 10
-
 1
1 -
2
-
3
-
4
-
5
-
6
-
 7
7 -
 8
8 -
 9
9 -
 10
10 -
 11
11 -
 12
12 -
 13
13 -
 14
14 -
 15
15 -
 16
16 -
 17
17 -
18
-
19
-
20
-
21
-
22
-
23
-
24
-
25
-
26
-
27
-
28
-
29
-
30
-
31
-
32
-
33
 |
 |
