Brother International CP-2000 Owners Manual - English - Page 7
legs completely., Turn the adjuster on the end of each
 |
View all Brother International CP-2000 manuals
Add to My Manuals
Save this manual to your list of manuals |
Page 7 highlights
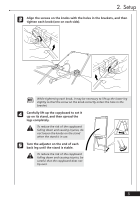
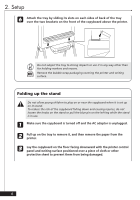
2. Setup 3 Align the screws on the knobs with the holes in the brackets, and then tighten each knob (one on each side). + While tightening each knob, it may be necessary to lift up the lower leg slightly so that the screw on the knob correctly enters the hole in the bracket. 4 Carefully lift up the copyboard to set it up on its stand, and then spread the legs completely. a To reduce the risk of the copyboard falling down and causing injuries, do not loosen the knobs on the stand when the stand is in use. 5 Turn the adjuster on the end of each back leg until the stand is stable. a To reduce the risk of the copyboard falling down and causing injuries, be careful that the copyboard does not tip over. 5
-
 1
1 -
 2
2 -
 3
3 -
 4
4 -
 5
5 -
 6
6 -
 7
7 -
 8
8 -
 9
9 -
 10
10 -
 11
11 -
 12
12 -
13
-
14
-
15
-
16
-
17
-
18
-
19
-
20
-
21
-
22
-
23
-
24
-
25
-
26
-
27
-
28
-
29
-
30
-
31
-
32
-
33
 |
 |

5
2. Setup
3
Align the screws on the knobs with the holes in the brackets, and then
tighten each knob (one on each side).
+
While tightening each knob, it may be necessary to lift up the lower leg
slightly so that the screw on the knob correctly enters the hole in the
bracket.
4
Carefully lift up the copyboard to set it
up on its stand, and then spread the
legs completely.
a
To reduce the risk of the copyboard
falling down and causing injuries, do
not loosen the knobs on the stand
when the stand is in use.
5
Turn the adjuster on the end of each
back leg until the stand is stable.
a
To reduce the risk of the copyboard
falling down and causing injuries, be
careful that the copyboard does not
tip over.