Brother International DreamMaker„ XE VE2200 Users Manual - English - Page 171
E-30 to E-32
 |
View all Brother International DreamMaker„ XE VE2200 manuals
Add to My Manuals
Save this manual to your list of manuals |
Page 171 highlights
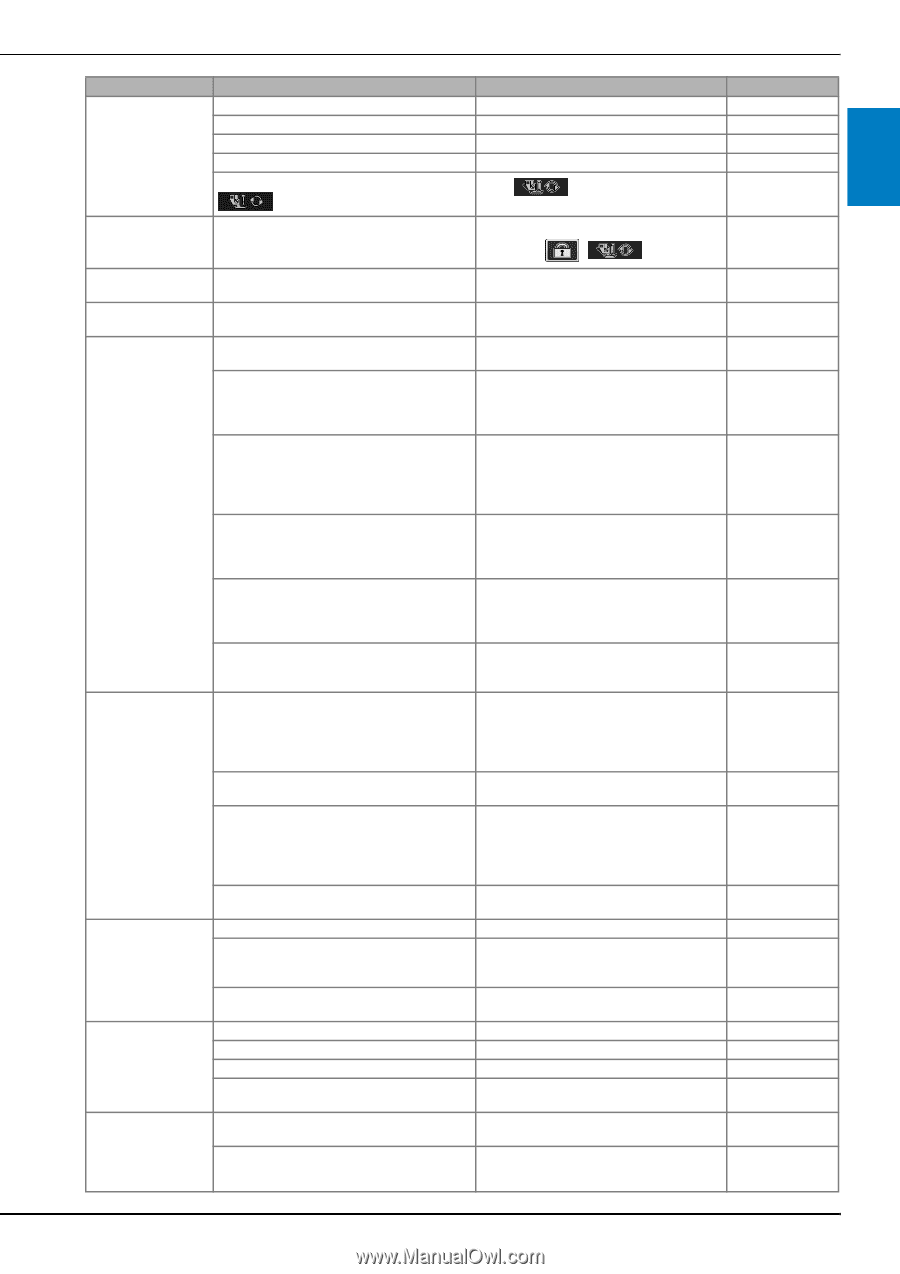
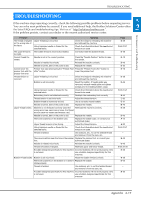
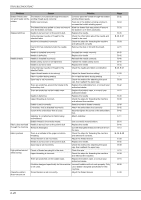
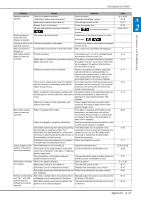
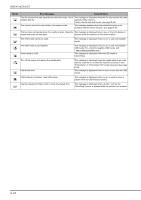
TROUBLESHOOTING Problem Machine does not operate Nothing happens, even if the LCD display is pressed Cause There is no pattern selected. "Start/Stop" button was not pushed. Main power switch is not turned on. Presser foot is not lowered. All keys and buttons have been locked by . The screen has been locked. Solution Select a pattern. Press the "Start/Stop" button. Turn the main power to ON. Lower the presser foot. Press to unlock all keys and buttons. Press either of the following keys to unlock the screen. The fabric feeds in the The feed mechanism is damaged. opposite direction. Contact your dealer or the nearest authorized service center. The LCD screen is fogged up. Condensation has formed on the LCD screen. After a while, the cloudiness will disappear. Embroidery pattern does not sew out correctly Thread is twisted. Use scissors, etc., to cut the twisted thread and remove it from the race, etc. Fabric was not inserted into the frame correctly If the fabric is not stretched tight in the frame, (fabric was loose, etc.). the pattern may turn out poorly or there may be shrinkage of the pattern. Set the fabric into the frame correctly. Stabilizing material was not attached. Always use stabilizing material, especially with stretch fabrics, lightweight fabrics, fabrics with a coarse weave, or fabrics that often cause pattern shrinkage. See your authorized dealer for the proper stabilizer. There was an object placed near the machine, and the carriage or embroidery frame hit the object during sewing. If the frame bumps something during sewing, the pattern will turn out poorly. Do not place anything in the area where the frame may bump it during sewing. Fabric outside the frame edges interferes with the sewing arm, so the embroidery unit cannot move. Reinsert the fabric in the embroidery frame so that the excess fabric is away from the sewing arm, and rotate the pattern 180 degrees. Fabric is too heavy, so the embroidery unit cannot move freely. Place a large thick book or similar object under the arm head to lightly lift the heavy side and keep it level. Embroidery pattern does not sew out correctly Fabric is hanging off the table. If the fabric is hanging off the table during embroidery, the embroidery unit will not move freely. Place the fabric so that it does not hang off the table or hold the fabric to keep it from dragging. Fabric is snagged or caught on something. Stop the machine and place the fabric so that it does not get caught or snagged. Embroidery frame was removed during sewing If the embroidery foot is bumped or the (for example, to reset the bobbin). The embroidery unit is moved during sewing, the embroidery foot was bumped or moved while pattern will not turn out. Be careful when removing or attaching the embroidery frame, or removing or reattaching the embroidery the embroidery unit was moved. frame during sewing. Stabilizer is incorrectly attached, for example, it Attach the stabilizer correctly. is smaller than the embroidery frame. Loops appear on the surface of the fabric when embroidering The thread tension is incorrectly set. Adjust the thread tension. The tension of the upper thread is incorrectly Use the embroidery needle plate cover. set for the combination of the fabric, thread and pattern being used. The combination of the bobbin case and bobbin thread is incorrect. Change the bobbin case or bobbin thread so that the correct combination is used. Embroidery unit does There is no pattern selected. not operate Main power switch is not turned on. Select a pattern. Turn the main power to ON. Embroidery unit is not attached correctly. Reattach the embroidery unit correctly. Embroidery frame was attached before the unit Perform the initialization process correctly. was initialized. Pointer of embroidery foot "W+" with LED pointer does not indicate the position correctly With thick or elastic fabric, the position will be misaligned only at raised parts in the fabric. With fabric having a very uneven surface, the position is not correctly aligned. Manually adjust the position according to the thickness of the fabric. The pointer indication should be used only as a reference. Page E-3, E-58 B-10 B-17 B-10 B-42, B-45 - - - A-13 E-14 E-11 E-21 E-14 - E-21 - E-26 E-11 E-30 to E-32 E-22 E-21 E-3, E-58 B-17 B-47 B-47 B-44 B-43 Maintenance and Troubleshooting A 2 Appendix A-21
-
 1
1 -
2
-
3
-
4
-
5
-
6
-
7
-
8
-
9
-
10
-
11
-
12
-
13
-
14
-
15
-
16
-
17
-
18
-
19
-
20
-
21
-
22
-
23
-
24
-
25
-
26
-
27
-
28
-
29
-
30
-
31
-
32
-
33
-
34
-
35
-
36
-
37
-
38
-
39
-
40
-
41
-
42
-
43
-
44
-
45
-
46
-
47
-
48
-
49
-
50
-
51
-
52
-
53
-
54
-
55
-
56
-
57
-
58
-
59
-
60
-
61
-
62
-
63
-
64
-
65
-
66
-
67
-
68
-
69
-
70
-
71
-
72
-
73
-
74
-
75
-
76
-
77
-
78
-
79
-
80
-
81
-
82
-
83
-
84
-
85
-
86
-
87
-
88
-
89
-
90
-
91
-
92
-
93
-
94
-
95
-
96
-
97
-
98
-
99
-
100
-
101
-
102
-
103
-
104
-
105
-
106
-
107
-
108
-
109
-
110
-
111
-
112
-
113
-
114
-
115
-
116
-
117
-
118
-
119
-
120
-
121
-
122
-
123
-
124
-
125
-
126
-
127
-
128
-
129
-
130
-
131
-
132
-
133
-
134
-
135
-
136
-
137
-
138
-
139
-
140
-
141
-
142
-
143
-
144
-
145
-
146
-
147
-
148
-
149
-
150
-
151
-
152
-
153
-
154
-
155
-
156
-
157
-
158
-
159
-
160
-
161
-
162
-
163
-
164
-
165
-
 166
166 -
 167
167 -
 168
168 -
 169
169 -
 170
170 -
 171
171 -
 172
172 -
 173
173 -
 174
174 -
 175
175 -
 176
176 -
177
-
178
-
179
-
180
 |
 |