Brother International DreamMaker„ XE VE2200 Users Manual - English - Page 44
Changing The Embroidery Foot
 |
View all Brother International DreamMaker„ XE VE2200 manuals
Add to My Manuals
Save this manual to your list of manuals |
Page 44 highlights
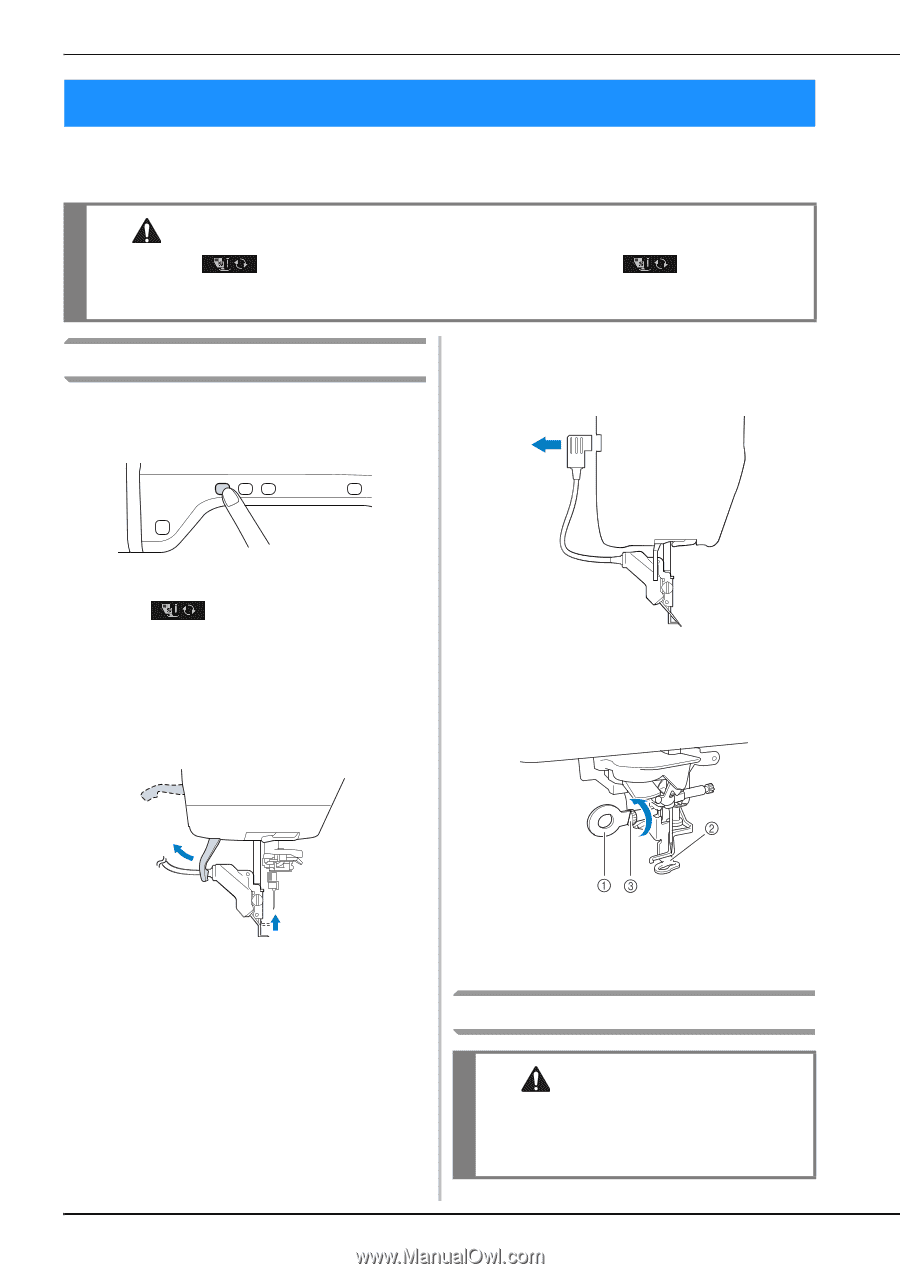
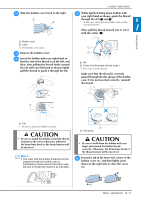
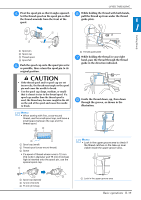
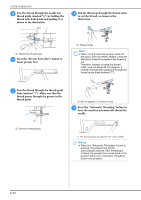
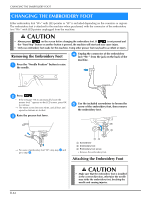
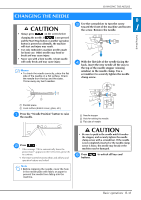
CHANGING THE EMBROIDERY FOOT CHANGING THE EMBROIDERY FOOT Either embroidery foot "W+" with LED pointer or "W" is included depending on the countries or regions. The embroidery foot is attached to the machine when purchased, with the connector of the embroidery foot "W+" with LED pointer unplugged from the machine. CAUTION • Always press on the screen before changing the embroidery foot. If is not pressed and the "Start/Stop" button or another button is pressed, the machine will start and may cause injury. • Only use embroidery feet made for this machine. Using other presser feet may lead to accident or injury. Removing the Embroidery Foot a Press the "Needle the needle. Position" button to raise d Unplug the connector of the embroidery foot "W+" from the jack on the back of the machine. b Press . * If the message "OK to automatically lower the presser foot? " appears on the LCD screen, press OK to continue. → The entire screen becomes white, and all keys and operation buttons are locked. c Raise the presser foot lever. e Use the included screwdriver to loosen the screw of the embroidery foot, then remove the embroidery foot. → For users of embroidery foot "W", skip step d and go to step e. a Screwdriver b Embroidery foot c Embroidery foot screw → Remove the embroidery foot. Attaching the Embroidery Foot CAUTION • Make sure that the embroidery foot is installed in the correct direction, otherwise the needle may strike the embroidery foot, breaking the needle and causing injuries. B-42
-
 1
1 -
2
-
3
-
4
-
5
-
6
-
7
-
8
-
9
-
10
-
11
-
12
-
13
-
14
-
15
-
16
-
17
-
18
-
19
-
20
-
21
-
22
-
23
-
24
-
25
-
26
-
27
-
28
-
29
-
30
-
31
-
32
-
33
-
34
-
35
-
36
-
37
-
38
-
 39
39 -
 40
40 -
 41
41 -
 42
42 -
 43
43 -
 44
44 -
 45
45 -
 46
46 -
 47
47 -
 48
48 -
 49
49 -
50
-
51
-
52
-
53
-
54
-
55
-
56
-
57
-
58
-
59
-
60
-
61
-
62
-
63
-
64
-
65
-
66
-
67
-
68
-
69
-
70
-
71
-
72
-
73
-
74
-
75
-
76
-
77
-
78
-
79
-
80
-
81
-
82
-
83
-
84
-
85
-
86
-
87
-
88
-
89
-
90
-
91
-
92
-
93
-
94
-
95
-
96
-
97
-
98
-
99
-
100
-
101
-
102
-
103
-
104
-
105
-
106
-
107
-
108
-
109
-
110
-
111
-
112
-
113
-
114
-
115
-
116
-
117
-
118
-
119
-
120
-
121
-
122
-
123
-
124
-
125
-
126
-
127
-
128
-
129
-
130
-
131
-
132
-
133
-
134
-
135
-
136
-
137
-
138
-
139
-
140
-
141
-
142
-
143
-
144
-
145
-
146
-
147
-
148
-
149
-
150
-
151
-
152
-
153
-
154
-
155
-
156
-
157
-
158
-
159
-
160
-
161
-
162
-
163
-
164
-
165
-
166
-
167
-
168
-
169
-
170
-
171
-
172
-
173
-
174
-
175
-
176
-
177
-
178
-
179
-
180
 |
 |