Brother International DreamWeaver„ VQ3000 Users Manual - English - Page 212
mechanism. At these times, the machine will make a sound different from what is made during normal
 |
View all Brother International DreamWeaver„ VQ3000 manuals
Add to My Manuals
Save this manual to your list of manuals |
Page 212 highlights
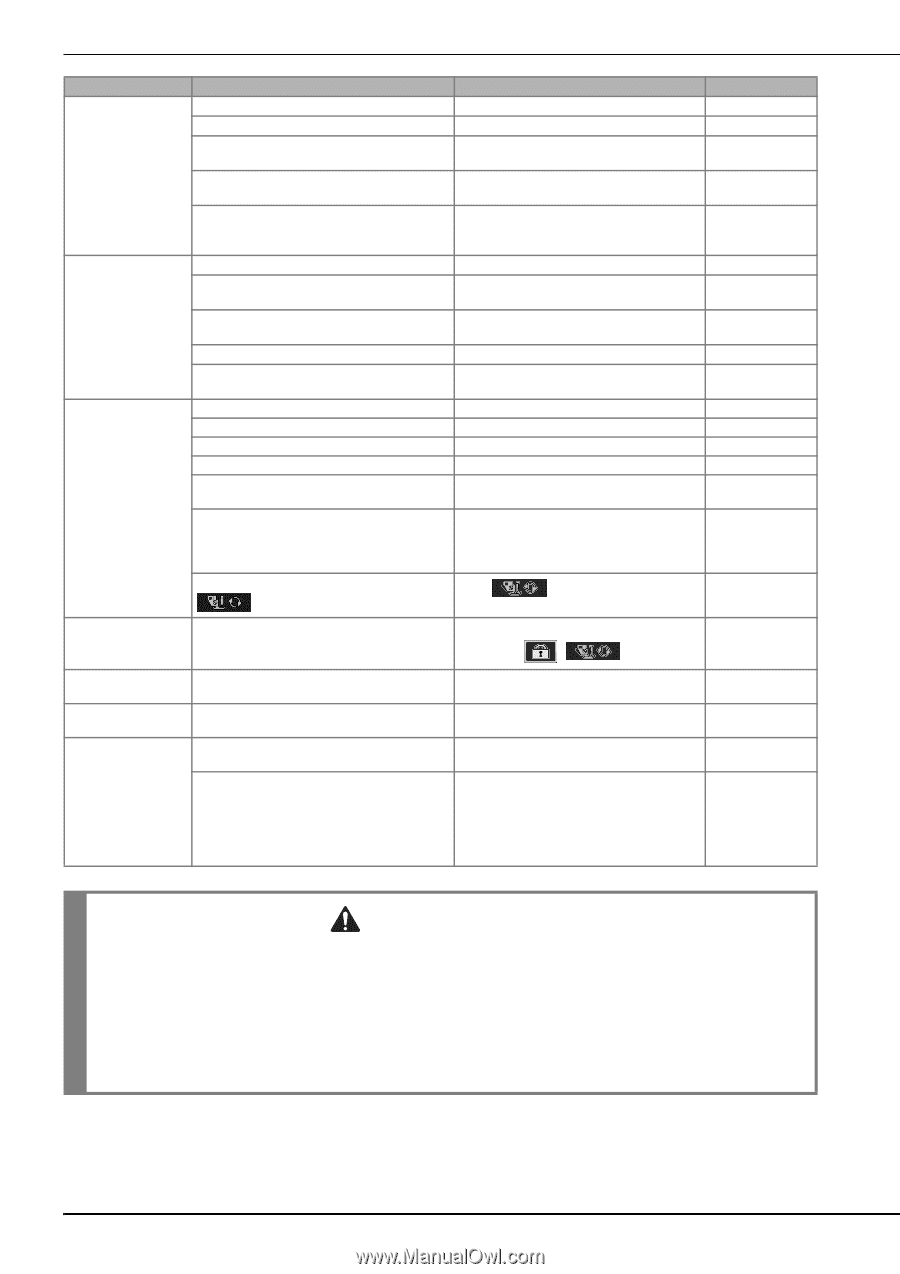
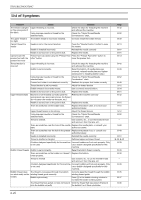
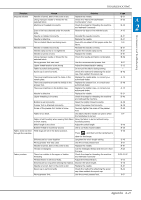
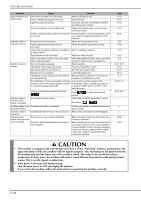
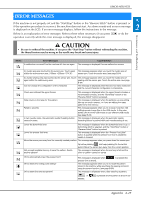
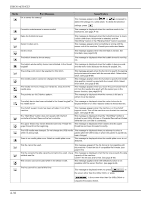
TROUBLESHOOTING Problem Cause Solution High-pitched sound Dust or lint is caught in the feed dogs. while sewing Pieces of thread are caught in the race. Remove the dust or lint. Clean the race. Upper threading is incorrect. Check the steps for threading the machine and rethread the machine. There are scratches on the bobbin case. Replace the bobbin case, or consult your authorized dealer. A bobbin designed specifically for this machine Incorrect bobbins will not work properly. Only is not used. use a bobbin designed specifically for this machine. Character pattern does not turn out Wrong presser foot was used. Pattern adjustment settings were set incorrectly. Attach the correct presser foot. Revise the pattern adjustment settings. Did not use a stabilizer material on thin fabrics Attach a stabilizer material. or stretch fabrics. Thread tension is set incorrectly. Adjust the thread tension. Machine does not operate Nothing happens, even if the LCD display is pressed Fabric was pulled, pushed or fed at an angle Sew while guiding the fabric with your hands while it was being sewn. so that the fabric is fed in a straight line. There is no pattern selected. Select a pattern. "Start/Stop" button was not pushed. Press the "Start/Stop" button. Main power switch is not turned on. Turn the main power to ON. Presser foot is not lowered. Lower the presser foot. "Start/Stop" button was pushed with the foot Remove the foot controller, or use the foot controller attached. controller to operate the machine. The "Start/Stop" button was pressed while the machine is set for the sewing speed controller to control the zigzag stitch width. Use the foot controller instead of the "Start/Stop" button to operate the machine, or set the "Width Control" to "OFF" in the settings screen. All keys and buttons have been locked by . Press buttons. to unlock all keys and The screen has been locked. Press either of the following keys to unlock the screen. The fabric feeds in the The feed mechanism is damaged. opposite direction. The LCD screen is fogged up. Condensation has formed on the LCD screen. Specifying with sensor pen cannot be done accurately The sensor pen has not been calibrated. The pen is being held differently than when it was calibrated. Contact your dealer or the nearest authorized service center. After a while, the cloudiness will disappear. Before using the sensor pen for the first time, be sure to calibrate it. When using the sensor pen, be sure to hold it at the same angle as when it was calibrated. The specification location may be misaligned if the pen is held at a slightly different angle. In this case, make fine adjustments after making the selection. Page A-15 A-15 B-42 A-15 B-39 S-67 S-82 S-81 S-12 S-3 S-21, S-77 B-13 B-19 B-13 S-4 B-25, S-4 B-49, B-51 - - - B-62 B-62 CAUTION • This machine is equipped with a thread detection device. If the "Start/Stop" button is pushed before the upper threading is done, the machine will not operate properly. Also, depending on the pattern selected, the machine may feed the fabric even if the needle is raised. This is due to the needle bar release mechanism. At these times, the machine will make a sound different from what is made during normal sewing. This is not the sign of a malfunction. • If the power is disconnected during sewing: Turn the main power to OFF and unplug the machine. If you restart the machine, follow the instructions for operating the machine correctly. A-28
-
 1
1 -
2
-
3
-
4
-
5
-
6
-
7
-
8
-
9
-
10
-
11
-
12
-
13
-
14
-
15
-
16
-
17
-
18
-
19
-
20
-
21
-
22
-
23
-
24
-
25
-
26
-
27
-
28
-
29
-
30
-
31
-
32
-
33
-
34
-
35
-
36
-
37
-
38
-
39
-
40
-
41
-
42
-
43
-
44
-
45
-
46
-
47
-
48
-
49
-
50
-
51
-
52
-
53
-
54
-
55
-
56
-
57
-
58
-
59
-
60
-
61
-
62
-
63
-
64
-
65
-
66
-
67
-
68
-
69
-
70
-
71
-
72
-
73
-
74
-
75
-
76
-
77
-
78
-
79
-
80
-
81
-
82
-
83
-
84
-
85
-
86
-
87
-
88
-
89
-
90
-
91
-
92
-
93
-
94
-
95
-
96
-
97
-
98
-
99
-
100
-
101
-
102
-
103
-
104
-
105
-
106
-
107
-
108
-
109
-
110
-
111
-
112
-
113
-
114
-
115
-
116
-
117
-
118
-
119
-
120
-
121
-
122
-
123
-
124
-
125
-
126
-
127
-
128
-
129
-
130
-
131
-
132
-
133
-
134
-
135
-
136
-
137
-
138
-
139
-
140
-
141
-
142
-
143
-
144
-
145
-
146
-
147
-
148
-
149
-
150
-
151
-
152
-
153
-
154
-
155
-
156
-
157
-
158
-
159
-
160
-
161
-
162
-
163
-
164
-
165
-
166
-
167
-
168
-
169
-
170
-
171
-
172
-
173
-
174
-
175
-
176
-
177
-
178
-
179
-
180
-
181
-
182
-
183
-
184
-
185
-
186
-
187
-
188
-
189
-
190
-
191
-
192
-
193
-
194
-
195
-
196
-
197
-
198
-
199
-
200
-
201
-
202
-
203
-
204
-
205
-
206
-
 207
207 -
 208
208 -
 209
209 -
 210
210 -
 211
211 -
 212
212 -
 213
213 -
 214
214 -
 215
215 -
 216
216 -
 217
217 -
218
-
219
-
220
-
221
-
222
-
223
-
224
 |
 |