Brother International DreamWeaver„ XE VM6200D Users Manual - English - Page 313
mechanism. At these times, the machine will make a sound different from what is made during normal
 |
View all Brother International DreamWeaver„ XE VM6200D manuals
Add to My Manuals
Save this manual to your list of manuals |
Page 313 highlights
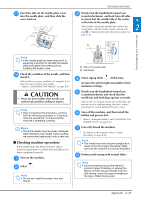
TROUBLESHOOTING Problem Cause Solution Embroidery pattern does not sew out correctly Fabric is hanging off the table. If the fabric is hanging off the table during embroidery, the embroidery unit will not move freely. Place the fabric so that it does not hang off the table or hold the fabric to keep it from dragging. Fabric is snagged or caught on something. Stop the machine and place the fabric so that it does not get caught or snagged. Embroidery frame was removed during sewing (for example, to reset the bobbin). The presser foot was bumped or moved while removing or attaching the embroidery frame, or the embroidery unit was moved. If the presser foot is bumped or the embroidery unit is moved during sewing, the pattern will not turn out. Be careful when removing or reattaching the embroidery frame during sewing. Stabilizer is incorrectly attached, for example, it Attach the stabilizer correctly. is smaller than the embroidery frame. Loops appear on the surface of the fabric when embroidering The thread tension is incorrectly set. Adjust the thread tension. The tension of the upper thread is incorrectly Use the embroidery needle plate cover. set for the combination of the fabric, thread and pattern being used. The combination of the bobbin case and bobbin thread is incorrect. Change the bobbin case or bobbin thread so that the correct combination is used. Embroidery unit does There is no pattern selected. not operate Main power switch is not turned on. Select a pattern. Turn the main power to ON. Embroidery unit is not attached correctly. Reattach the embroidery unit correctly. Embroidery frame was attached before the unit Perform the initialization process correctly. was initialized. Pointer of embroidery foot "W+" with LED pointer does not indicate the position correctly With thick elastic fabric, the position will be misaligned only at raised parts in the fabric. With fabric having a very uneven surface, the position is not correctly aligned. Manually adjust the position according to the thickness of the fabric. The pointer indication should be used only as a reference. Specifying with The sensor pen has not been calibrated. sensor pen cannot be done accurately The pen is being held differently than when it was calibrated. Before using the sensor pen for the first time, be sure to calibrate it. When using the sensor pen, be sure to hold it at the same angle as when it was calibrated. The specification location may be misaligned if the pen is held at a slightly different angle. In this case, make fine adjustments after making the selection. Page E-21 - E-26 E-11 E-30 to E-32 E-22 E-21 E-3, E-58 B-21 B-64 B-64 B-63 B-62 B-74 B-74 Maintenance and Troubleshooting A 2 CAUTION • This machine is equipped with a thread detection device. If the "Start/Stop" button is pushed before the upper threading is done, the machine will not operate properly. Also, depending on the pattern selected, the machine may feed the fabric even if the needle is raised. This is due to the needle bar release mechanism. At these times, the machine will make a sound different from what is made during normal sewing. This is not the sign of a malfunction. • If the power is disconnected during sewing: Turn the main power to OFF and unplug the machine. If you restart the machine, follow the instructions for operating the machine correctly. Appendix A-33
-
 1
1 -
2
-
3
-
4
-
5
-
6
-
7
-
8
-
9
-
10
-
11
-
12
-
13
-
14
-
15
-
16
-
17
-
18
-
19
-
20
-
21
-
22
-
23
-
24
-
25
-
26
-
27
-
28
-
29
-
30
-
31
-
32
-
33
-
34
-
35
-
36
-
37
-
38
-
39
-
40
-
41
-
42
-
43
-
44
-
45
-
46
-
47
-
48
-
49
-
50
-
51
-
52
-
53
-
54
-
55
-
56
-
57
-
58
-
59
-
60
-
61
-
62
-
63
-
64
-
65
-
66
-
67
-
68
-
69
-
70
-
71
-
72
-
73
-
74
-
75
-
76
-
77
-
78
-
79
-
80
-
81
-
82
-
83
-
84
-
85
-
86
-
87
-
88
-
89
-
90
-
91
-
92
-
93
-
94
-
95
-
96
-
97
-
98
-
99
-
100
-
101
-
102
-
103
-
104
-
105
-
106
-
107
-
108
-
109
-
110
-
111
-
112
-
113
-
114
-
115
-
116
-
117
-
118
-
119
-
120
-
121
-
122
-
123
-
124
-
125
-
126
-
127
-
128
-
129
-
130
-
131
-
132
-
133
-
134
-
135
-
136
-
137
-
138
-
139
-
140
-
141
-
142
-
143
-
144
-
145
-
146
-
147
-
148
-
149
-
150
-
151
-
152
-
153
-
154
-
155
-
156
-
157
-
158
-
159
-
160
-
161
-
162
-
163
-
164
-
165
-
166
-
167
-
168
-
169
-
170
-
171
-
172
-
173
-
174
-
175
-
176
-
177
-
178
-
179
-
180
-
181
-
182
-
183
-
184
-
185
-
186
-
187
-
188
-
189
-
190
-
191
-
192
-
193
-
194
-
195
-
196
-
197
-
198
-
199
-
200
-
201
-
202
-
203
-
204
-
205
-
206
-
207
-
208
-
209
-
210
-
211
-
212
-
213
-
214
-
215
-
216
-
217
-
218
-
219
-
220
-
221
-
222
-
223
-
224
-
225
-
226
-
227
-
228
-
229
-
230
-
231
-
232
-
233
-
234
-
235
-
236
-
237
-
238
-
239
-
240
-
241
-
242
-
243
-
244
-
245
-
246
-
247
-
248
-
249
-
250
-
251
-
252
-
253
-
254
-
255
-
256
-
257
-
258
-
259
-
260
-
261
-
262
-
263
-
264
-
265
-
266
-
267
-
268
-
269
-
270
-
271
-
272
-
273
-
274
-
275
-
276
-
277
-
278
-
279
-
280
-
281
-
282
-
283
-
284
-
285
-
286
-
287
-
288
-
289
-
290
-
291
-
292
-
293
-
294
-
295
-
296
-
297
-
298
-
299
-
300
-
301
-
302
-
303
-
304
-
305
-
306
-
307
-
 308
308 -
 309
309 -
 310
310 -
 311
311 -
 312
312 -
 313
313 -
 314
314 -
 315
315 -
 316
316 -
 317
317 -
 318
318 -
319
-
320
-
321
-
322
-
323
-
324
 |
 |
