Brother International HE-120 Users Manual - English - Page 24
Winding/Installing the Bobbin - sewing machine model
 |
View all Brother International HE-120 manuals
Add to My Manuals
Save this manual to your list of manuals |
Page 24 highlights
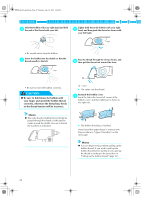
SE-BrotherE_sgml.book Page 18 Monday, June 30, 2003 3:44 PM GETTING READY Winding/Installing the Bobbin This section describes how to wind the thread onto the bobbin, and then insert the bobbin thread. Bobbin precautions Winding the bobbin Be sure to observe the following precautions concerning the bobbin. CAUTION ● Only use the Bobbin (part code: SA156, SFB:XA5539-151) designed specifically for this sewing machine. Use of any other bobbin may result in injuries or damage to the machine. ● The included bobbin was designed specifically for this sewing machine. If bobbins from older models are used, the machine will not operate correctly. Use only the included bobbin or bobbins of the same type (part code: SA156, SFB:XA5539-151). 11.5 mm (7/16 inch) Actual size This model Older model Wind the thread around the bobbin to prepare the bobbin thread. Turn on the sewing machine. a Open the bobbin winder cover at the top on b the right side of the sewing machine. Raise until it stops with a click. Swing up the bobbin thread spool pin. c Move the bobbin thread spool pin up as far as possible. 1 a Bobbin thread spool pin 18
-
 1
1 -
2
-
3
-
4
-
5
-
6
-
7
-
8
-
9
-
10
-
11
-
12
-
13
-
14
-
15
-
16
-
17
-
18
-
 19
19 -
 20
20 -
 21
21 -
 22
22 -
 23
23 -
 24
24 -
 25
25 -
 26
26 -
 27
27 -
 28
28 -
 29
29 -
30
-
31
-
32
-
33
-
34
-
35
-
36
-
37
-
38
-
39
-
40
-
41
-
42
-
43
-
44
-
45
-
46
-
47
-
48
-
49
-
50
-
51
-
52
-
53
-
54
-
55
-
56
-
57
-
58
-
59
-
60
-
61
-
62
-
63
-
64
-
65
-
66
-
67
-
68
-
69
-
70
-
71
-
72
-
73
-
74
-
75
-
76
-
77
-
78
-
79
-
80
-
81
-
82
-
83
-
84
-
85
-
86
-
87
-
88
-
89
-
90
-
91
-
92
-
93
-
94
-
95
-
96
-
97
-
98
-
99
-
100
-
101
-
102
-
103
-
104
-
105
-
106
-
107
-
108
-
109
-
110
-
111
-
112
-
113
-
114
-
115
-
116
-
117
-
118
-
119
-
120
-
121
-
122
-
123
-
124
-
125
-
126
-
127
-
128
-
129
-
130
-
131
-
132
-
133
-
134
-
135
-
136
-
137
-
138
-
139
-
140
-
141
-
142
-
143
-
144
-
145
-
146
-
147
-
148
-
149
-
150
-
151
-
152
-
153
-
154
-
155
-
156
-
157
-
158
-
159
-
160
-
161
-
162
-
163
-
164
-
165
-
166
-
167
-
168
-
169
-
170
-
171
-
172
-
173
-
174
-
175
-
176
-
177
-
178
-
179
-
180
-
181
-
182
-
183
 |
 |
