Brother International HE-120 Users Manual - English - Page 3
Names of Machine Parts and Their Functions - embroidery sewing machine
 |
View all Brother International HE-120 manuals
Add to My Manuals
Save this manual to your list of manuals |
Page 3 highlights
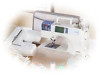
SE-BrotherE_sgml.book Page B Monday, June 30, 2003 3:44 PM Names of Machine Parts and Their Functions The names of the various parts of the sewing machine and their functions are described below. Before using the sewing machine, carefully read these descriptions to learn the names of the machine parts. Front view 1 F 2 E 3 D C 4 B A 5 0 6 7 9 8 a Thread cassette compartment cover b Thread cassette compartment Insert a thread cassette into the thread cassette compartment. c Thread cassette eject lever Press this lever to eject the installed thread cassette. d Thread tension dial Use the thread tension dial to adjust the tension of the upper thread. e Thread cutter Pass the threads through the thread cutter to cut them. f Arm Plug in the connector for the embroidery unit. g Embroidery unit connector slot Plug in the connector for the embroidery unit. h Flap Use the flap to create a table. When the sewing machine is not being used, store the machine with the flap folded up. Remove the flap to sew cylindrical pieces such as sleeve cuffs. i Sliding leg Pull out the sliding leg during free-arm sewing. j Operation buttons Use the operation buttons to start the sewing machine and raise and lower the needle. (page Cover D) k Operation panel Select a stitch from those that appear in the operation panel. (page Cover E) l Bobbin winder Use the bobbin winder when winding the bobbin. m Bobbin thread spool pin Place the spool of thread for the bobbin onto this spool pin in order to wind the bobbin. n Bobbin storage compartment Store the bobbins designed specifically for this sewing machine in this compartment. o Bobbin winder cover Open this cover when winding the bobbin. p Thread guide for bobbin winding Pass the thread around this thread guide when winding the bobbin thread. Cover B
-
 1
1 -
 2
2 -
 3
3 -
 4
4 -
 5
5 -
 6
6 -
 7
7 -
 8
8 -
 9
9 -
10
-
11
-
12
-
13
-
14
-
15
-
16
-
17
-
18
-
19
-
20
-
21
-
22
-
23
-
24
-
25
-
26
-
27
-
28
-
29
-
30
-
31
-
32
-
33
-
34
-
35
-
36
-
37
-
38
-
39
-
40
-
41
-
42
-
43
-
44
-
45
-
46
-
47
-
48
-
49
-
50
-
51
-
52
-
53
-
54
-
55
-
56
-
57
-
58
-
59
-
60
-
61
-
62
-
63
-
64
-
65
-
66
-
67
-
68
-
69
-
70
-
71
-
72
-
73
-
74
-
75
-
76
-
77
-
78
-
79
-
80
-
81
-
82
-
83
-
84
-
85
-
86
-
87
-
88
-
89
-
90
-
91
-
92
-
93
-
94
-
95
-
96
-
97
-
98
-
99
-
100
-
101
-
102
-
103
-
104
-
105
-
106
-
107
-
108
-
109
-
110
-
111
-
112
-
113
-
114
-
115
-
116
-
117
-
118
-
119
-
120
-
121
-
122
-
123
-
124
-
125
-
126
-
127
-
128
-
129
-
130
-
131
-
132
-
133
-
134
-
135
-
136
-
137
-
138
-
139
-
140
-
141
-
142
-
143
-
144
-
145
-
146
-
147
-
148
-
149
-
150
-
151
-
152
-
153
-
154
-
155
-
156
-
157
-
158
-
159
-
160
-
161
-
162
-
163
-
164
-
165
-
166
-
167
-
168
-
169
-
170
-
171
-
172
-
173
-
174
-
175
-
176
-
177
-
178
-
179
-
180
-
181
-
182
-
183
 |
 |
