Brother International Isodore„ Innov-ís 5000 Users Manual - English - Page 23
Display, Key Name, Explanation
 |
View all Brother International Isodore„ Innov-ís 5000 manuals
Add to My Manuals
Save this manual to your list of manuals |
Page 23 highlights
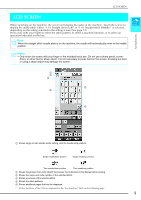
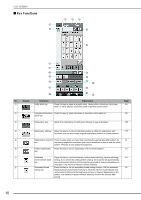
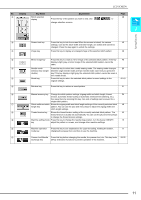
No. Display Key Name i Stitch selection display Explanation Press the key of the pattern you want to sew. Use change selection screens. LCD SCREEN Page 48 to 1 Getting Ready j Screen lock key Press this key to lock the screen.When the screen is locked, the various 46 settings, such as the stitch width and stitch length, are locked and cannot be changed. Press this key again to unlock the settings. k Image key Press this key to display an enlarged image of the selected stitch pattern. 49 l Mirror image key Press this key to create a mirror image of the selected stitch pattern. If the key 49 display is light gray, a mirror image of the selected stitch pattern cannot be sewn. m Needle mode Press this key to select twin needle sewing mode. The sewing mode changes 29 selection key (single/ between single needle mode and twin needle mode each time you press the double) key. If the key display is light gray, the selected stitch pattern cannot be sewn in twin needle mode. n Reset key Press this key to return the selected stitch pattern's saved settings to the 42-43 original settings. o Retrieve key Press this key to retrieve a saved pattern. 51 p Manual memory key Change the stitch pattern settings (zigzag width and stitch length, thread 50 tension, automatic thread cutting or automatic reinforcement stitching, etc.), then save them by pressing this key. Five sets of settings can be saved for a single stitch pattern. q Stitch width and stitch Shows the zigzag width and stitch length settings of the currently selected stitch 42 length key pattern. You can use the plus and minus keys to adjust the zigzag width and stitch length settings. r Thread tension key Shows the thread tension setting of the currently selected stitch pattern. The 43 thread tension is usually set automatically. You can use the plus and minus keys to change the thread tension settings. s Machine setting mode Press this key to change the needle stop position, turn the buzzer ON/OFF, 12 key adjust the pattern or screen, and change other machine settings. t Machine operation Press this key to see explanations for upper threading, winding the bobbin, 17 mode key changing the presser foot, and how to use the machine. u Presser foot/Needle Press this key before changing the needle, the presser foot, etc. This key locks 32-35 exchange key all key and button functions to prevent operation of the machine. 11
-
 1
1 -
2
-
3
-
4
-
5
-
6
-
7
-
8
-
9
-
10
-
11
-
12
-
13
-
14
-
15
-
16
-
17
-
 18
18 -
 19
19 -
 20
20 -
 21
21 -
 22
22 -
 23
23 -
 24
24 -
 25
25 -
 26
26 -
 27
27 -
 28
28 -
29
-
30
-
31
-
32
-
33
-
34
-
35
-
36
-
37
-
38
-
39
-
40
-
41
-
42
-
43
-
44
-
45
-
46
-
47
-
48
-
49
-
50
-
51
-
52
-
53
-
54
-
55
-
56
-
57
-
58
-
59
-
60
-
61
-
62
-
63
-
64
-
65
-
66
-
67
-
68
-
69
-
70
-
71
-
72
-
73
-
74
-
75
-
76
-
77
-
78
-
79
-
80
-
81
-
82
-
83
-
84
-
85
-
86
-
87
-
88
-
89
-
90
-
91
-
92
-
93
-
94
-
95
-
96
-
97
-
98
-
99
-
100
-
101
-
102
-
103
-
104
-
105
-
106
-
107
-
108
-
109
-
110
-
111
-
112
-
113
-
114
-
115
-
116
-
117
-
118
-
119
-
120
-
121
-
122
-
123
-
124
-
125
-
126
-
127
-
128
-
129
-
130
-
131
-
132
-
133
-
134
-
135
-
136
-
137
-
138
-
139
-
140
-
141
-
142
-
143
-
144
-
145
-
146
-
147
-
148
-
149
-
150
-
151
-
152
-
153
-
154
-
155
-
156
-
157
-
158
-
159
-
160
-
161
-
162
-
163
-
164
-
165
-
166
-
167
-
168
-
169
-
170
-
171
-
172
-
173
-
174
-
175
-
176
-
177
-
178
-
179
-
180
-
181
-
182
-
183
-
184
-
185
-
186
-
187
-
188
-
189
-
190
-
191
-
192
-
193
-
194
-
195
-
196
-
197
-
198
-
199
-
200
-
201
-
202
-
203
-
204
-
205
-
206
-
207
-
208
-
209
-
210
-
211
-
212
-
213
-
214
-
215
-
216
-
217
-
218
-
219
-
220
-
221
-
222
-
223
-
224
-
225
-
226
-
227
-
228
-
229
-
230
-
231
-
232
-
233
-
234
-
235
-
236
-
237
-
238
-
239
-
240
-
241
-
242
-
243
-
244
-
245
-
246
-
247
-
248
-
249
-
250
-
251
-
252
 |
 |
