Brother International Isodore„ Innov-ís 5000 Users Manual - English - Page 41
Using the Twin Needle Mode, CAUTION
 |
View all Brother International Isodore„ Innov-ís 5000 manuals
Add to My Manuals
Save this manual to your list of manuals |
Page 41 highlights
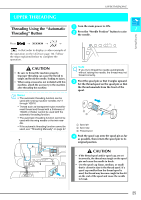
l Lower the presser foot lever. m Holding the thread with the thread through both both hands, pass the upper and lower needle bar thread guides. 1a 2b a Needle bar thread guide (upper) b Needle bar thread guide (lower) n Pass the thread through the needle from front to back. eye of the UPPER THREADING Using the Twin Needle Mode The twin needle can only be used for patterns that show after being selected. Before you select a stitch pattern, make sure the stitch can be 1 sewn in the twin needle mode (refer to the "STITCH SETTING CHART" at the end of this manual). Getting Ready CAUTION • Use only twin needles made for this machine (part code X59296-151). Other needles could break, resulting in damage. • Be sure to set the twin needle mode when using the twin needle. Using the twin needle while the machine is in single needle mode could cause the needle to break, resulting in damage. • Do not sew with bent needles. The needle could break and cause injury. • When using the twin needle, be sure to use presser foot "J" only. • When the twin needle is used, bunched stitches may occur depending on the types of fabric and thread that are used. If this occurs, use monogramming foot "N". a Press and install the twin needle (see "CHANGING THE NEEDLE" on page 34). o Pass the thread through the presser foot, and then pull out about 100-150 mm (approx. 4-6 inches) of thread toward the back of the machine. b Manually thread the machine. * Follow the steps for threading a single needle for the first threading (see "Threading Manually" on page 27). a a 100-150 mm (approx. 4-6 inches) p Press buttons. to unlock all keys and 29
-
 1
1 -
2
-
3
-
4
-
5
-
6
-
7
-
8
-
9
-
10
-
11
-
12
-
13
-
14
-
15
-
16
-
17
-
18
-
19
-
20
-
21
-
22
-
23
-
24
-
25
-
26
-
27
-
28
-
29
-
30
-
31
-
32
-
33
-
34
-
35
-
 36
36 -
 37
37 -
 38
38 -
 39
39 -
 40
40 -
 41
41 -
 42
42 -
 43
43 -
 44
44 -
 45
45 -
 46
46 -
47
-
48
-
49
-
50
-
51
-
52
-
53
-
54
-
55
-
56
-
57
-
58
-
59
-
60
-
61
-
62
-
63
-
64
-
65
-
66
-
67
-
68
-
69
-
70
-
71
-
72
-
73
-
74
-
75
-
76
-
77
-
78
-
79
-
80
-
81
-
82
-
83
-
84
-
85
-
86
-
87
-
88
-
89
-
90
-
91
-
92
-
93
-
94
-
95
-
96
-
97
-
98
-
99
-
100
-
101
-
102
-
103
-
104
-
105
-
106
-
107
-
108
-
109
-
110
-
111
-
112
-
113
-
114
-
115
-
116
-
117
-
118
-
119
-
120
-
121
-
122
-
123
-
124
-
125
-
126
-
127
-
128
-
129
-
130
-
131
-
132
-
133
-
134
-
135
-
136
-
137
-
138
-
139
-
140
-
141
-
142
-
143
-
144
-
145
-
146
-
147
-
148
-
149
-
150
-
151
-
152
-
153
-
154
-
155
-
156
-
157
-
158
-
159
-
160
-
161
-
162
-
163
-
164
-
165
-
166
-
167
-
168
-
169
-
170
-
171
-
172
-
173
-
174
-
175
-
176
-
177
-
178
-
179
-
180
-
181
-
182
-
183
-
184
-
185
-
186
-
187
-
188
-
189
-
190
-
191
-
192
-
193
-
194
-
195
-
196
-
197
-
198
-
199
-
200
-
201
-
202
-
203
-
204
-
205
-
206
-
207
-
208
-
209
-
210
-
211
-
212
-
213
-
214
-
215
-
216
-
217
-
218
-
219
-
220
-
221
-
222
-
223
-
224
-
225
-
226
-
227
-
228
-
229
-
230
-
231
-
232
-
233
-
234
-
235
-
236
-
237
-
238
-
239
-
240
-
241
-
242
-
243
-
244
-
245
-
246
-
247
-
248
-
249
-
250
-
251
-
252
 |
 |
