Brother International Isodore„ Innov-ís 5000 Users Manual - English - Page 52
Sewing Reinforcement Stitches, Sewing Curves, Changing Sewing Direction
 |
View all Brother International Isodore„ Innov-ís 5000 manuals
Add to My Manuals
Save this manual to your list of manuals |
Page 52 highlights
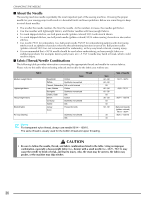
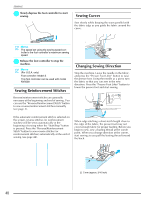
SEWING b Slowly depress sewing. the foot controller to start Sewing Curves Sew slowly while keeping the seam parallel with the fabric edge as you guide the fabric around the curve. Memo The speed set using the sewing speed controller is the foot controller's maximum sewing speed. c Release the machine. foot controller to stop the Memo (For U.S.A. only) Foot controller: Model S This foot controller can be used with model NV5000 Sewing Reinforcement Stitches Changing Sewing Direction Stop the machine. Leave the needle in the fabric, and press the "Presser Foot Lifter" button to raise the presser foot. Using the needle as a pivot, turn the fabric so that you can sew in the new direction. Press the "Presser Foot Lifter" button to lower the presser foot and start sewing. Reverse/reinforcement stitches are generally necessary at the beginning and end of sewing. You can use the "Reverse/Reinforcement Stitch" button to sew reverse/reinforcement stitches manually (see page 3). If the automatic reinforcement stitch is selected on the screen, reverse stitches (or reinforcement stitches) will be sewn automatically at the beginning of sewing when the "Start/Stop" button is pressed. Press the "Reverse/Reinforcement Stitch" button to sew reverse stitches (or reinforcement stitches) automatically at the end of sewing (see page 44). When edge stitching a short stitch length close to the edge of the fabric, the presser foot may not cover enough fabric for proper feeding. Before you begin to sew, sew a basting thread at the corner point. When you change direction at the corner, start sewing as you pull the basting thread toward the back. a a 5 mm (approx. 3/16 inch) 40
-
 1
1 -
2
-
3
-
4
-
5
-
6
-
7
-
8
-
9
-
10
-
11
-
12
-
13
-
14
-
15
-
16
-
17
-
18
-
19
-
20
-
21
-
22
-
23
-
24
-
25
-
26
-
27
-
28
-
29
-
30
-
31
-
32
-
33
-
34
-
35
-
36
-
37
-
38
-
39
-
40
-
41
-
42
-
43
-
44
-
45
-
46
-
 47
47 -
 48
48 -
 49
49 -
 50
50 -
 51
51 -
 52
52 -
 53
53 -
 54
54 -
 55
55 -
 56
56 -
 57
57 -
58
-
59
-
60
-
61
-
62
-
63
-
64
-
65
-
66
-
67
-
68
-
69
-
70
-
71
-
72
-
73
-
74
-
75
-
76
-
77
-
78
-
79
-
80
-
81
-
82
-
83
-
84
-
85
-
86
-
87
-
88
-
89
-
90
-
91
-
92
-
93
-
94
-
95
-
96
-
97
-
98
-
99
-
100
-
101
-
102
-
103
-
104
-
105
-
106
-
107
-
108
-
109
-
110
-
111
-
112
-
113
-
114
-
115
-
116
-
117
-
118
-
119
-
120
-
121
-
122
-
123
-
124
-
125
-
126
-
127
-
128
-
129
-
130
-
131
-
132
-
133
-
134
-
135
-
136
-
137
-
138
-
139
-
140
-
141
-
142
-
143
-
144
-
145
-
146
-
147
-
148
-
149
-
150
-
151
-
152
-
153
-
154
-
155
-
156
-
157
-
158
-
159
-
160
-
161
-
162
-
163
-
164
-
165
-
166
-
167
-
168
-
169
-
170
-
171
-
172
-
173
-
174
-
175
-
176
-
177
-
178
-
179
-
180
-
181
-
182
-
183
-
184
-
185
-
186
-
187
-
188
-
189
-
190
-
191
-
192
-
193
-
194
-
195
-
196
-
197
-
198
-
199
-
200
-
201
-
202
-
203
-
204
-
205
-
206
-
207
-
208
-
209
-
210
-
211
-
212
-
213
-
214
-
215
-
216
-
217
-
218
-
219
-
220
-
221
-
222
-
223
-
224
-
225
-
226
-
227
-
228
-
229
-
230
-
231
-
232
-
233
-
234
-
235
-
236
-
237
-
238
-
239
-
240
-
241
-
242
-
243
-
244
-
245
-
246
-
247
-
248
-
249
-
250
-
251
-
252
 |
 |
