Brother International Isodore„ Innov-ís 5000 Users Manual - English - Page 39
Threading Manually, CAUTION
 |
View all Brother International Isodore„ Innov-ís 5000 manuals
Add to My Manuals
Save this manual to your list of manuals |
Page 39 highlights
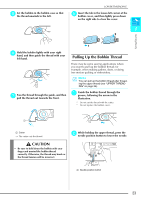
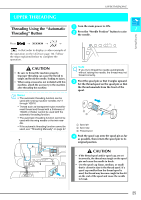
UPPER THREADING Note a Turn the main power to ON. When the "Automatic Threading" button is pressed, the presser foot will be automatically lowered. If you are using an incorrect needle and thread b Turn the machine handwheel so that is aligned with the the line on line on the the handwheel. combination, the hook may sometimes get caught in the needle. If this happens, remove 1 the hook from the needle as described below. Getting Ready CAUTION • The needle thread carrier will automatically thread the needle when the "Automatic Threading" button is pressed. Be sure to keep your hands and other items away from the needle area, otherwise injuries may occur. Threading Manually Automatic threading cannot be used when using the wing needle, the twin needle, or special thread with a thickness of 130/20 or thicker. In these cases, thread the needle as described below. a a Line on handwheel Memo If the line on the machine is not aligned with the line on the handwheel, the sewing machine cannot be threaded. Check that the line on the handwheel is facing up as shown in the illustration above. c Press . → The key appears as . d Raise the presser foot lever. 10 8 11 9 7 4, 12 13 14 15 5, 6 3 2 1 e Pivot the spool pin so that it angles upward. Set the thread spool on the spool pin so that the thread unwinds from the front of the spool. a b c a Spool pin b Spool cap c Thread spool 27
-
 1
1 -
2
-
3
-
4
-
5
-
6
-
7
-
8
-
9
-
10
-
11
-
12
-
13
-
14
-
15
-
16
-
17
-
18
-
19
-
20
-
21
-
22
-
23
-
24
-
25
-
26
-
27
-
28
-
29
-
30
-
31
-
32
-
33
-
 34
34 -
 35
35 -
 36
36 -
 37
37 -
 38
38 -
 39
39 -
 40
40 -
 41
41 -
 42
42 -
 43
43 -
 44
44 -
45
-
46
-
47
-
48
-
49
-
50
-
51
-
52
-
53
-
54
-
55
-
56
-
57
-
58
-
59
-
60
-
61
-
62
-
63
-
64
-
65
-
66
-
67
-
68
-
69
-
70
-
71
-
72
-
73
-
74
-
75
-
76
-
77
-
78
-
79
-
80
-
81
-
82
-
83
-
84
-
85
-
86
-
87
-
88
-
89
-
90
-
91
-
92
-
93
-
94
-
95
-
96
-
97
-
98
-
99
-
100
-
101
-
102
-
103
-
104
-
105
-
106
-
107
-
108
-
109
-
110
-
111
-
112
-
113
-
114
-
115
-
116
-
117
-
118
-
119
-
120
-
121
-
122
-
123
-
124
-
125
-
126
-
127
-
128
-
129
-
130
-
131
-
132
-
133
-
134
-
135
-
136
-
137
-
138
-
139
-
140
-
141
-
142
-
143
-
144
-
145
-
146
-
147
-
148
-
149
-
150
-
151
-
152
-
153
-
154
-
155
-
156
-
157
-
158
-
159
-
160
-
161
-
162
-
163
-
164
-
165
-
166
-
167
-
168
-
169
-
170
-
171
-
172
-
173
-
174
-
175
-
176
-
177
-
178
-
179
-
180
-
181
-
182
-
183
-
184
-
185
-
186
-
187
-
188
-
189
-
190
-
191
-
192
-
193
-
194
-
195
-
196
-
197
-
198
-
199
-
200
-
201
-
202
-
203
-
204
-
205
-
206
-
207
-
208
-
209
-
210
-
211
-
212
-
213
-
214
-
215
-
216
-
217
-
218
-
219
-
220
-
221
-
222
-
223
-
224
-
225
-
226
-
227
-
228
-
229
-
230
-
231
-
232
-
233
-
234
-
235
-
236
-
237
-
238
-
239
-
240
-
241
-
242
-
243
-
244
-
245
-
246
-
247
-
248
-
249
-
250
-
251
-
252
 |
 |
