Brother International Isodore„ Innov-ís 5000 Users Manual - English - Page 31
Lower Threading
 |
View all Brother International Isodore„ Innov-ís 5000 manuals
Add to My Manuals
Save this manual to your list of manuals |
Page 31 highlights
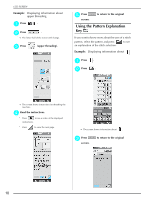
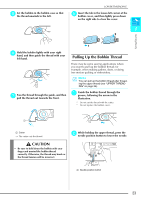
LOWER THREADING LOWER THREADING Winding the Bobbin Press → → a Turn the main power to ON. 1 b Align the groove in the bobbin with the spring on the bobbin winder shaft, and set → the bobbin on the shaft. Getting Ready in that order to display a video example of a bobbin winding on the LCD (see page 18). Follow the steps explained below to complete the b operation. CAUTION • The enclosed bobbin was designed specifically for this sewing machine. If bobbins from other models are used, the machine will not operate correctly. Use only the enclosed bobbin or bobbins of the same type (part code: SA156, SFB). 11.5 mm (approx. 7/16 inch) Actual size This model Other models a Groove of the bobbin b Spring on the shaft c Set the supplemental position. spool pin in the "up" a ■ Using the Supplemental Spool Pin With this machine, you can wind the bobbin during sewing. While using the main spool pin to sew embroidery, you can conveniently wind the bobbin using the supplemental spool pin. 65 a 3, 4 2 9 7, 8 a Supplemental spool pin d Place the spool of thread on the supplemental spool pin, so that thread unrolls from the front. Then push the spool cap onto the spool pin as far as possible to secure the thread spool. a Supplemental spool pin o l 1 a b c a Spool pin b Spool cap c Thread spool 19
-
 1
1 -
2
-
3
-
4
-
5
-
6
-
7
-
8
-
9
-
10
-
11
-
12
-
13
-
14
-
15
-
16
-
17
-
18
-
19
-
20
-
21
-
22
-
23
-
24
-
25
-
 26
26 -
 27
27 -
 28
28 -
 29
29 -
 30
30 -
 31
31 -
 32
32 -
 33
33 -
 34
34 -
 35
35 -
 36
36 -
37
-
38
-
39
-
40
-
41
-
42
-
43
-
44
-
45
-
46
-
47
-
48
-
49
-
50
-
51
-
52
-
53
-
54
-
55
-
56
-
57
-
58
-
59
-
60
-
61
-
62
-
63
-
64
-
65
-
66
-
67
-
68
-
69
-
70
-
71
-
72
-
73
-
74
-
75
-
76
-
77
-
78
-
79
-
80
-
81
-
82
-
83
-
84
-
85
-
86
-
87
-
88
-
89
-
90
-
91
-
92
-
93
-
94
-
95
-
96
-
97
-
98
-
99
-
100
-
101
-
102
-
103
-
104
-
105
-
106
-
107
-
108
-
109
-
110
-
111
-
112
-
113
-
114
-
115
-
116
-
117
-
118
-
119
-
120
-
121
-
122
-
123
-
124
-
125
-
126
-
127
-
128
-
129
-
130
-
131
-
132
-
133
-
134
-
135
-
136
-
137
-
138
-
139
-
140
-
141
-
142
-
143
-
144
-
145
-
146
-
147
-
148
-
149
-
150
-
151
-
152
-
153
-
154
-
155
-
156
-
157
-
158
-
159
-
160
-
161
-
162
-
163
-
164
-
165
-
166
-
167
-
168
-
169
-
170
-
171
-
172
-
173
-
174
-
175
-
176
-
177
-
178
-
179
-
180
-
181
-
182
-
183
-
184
-
185
-
186
-
187
-
188
-
189
-
190
-
191
-
192
-
193
-
194
-
195
-
196
-
197
-
198
-
199
-
200
-
201
-
202
-
203
-
204
-
205
-
206
-
207
-
208
-
209
-
210
-
211
-
212
-
213
-
214
-
215
-
216
-
217
-
218
-
219
-
220
-
221
-
222
-
223
-
224
-
225
-
226
-
227
-
228
-
229
-
230
-
231
-
232
-
233
-
234
-
235
-
236
-
237
-
238
-
239
-
240
-
241
-
242
-
243
-
244
-
245
-
246
-
247
-
248
-
249
-
250
-
251
-
252
 |
 |
