Brother International KE-430D Instruction Manual - English - Page 17
Brother International KE-430D Manual
 |
View all Brother International KE-430D manuals
Add to My Manuals
Save this manual to your list of manuals |
Page 17 highlights
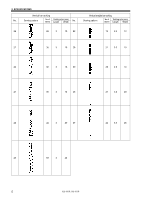
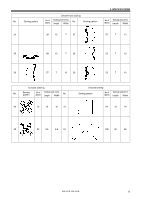
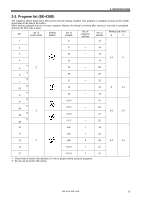
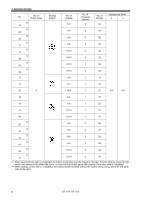
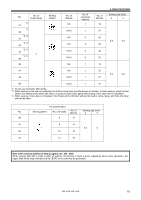
No. No. of button holes *2 21 *2 34 *2 *3 22 *2 *4 43 *2 *3 35 4 *2 *4 44 46 Sewing pattern No. of threads 6-6 10-10 6-6 6-6 10-10 10-10 6-6 No. of crossover stitches 1 1 0 0 0 0 1 No. of stitches 19 27 24 24 32 32 19 2. SPECIFICATIONS Sewing size (mm) X Y 2.4 3.4 47 8-8 1 23 3.4 3.4 48 10-10 1 27 49 12-12 1 31 *2 Do not use the button lifter spring. *3 When sewing of one side is completed, the button clamp rises and the thread is trimmed. To finish sewing, press the foot switch until sewing of the other side starts, or press the foot switch again after sewing of the other side is completed. *4 When sewing of one side is completed, the thread will be trimmed without the button clamp rising, and then the other side will be sewn. For shank button No. Sewing pattern No. of threads No. of stitches Sewing size (mm) X Y 50 6 12 51 8 14 3.4 0 52 10 16 53 12 18 Note when creating additional data (program nos. 200 - 999) When sewing data with a small number of stitches (15 stitches or less) is sewn repeatedly (short cycle operation), the upper shaft motor may overheat and the "E150" error code may be generated. KE-430D, BE-438D 10
-
 1
1 -
2
-
3
-
4
-
5
-
6
-
7
-
8
-
9
-
10
-
11
-
 12
12 -
 13
13 -
 14
14 -
 15
15 -
 16
16 -
 17
17 -
 18
18 -
 19
19 -
 20
20 -
 21
21 -
 22
22 -
23
-
24
-
25
-
26
-
27
-
28
-
29
-
30
-
31
-
32
-
33
-
34
-
35
-
36
-
37
-
38
-
39
-
40
-
41
-
42
-
43
-
44
-
45
-
46
-
47
-
48
-
49
-
50
-
51
-
52
-
53
-
54
-
55
-
56
-
57
-
58
-
59
-
60
-
61
-
62
-
63
-
64
-
65
-
66
 |
 |
