Brother International MFC-3200C Quick Setup Guide - English - Page 10
Selecting a Receive Mode, 9 Setting a Date and Time, Menu/Set, Stop/Exit - user manual
 |
View all Brother International MFC-3200C manuals
Add to My Manuals
Save this manual to your list of manuals |
Page 10 highlights
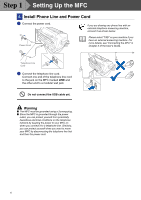
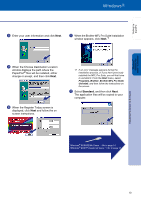
Step 1 Setting Up the MFC Stop/Exit 3200C Fax Printer Copier Scanner PC Fax Menu/Set Dial pad Black Fax Start Receive Mode 8 Selecting a Receive Mode Choose the mode which best suits your needs by pressing the Receive Mode key repeatedly. Did you connect an external telephone answering machine to the MFC? Yes No Did you use the voice message function of your external telephone answering machine? No Do you want the MFC to answer fax calls only? Yes FAX ONLY The MFC automatically answers every call as a fax. FAX/TEL The MFC controls the line and automatically answers every call. If the call is not a fax, it will ring for you to pick up the call. No MANUAL You control the phone line and must answer every call yourself. Yes TAD:ANSWER MACH. Your external answering machine (TAD) automatically answers every call. Voice messages are stored on the external TAD. Fax messages are printed. You must set your TAD to answer calls. For more details, see Setup Receive in Chapter 6 of the User's Guide. 9 Setting a Date and Time The MFC displays the date and time, and prints it on every fax you send. 1 Press the Menu/Set key. 2 Press the key. 3 Press the key. 4 Enter the last two digits of the year on the dial pad, and then press the Menu/Set key. 3.DATE/TIME YEAR:03 (e.g. Enter 0, 3 for 2003.) 5 Enter the two digits for the month on the dial pad, and then press the Menu/Set key. MONTH:09 (e.g. Enter 0, 9 for September.) 6 Enter the two digits for the day on the dial pad, and then press the Menu/Set key. DAY:06 (e.g. Enter 0, 6.) 7 Enter the time in 24-hour format on the dial pad, and then press the Menu/Set key. TIME:15:25 (e.g. Enter 1, 5, 2, 5 for 3:25 P.M.) 8 Press the Stop/Exit key. If you want to repeat from step1, press the Stop/Exit key. 8
-
 1
1 -
2
-
3
-
4
-
 5
5 -
 6
6 -
 7
7 -
 8
8 -
 9
9 -
 10
10 -
 11
11 -
 12
12 -
 13
13 -
 14
14 -
 15
15 -
16
-
17
-
18
-
19
-
20
-
21
-
22
-
23
-
24
-
25
-
26
-
27
-
28
-
29
-
30
-
31
 |
 |
