Brother International MFC 5460CN Users Manual - English - Page 99
PictBridge, Before Using PictBridge, PictBridge requirements, Using PictBridge - usb printer
 |
UPC - 012502615903
View all Brother International MFC 5460CN manuals
Add to My Manuals
Save this manual to your list of manuals |
Page 99 highlights
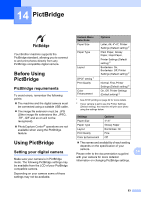
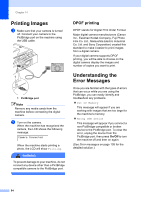
14 PictBridge 14 Your Brother machine supports the PictBridge standard, allowing you to connect to and print photos directly from any PictBridge compatible digital camera. Before Using PictBridge 14 PictBridge requirements 14 To avoid errors, remember the following points: „ The machine and the digital camera must be connected using a suitable USB cable. „ The image file extension must be .JPG (Other image file extensions like .JPEG, .TIF, .GIF and so on will not be recognized). „ PhotoCapture Center® operations are not available when using the PictBridge feature. Using PictBridge 14 Setting your digital camera 14 Make sure your camera is in PictBridge mode. The following PictBridge settings may be available from the LCD of your PictBridge compatible camera. Depending on your camera some of these settings may not be available. Camera Menu Selections Paper Size Paper Type Layout DPOF setting 1 Print Quality Color Enhancement Options Letter, A4, 4"×6", Printer Settings (Default setting) 2 Plain Paper, Glossy Paper, Inkjet Paper, Printer Settings (Default setting) 2 Borderless: On, Borderless: Off, Printer Settings (Default setting) 2 - Normal, Fine, Printer Settings (Default setting) 2 On, Off, Printer Settings (Default setting) 2 1 See DPOF printing on page 84 for more details. 2 If your camera is set to use the Printer Settings (Default setting), the machine will print your photo using the settings below. Settings Paper Size Paper Type Layout Print Quality Color Enhancement Options 4"×6" Glossy Paper Borderless: On Fine Off „ The names and availability of each setting depends on the specification of your camera. 14 Please refer to the documentation supplied with your camera for more detailed information on changing PictBridge settings. 83
-
 1
1 -
2
-
3
-
4
-
5
-
6
-
7
-
8
-
9
-
10
-
11
-
12
-
13
-
14
-
15
-
16
-
17
-
18
-
19
-
20
-
21
-
22
-
23
-
24
-
25
-
26
-
27
-
28
-
29
-
30
-
31
-
32
-
33
-
34
-
35
-
36
-
37
-
38
-
39
-
40
-
41
-
42
-
43
-
44
-
45
-
46
-
47
-
48
-
49
-
50
-
51
-
52
-
53
-
54
-
55
-
56
-
57
-
58
-
59
-
60
-
61
-
62
-
63
-
64
-
65
-
66
-
67
-
68
-
69
-
70
-
71
-
72
-
73
-
74
-
75
-
76
-
77
-
78
-
79
-
80
-
81
-
82
-
83
-
84
-
85
-
86
-
87
-
88
-
89
-
90
-
91
-
92
-
93
-
 94
94 -
 95
95 -
 96
96 -
 97
97 -
 98
98 -
 99
99 -
 100
100 -
 101
101 -
 102
102 -
 103
103 -
 104
104 -
105
-
106
-
107
-
108
-
109
-
110
-
111
-
112
-
113
-
114
-
115
-
116
-
117
-
118
-
119
-
120
-
121
-
122
-
123
-
124
-
125
-
126
-
127
-
128
-
129
-
130
-
131
-
132
-
133
-
134
-
135
-
136
-
137
-
138
-
139
-
140
-
141
-
142
-
143
-
144
-
145
-
146
-
147
-
148
-
149
-
150
-
151
-
152
-
153
-
154
-
155
-
156
-
157
-
158
-
159
-
160
-
161
-
162
-
163
-
164
-
165
-
166
-
167
-
168
-
169
 |
 |