Brother International MFC 640CW Quick Setup Guide - English - Page 22
For Wireless Network Users, For Windows, 98SE/Me/2000 Professional/XP in infrastructure mode - 7 in 1 wireless machine
 |
UPC - 012502614036
View all Brother International MFC 640CW manuals
Add to My Manuals
Save this manual to your list of manuals |
Page 22 highlights
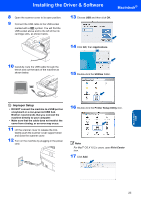
STEP2 Installing the Driver & Software Windows® Windows® Wireless Network For Wireless Network Users (For Windows® 98/98SE/Me/2000 Professional/XP in infrastructure mode) Important Make sure that you have finished the instructions from Step 1 Setting Up the Machine on page 4-11. These instructions will install your Brother machine in a typical small office or home wireless network environment in infrastructure mode, using a wireless router or access point that uses DHCP to assign IP addresses. If you want to setup your machine in any other wireless environment you can find instructions in the Network User's Guide on the CD-ROM. You can view the Network User's Guide by following the instructions below. 1 Turn on your PC. Insert the Brother CD-ROM labeled Windows® into your CD-ROM drive. 2 If the model name screen appears, click your model name. 3 If the language screen appears, click your language. The CD-ROM main menu will appear. 4 Click Documentation. 5 Click the User's Guide. 6 Click the Network User's Guide. Note If the window does not appear, use Windows® Explorer to run the setup.exe program from the root directory of the Brother CD-ROM. To achieve optimum results with normal every day document printing, place the Brother machine as close to the network access point (router) as possible with minimal obstructions. Large objects and walls between the two devices as well as interference from other electronic devices can affect the data transfer speed of your documents. Due to these factors, wireless may not be the best method of connection for all types of documents and applications. If you are printing large files, such as photos on glossy paper or multi-page documents with mixed text and large graphics, you may want to consider choosing wired Ethernet for a faster data transfer, or USB for the fastest throughput speed. First you must configure the wireless network settings of your machine to communicate with your network access point (router). After the machine is configured to communicate with your access point computers on your network will have access to the machine. To use the machine from these computers, you will need to install the MFL-Pro Software Suite. The following steps will guide you through the configuration and installation process. 20 1 Write down the wireless network settings of your access point or wireless router. SSID (Service Set ID or Network name) WEP Key (if needed) WPA-PSK (TKIP) (if needed) The WEP key is for 64bit encrypted networks or 128 bit encrypted networks and can contain both numbers and letters. If you do not know this information you should see the documentation provided with your access point or wireless router. This key is a 64-bit or 128-bit value that must be entered in an ASCII or HEXADECIMAL format. For example: 64 bit ASCII: Uses 5 text characters. e.g. "Hello" (this is case sensitive) 64 bit Uses 10 digits of hexadecimal data. Hexadecimal: e.g. "71f2234aba" 128 bit ASCII: Uses 13 text characters. e.g. "Wirelesscomms" (this is case sensitive) 128 bit Uses 26 digits of hexadecimal data. Hexadecimal: e.g. "71f2234ab56cd709e5412aa3ba" WPA-PSK enables a Protected Access Preshared key that allows the Brother wireless machine to associate with access points using TKIP encryption. WPA-PSK uses a Pre-Shared Key that is more than 7 and less than 64 characters in length. Note Your machine supports WEP and WPAPSK(TKIP). WPA-PSK(AES) is not supported. See Chapter 3 of the Network User's Guide for more details.
-
 1
1 -
2
-
3
-
4
-
5
-
6
-
7
-
8
-
9
-
10
-
11
-
12
-
13
-
14
-
15
-
16
-
 17
17 -
 18
18 -
 19
19 -
 20
20 -
 21
21 -
 22
22 -
 23
23 -
 24
24 -
 25
25 -
 26
26 -
 27
27 -
28
-
29
-
30
-
31
-
32
-
33
-
34
-
35
-
36
-
37
-
38
-
39
-
40
-
41
-
42
-
43
-
44
-
45
 |
 |