Brother International PC-210PRW Users Manual - English - Page 25
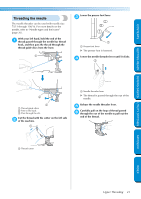
Press, needle position button once, or twice to raise the needle., Lift open the upper cover.
 |
View all Brother International PC-210PRW manuals
Add to My Manuals
Save this manual to your list of manuals |
Page 25 highlights
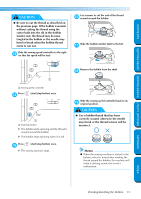
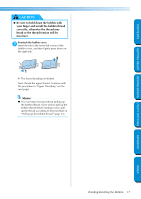
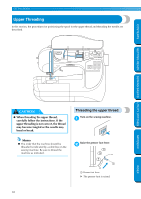
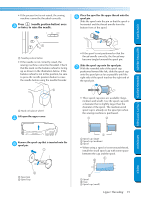
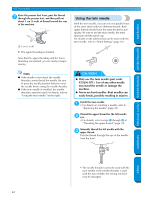
• If the presser foot is not raised, the sewing machine cannot be threaded correctly. Press (needle position button) once 3 or twice to raise the needle. Place the spool for the upper thread onto the 6 spool pin. Slide the spool onto the pin so that the spool is horizontal and the thread unrolls from the bottom front of the spool. CONTENTS GETTING READY SEWING BASICS UTILITY STITCHES 1 1 Needle position button • If the needle is not correctly raised, the sewing machine cannot be threaded. Check that the mark on the balance wheel is facing up as shown in the illustration below. If the balance wheel is not in this position, be sure to press the needle position button to raise the needle before using the needle threader. • If the spool is not positioned so that the thread unrolls correctly, the thread may become tangled around the spool pin. Slide the spool cap onto the spool pin. 7 With the rounded side of the spool cap positioned toward the left, slide the spool cap onto the spool pin as far as possible until the right side of the spool touches the right end of the spool pin. 1 1 Mark on balance wheel Lift open the upper cover. 4 • Three spool cap sizes are available (large, medium and small). Use the spool cap with a diameter that is slightly larger than the diameter of the spool. The medium-sized spool cap is already on the spool pin when the sewing machine is purchased. 1 2 Remove the spool cap that is inserted onto the 5 spool pin. 1 2 1 Spool pin 2 Spool cap 3 1 Spool cap (large) 2 Spool cap (medium) 3 Spool • When using a spool of cross-wound thread, install the small spool cap with some space between the cap and the spool. 1 2 3 1 Spool 2 Gap 3 Spool cap (small) Upper Threading 19 APPENDIX INDEX
-
 1
1 -
2
-
3
-
4
-
5
-
6
-
7
-
8
-
9
-
10
-
11
-
12
-
13
-
14
-
15
-
16
-
17
-
18
-
19
-
 20
20 -
 21
21 -
 22
22 -
 23
23 -
 24
24 -
 25
25 -
 26
26 -
 27
27 -
 28
28 -
 29
29 -
 30
30 -
31
-
32
-
33
-
34
-
35
-
36
-
37
-
38
-
39
-
40
-
41
-
42
-
43
-
44
-
45
-
46
-
47
-
48
-
49
-
50
-
51
-
52
-
53
-
54
-
55
-
56
-
57
-
58
-
59
-
60
-
61
-
62
-
63
-
64
-
65
-
66
-
67
-
68
-
69
-
70
-
71
-
72
-
73
-
74
-
75
-
76
-
77
-
78
-
79
-
80
-
81
-
82
-
83
-
84
-
85
-
86
-
87
-
88
-
89
-
90
-
91
-
92
-
93
-
94
-
95
-
96
-
97
-
98
-
99
-
100
-
101
-
102
-
103
-
104
-
105
-
106
-
107
-
108
-
109
-
110
-
111
 |
 |
