Brother International PC-210PRW Users Manual - English - Page 66
Basic Stitching
 |
View all Brother International PC-210PRW manuals
Add to My Manuals
Save this manual to your list of manuals |
Page 66 highlights
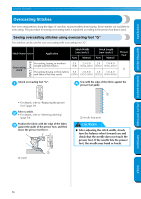
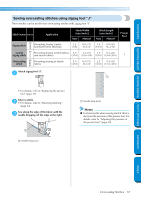
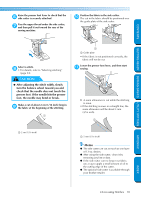
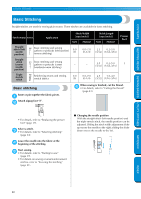
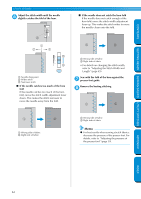
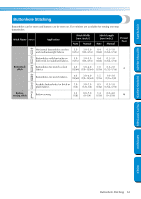
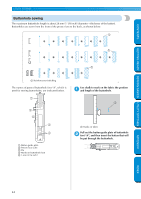
UTILITY STITCHES CONTENTS GETTING READY SEWING BASICS UTILITY STITCHES Basic Stitching Straight stitches are used for sewing plain seams. Three stitches are available for basic stitching. Stitch Name Pattern Application Stitch Width [mm (inch.)] Auto Manual Stitch Length [mm (inch.)] Auto Manual Presser Foot Straight stitch (left needle position) Basic stitching and sewing gathers or pintucks (left baseline/ reverse stitching) 0.0 (0) 0.0-7.0 2.5 0.2-5.0 (0-1/4) (3/32) (1/64-3/16) Straight stitch (center needle position) Basic stitching and sewing gathers or pintucks (center baseline/reverse stitching) - - 2.5 0.2-5.0 J (3/32) (1/64-3/16) Triple stretch stitch Reinforcing seams and sewing stretch fabrics 0.0 0.0-7.0 2.5 1.5-4.0 (0) (0-1/4) (3/32) (1/16-3/16) Basic stitching Baste or pin together the fabric pieces. 1 Attach zigzag foot "J". 2 J When sewing is finished, cut the thread. 6 • For details, refer to "Cutting the thread" (page 43). • For details, refer to "Replacing the presser foot" (page 29). Select a stitch. 3 • For details, refer to "Selecting stitching" (page 54). Lower the needle into the fabric at the 4 beginning of the stitching. Start sewing. 5 • For details, refer to "Starting to sew" (page 39). • For details on sewing reverse/reinforcement stitches, refer to "Securing the stitching" (page 41). ■ Changing the needle position With the straight stitch (left needle position) and the triple stretch stitch, the needle position can be adjusted. Sliding the stitch width adjustment slider up moves the needle to the right; sliding the slider down moves the needle to the left. APPENDIX INDEX 60
-
 1
1 -
2
-
3
-
4
-
5
-
6
-
7
-
8
-
9
-
10
-
11
-
12
-
13
-
14
-
15
-
16
-
17
-
18
-
19
-
20
-
21
-
22
-
23
-
24
-
25
-
26
-
27
-
28
-
29
-
30
-
31
-
32
-
33
-
34
-
35
-
36
-
37
-
38
-
39
-
40
-
41
-
42
-
43
-
44
-
45
-
46
-
47
-
48
-
49
-
50
-
51
-
52
-
53
-
54
-
55
-
56
-
57
-
58
-
59
-
60
-
 61
61 -
 62
62 -
 63
63 -
 64
64 -
 65
65 -
 66
66 -
 67
67 -
 68
68 -
 69
69 -
 70
70 -
 71
71 -
72
-
73
-
74
-
75
-
76
-
77
-
78
-
79
-
80
-
81
-
82
-
83
-
84
-
85
-
86
-
87
-
88
-
89
-
90
-
91
-
92
-
93
-
94
-
95
-
96
-
97
-
98
-
99
-
100
-
101
-
102
-
103
-
104
-
105
-
106
-
107
-
108
-
109
-
110
-
111
 |
 |
