Brother International PC-3000 Users Manual - English - Page 19
Upper Threading - installation manual
 |
View all Brother International PC-3000 manuals
Add to My Manuals
Save this manual to your list of manuals |
Page 19 highlights
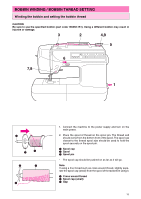
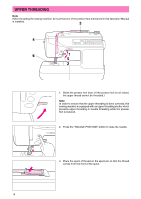
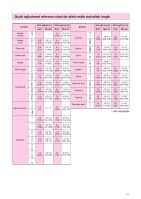
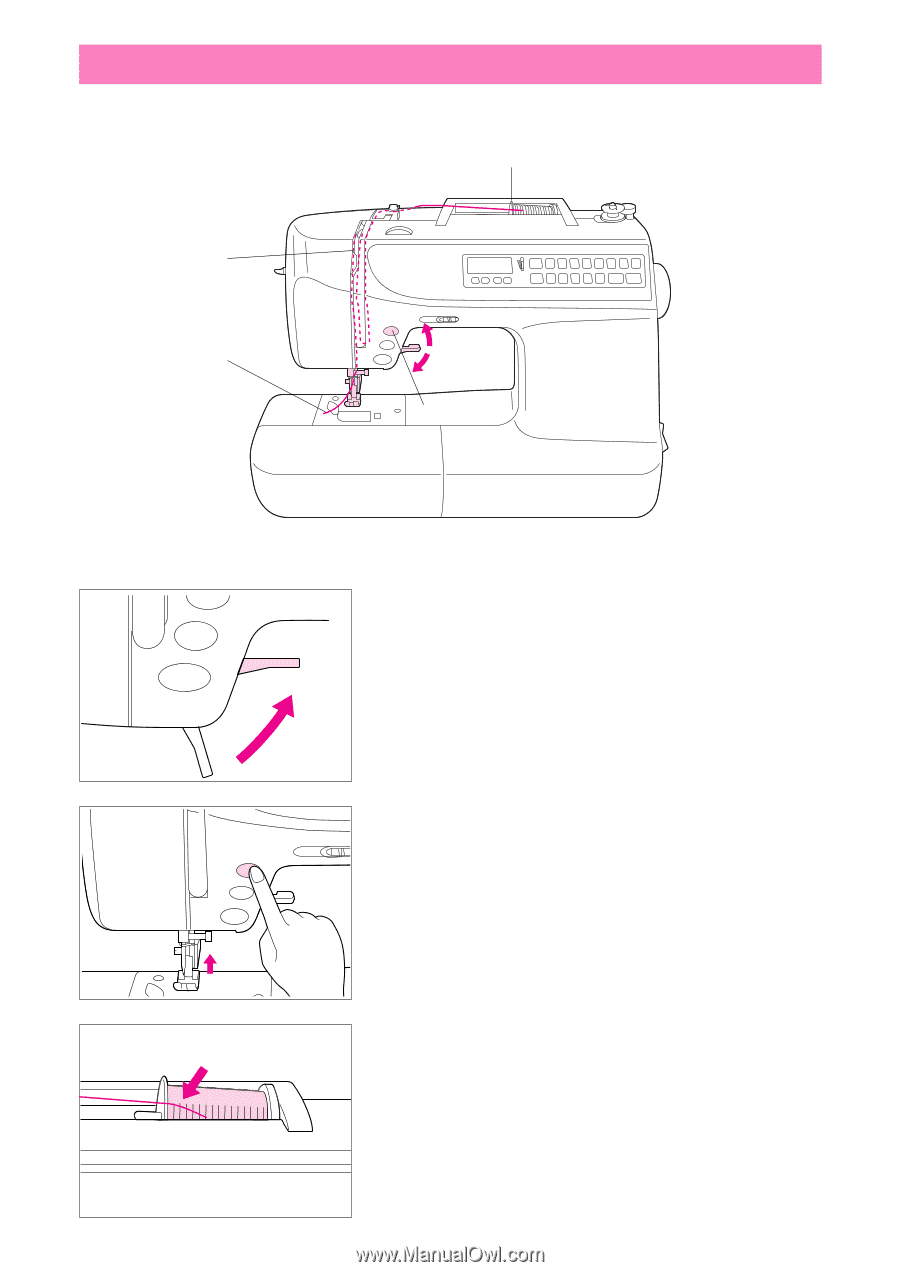
UPPER THREADING Note When threading the sewing machine, be sure that one of the presser foot mentioned in this Operation Manual is installed. 3 4 6 1 5 2 1. Raise the presser foot lever. (If the presser foot is not raised, the upper thread cannot be threaded.) Note In order to ensure that the upper threading is done correctly, this sewing machine is equipped with an upper threading shutter which prevents upper threading or needle threading while the presser foot is lowered. 2. Press the "NEEDLE POSITION" button to raise the needle. 3. Place the spool of thread on the spool pin so that the thread comes from the front of the spool. 16
-
 1
1 -
2
-
3
-
4
-
5
-
6
-
7
-
8
-
9
-
10
-
11
-
12
-
13
-
 14
14 -
 15
15 -
 16
16 -
 17
17 -
 18
18 -
 19
19 -
 20
20 -
 21
21 -
 22
22 -
 23
23 -
 24
24 -
25
-
26
-
27
-
28
-
29
-
30
-
31
-
32
-
33
-
34
-
35
-
36
-
37
-
38
-
39
-
40
-
41
-
42
-
43
-
44
-
45
-
46
-
47
-
48
-
49
-
50
-
51
-
52
-
53
-
54
-
55
-
56
-
57
-
58
-
59
-
60
-
61
-
62
-
63
-
64
-
65
-
66
-
67
-
68
-
69
-
70
-
71
-
72
-
73
-
74
-
75
-
76
-
77
-
78
-
79
-
80
-
81
-
82
-
83
-
84
-
85
-
86
-
87
-
88
-
89
-
90
-
91
-
92
-
93
-
94
-
95
-
96
-
97
-
98
-
99
-
100
-
101
-
102
-
103
-
104
 |
 |
16
UPPER THREADING
1.
Raise the presser foot lever. (If the presser foot is not raised,
the upper thread cannot be threaded.)
Note
In order to ensure that the upper threading is done correctly, this
sewing machine is equipped with an upper threading shutter which
prevents upper threading or needle threading while the presser
foot is lowered.
2.
Press the
“
NEEDLE POSITION
”
button to raise the needle.
3.
Place the spool of thread on the spool pin so that the thread
comes from the front of the spool.
Note
When threading the sewing machine, be sure that one of the presser foot mentioned in this Operation Manual
is installed.
1
2
5
3
4
6