Brother International PC-3000 Users Manual - English - Page 47
Metal bracket on the buttonhole foot, Keyhole buttonhole, Small eyelet punch accessory #9
 |
View all Brother International PC-3000 manuals
Add to My Manuals
Save this manual to your list of manuals |
Page 47 highlights
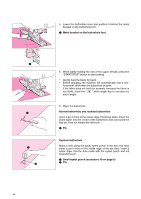
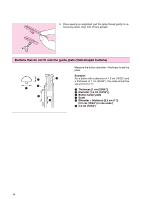
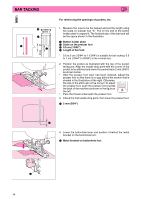
5 6 4. Lower the buttonhole lever and position it behind the metal bracket on the buttonhole foot. 1 Metal bracket on the buttonhole foot 1 5 6 5. While lightly holding the end of the upper thread, press the "START/STOP" button to start sewing. * Gently feed the fabric by hand. * Before stopping, the machine will automatically sew a rein- forcement stitch after the buttonhole is sewn. * If the fabric does not feed (for example, because the fabric is too thick), touch the " " stitch length key to increase the stitch length. 6. Open the buttonhole. Normal buttonhole and rounded buttonhole Insert a pin in front of the inside edge of both bar tacks. Insert the seam ripper into the center of the buttonhole and cut toward the first pin, then cut toward the other pin. 1 Pin Keyhole buttonhole Make a hole using the small eyelet punch in the key end, then insert a pin in front of the inside edge of the bar tack. Insert a seam ripper into the hole made with the eyelet punch and cut towards the pin. 1 Small eyelet punch (accessory #9 on page 6) 2 Pin 44
-
 1
1 -
2
-
3
-
4
-
5
-
6
-
7
-
8
-
9
-
10
-
11
-
12
-
13
-
14
-
15
-
16
-
17
-
18
-
19
-
20
-
21
-
22
-
23
-
24
-
25
-
26
-
27
-
28
-
29
-
30
-
31
-
32
-
33
-
34
-
35
-
36
-
37
-
38
-
39
-
40
-
41
-
 42
42 -
 43
43 -
 44
44 -
 45
45 -
 46
46 -
 47
47 -
 48
48 -
 49
49 -
 50
50 -
 51
51 -
 52
52 -
53
-
54
-
55
-
56
-
57
-
58
-
59
-
60
-
61
-
62
-
63
-
64
-
65
-
66
-
67
-
68
-
69
-
70
-
71
-
72
-
73
-
74
-
75
-
76
-
77
-
78
-
79
-
80
-
81
-
82
-
83
-
84
-
85
-
86
-
87
-
88
-
89
-
90
-
91
-
92
-
93
-
94
-
95
-
96
-
97
-
98
-
99
-
100
-
101
-
102
-
103
-
104
 |
 |
