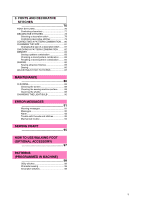
Brother International PC-3000 Users Manual - English - Page 8
Main Power Switch And, Connectors, Flatbed Attachment With, Accessory Compartment - installation
 |
View all Brother International PC-3000 manuals
Add to My Manuals
Save this manual to your list of manuals |
Page 8 highlights
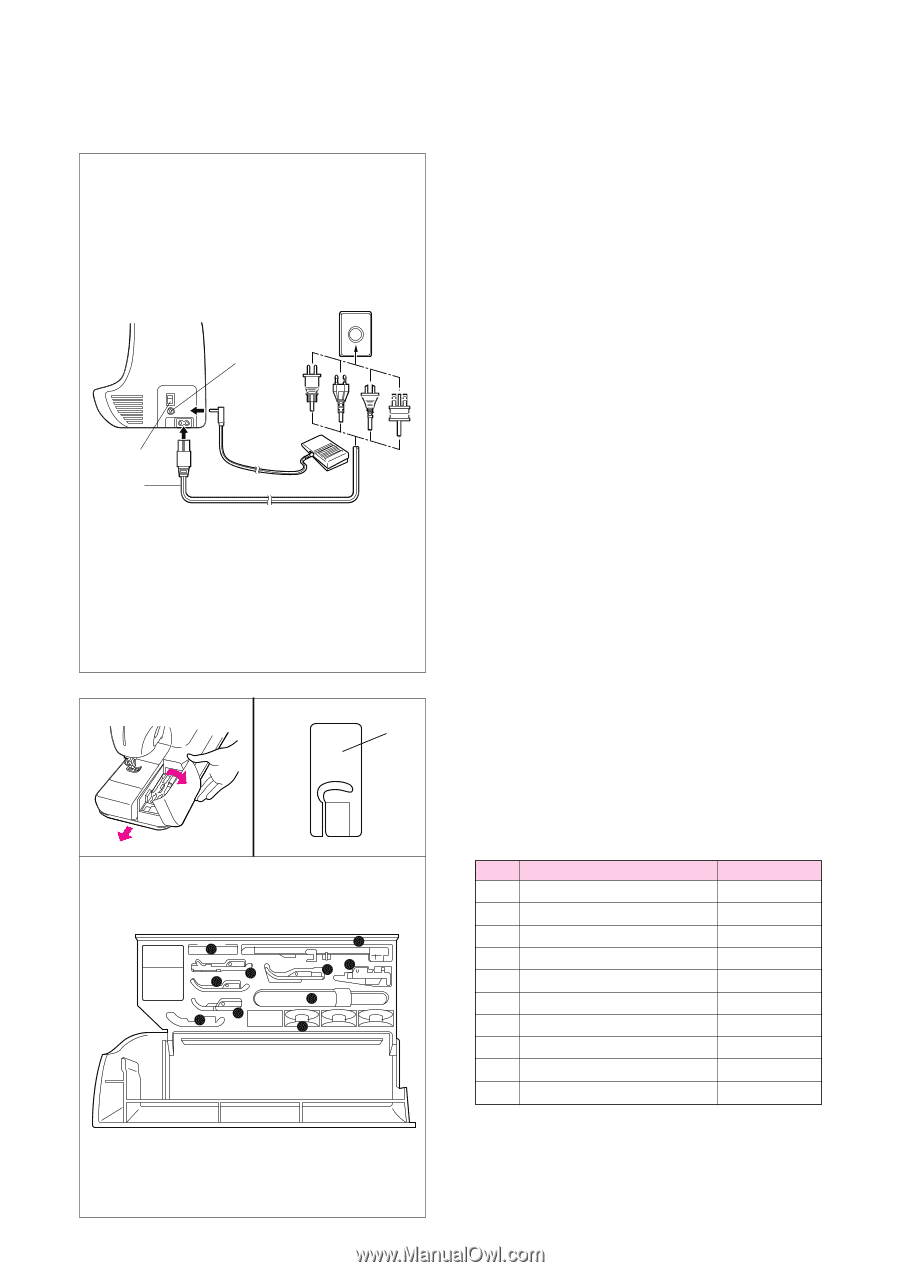
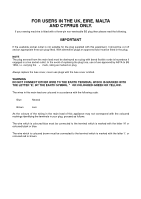
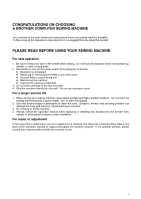
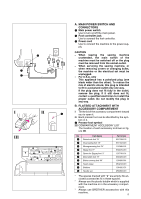
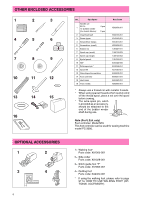
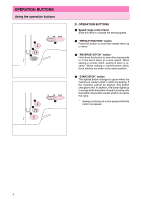
2 1 3 I II 1 J III 1 10 # 2 3 67 8 5 4# 9 A. MAIN POWER SWITCH AND CONNECTORS 1 Main power switch Use to turn on/off the main power. 2 Foot controller jack Use to connect the foot controller. 3 Power cord Use to connect the machine to the power supply. CAUTION - When leaving the sewing machine unattended, the main switch of the machine must be switched off or the plug must be removed from the socket-outlet. - When servicing the sewing machine, or when removing covers or changing bulbs, the machine or the electrical set must be unplugged. - For U.S.A. only This appliance has a polarized plug (one blade wider than the other). To reduce the risk of electric shock, this plug is intended to fit in a polarized outlet only one way. If the plug does not fit fully in the outlet, reverse the plug. If it still does not fit, contact a qualified electrician to install the proper outlet. Do not modify the plug in any way. B. FLATBED ATTACHMENT WITH ACCESSORY COMPARTMENT I Tilt the lid of the accessory compartment toward you to open it. II Each presser foot can be identified by the symbol on it. 1 Presser foot symbol III COMPARTMENT ACCESSORY LIST The location of each accessory is shown in figure III. No. Part Name 1 Buttonhole foot "A" 2 Overcasting foot "G" 3 Monogramming foot "N" 4 Zipper foot "I" 5 Space for Zigzag foot "J" 6 Blind stitch foot "R" 7 Button-sewing foot "M" 8 Seam ripper 9 Bobbins ; Needle set Part Code X57789-101 X51162-001 137988-101 X59370-051 137748-101 X56409-001 130489-001 X54243-001 136492-151 X58358-001 * The spaces marked with "#" are empty. No enclosed accessories fit in these spaces. * Always use the plastic bobbin which is supplied with the machine or in the accessory compartment. * Always use BROTHER accessories with this machine. 5
-
 1
1 -
2
-
 3
3 -
 4
4 -
 5
5 -
 6
6 -
 7
7 -
 8
8 -
 9
9 -
 10
10 -
 11
11 -
 12
12 -
 13
13 -
14
-
15
-
16
-
17
-
18
-
19
-
20
-
21
-
22
-
23
-
24
-
25
-
26
-
27
-
28
-
29
-
30
-
31
-
32
-
33
-
34
-
35
-
36
-
37
-
38
-
39
-
40
-
41
-
42
-
43
-
44
-
45
-
46
-
47
-
48
-
49
-
50
-
51
-
52
-
53
-
54
-
55
-
56
-
57
-
58
-
59
-
60
-
61
-
62
-
63
-
64
-
65
-
66
-
67
-
68
-
69
-
70
-
71
-
72
-
73
-
74
-
75
-
76
-
77
-
78
-
79
-
80
-
81
-
82
-
83
-
84
-
85
-
86
-
87
-
88
-
89
-
90
-
91
-
92
-
93
-
94
-
95
-
96
-
97
-
98
-
99
-
100
-
101
-
102
-
103
-
104
 |
 |