Brother International Quattro 2 6700D My Custom Design Guide - English - Page 25
Precautions on Drawing, After selecting the color of an area
 |
View all Brother International Quattro 2 6700D manuals
Add to My Manuals
Save this manual to your list of manuals |
Page 25 highlights
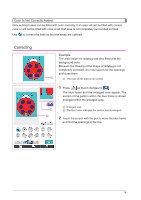
Precautions on Drawing • Do not try to fill an area with lines, otherwise the drawing cannot be converted to embroidery data. • Color can only fill an outlined area. Be sure to design the area that you wish to fill with color so that it is outlined. In addition, a very small area (thin area) cannot be filled. • After selecting the color of an area, lines of the drawing other than those drawn freehand cannot be edited or added. To change a line other than one drawn freehand, press to return the drawing to the point before the first color of an area was selected. Before adding color to the drawing, be sure that the shape of the lines is as desired. • The number of drawing operations are limited. Once this limit is reached, the error message shown at the right appears and no operation other than pressing can be performed. Once the drawing is finished, add colors as desired. * If no colors are to be added, continue with the procedure described in "3 Specifying Stitching Settings" on page 31. If a stitching method is not to be specified, continue with the procedure described in "4 Converting to Embroidery Data" on page 35. * To clear the entire area and start a new drawing, press . All data that had been drawn is erased, and the screen appears as it did when My Custom Design was started up (see page 45). * To close the application and use the sewing machine, press . All data that had been drawn is erased (see page 46). * To save created data, continue with the procedure described in "Saving Image Data" on page 42. 25
-
 1
1 -
2
-
3
-
4
-
5
-
6
-
7
-
8
-
9
-
10
-
11
-
12
-
13
-
14
-
15
-
16
-
17
-
18
-
19
-
 20
20 -
 21
21 -
 22
22 -
 23
23 -
 24
24 -
 25
25 -
 26
26 -
 27
27 -
 28
28 -
 29
29 -
 30
30 -
31
-
32
-
33
-
34
-
35
-
36
-
37
-
38
-
39
-
40
-
41
-
42
-
43
-
44
-
45
-
46
-
47
-
48
-
49
 |
 |
