Brother International Quattro 2 6700D My Custom Design Guide - English - Page 34
Reducing the Pattern Size, Additional Functions
 |
View all Brother International Quattro 2 6700D manuals
Add to My Manuals
Save this manual to your list of manuals |
Page 34 highlights
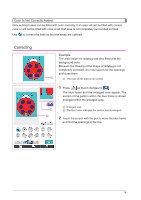
Additional Functions Reducing the Pattern Size The size of the created pattern can be changed. Select a size from 50%, 70% and 100%. Notes • The pattern can also be enlarged or reduced from the embroidering or embroidery-editing screen of the sewing machine. If the desired size cannot be selected with this software or if a specific size is required, adjust the size from the sewing machine. 1 Press in the pattern drawing screen. The screen shown at the left appears. 2 Press or beside . Press once to reduce the size to 70%. Press again to reduce the size to 50%. To return the size to the original size (100%), press . 3 Press . The screen returns to the one displayed before the stitch settings screen was displayed. After the stitching settings are selected, convert the image data to embroidery data. * To clear the entire area and start a new drawing, press . All data that had been drawn is erased, and the screen appears as it did when My Custom Design was started up (see page 45). * To close the application and use the sewing machine, press . All data that had been drawn is erased (see page 46). * To save created data, continue with the procedure described in "Saving Image Data" on page 42. 34
-
 1
1 -
2
-
3
-
4
-
5
-
6
-
7
-
8
-
9
-
10
-
11
-
12
-
13
-
14
-
15
-
16
-
17
-
18
-
19
-
20
-
21
-
22
-
23
-
24
-
25
-
26
-
27
-
28
-
 29
29 -
 30
30 -
 31
31 -
 32
32 -
 33
33 -
 34
34 -
 35
35 -
 36
36 -
 37
37 -
 38
38 -
 39
39 -
40
-
41
-
42
-
43
-
44
-
45
-
46
-
47
-
48
-
49
 |
 |
