Brother International XL-3025 Users Manual - English - Page 58
Desenchule
 |
View all Brother International XL-3025 manuals
Add to My Manuals
Save this manual to your list of manuals |
Page 58 highlights
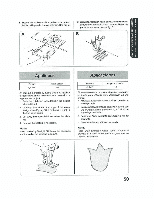
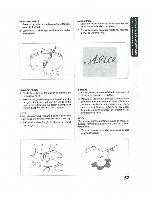
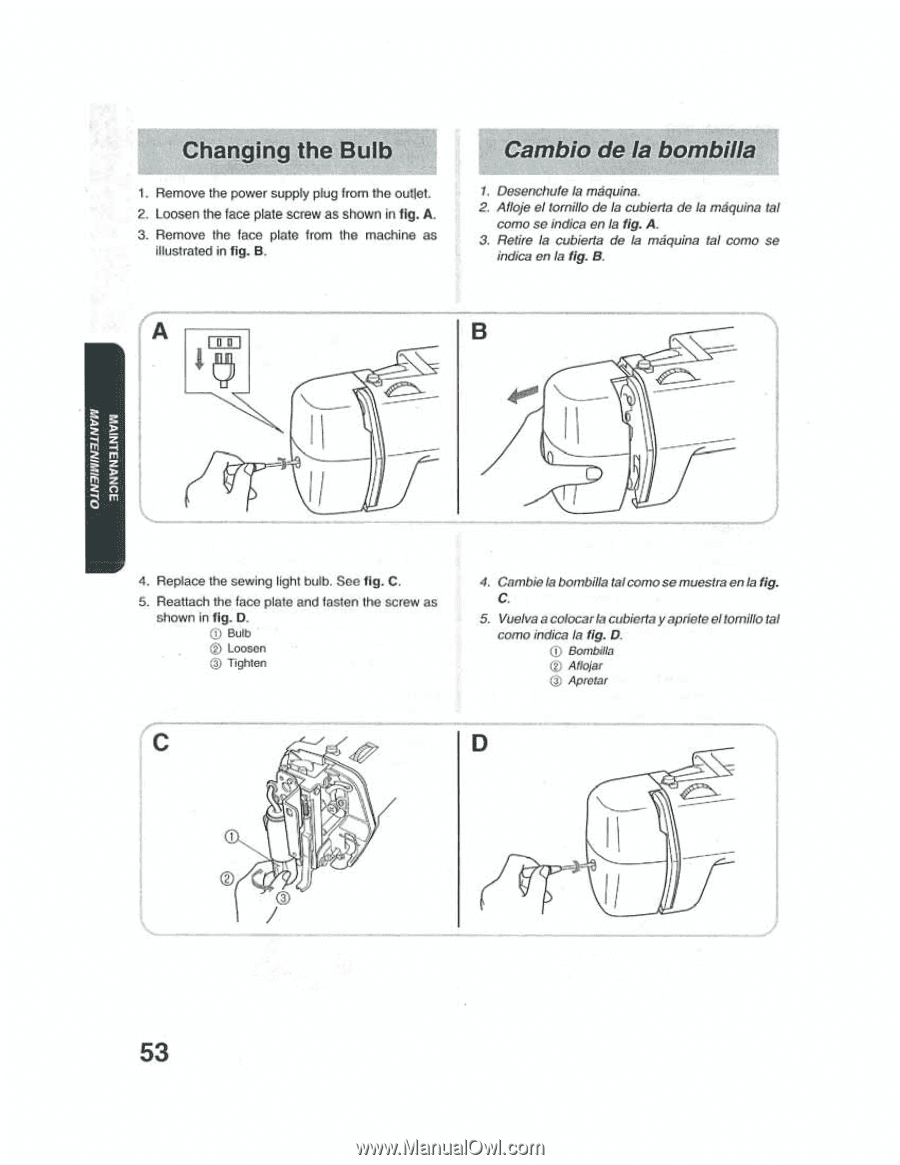
Changing the Bulb 1. Remove the power supply plug from the outlet. 2. Loosen the lace plate screw as shown In fig. A. 3. Remove the lace plate from the machine as Illustrated in fig. B. Cambio de la bombilla 1. Desenchule la maquina. 2. Alloje el tornillo de la cubierta de la maquina tal como se indica en la fig. A. 3. Retire la cubierta de la maquina tat como se indica en Pa lig. B. reA- too l B fl 4. Replace the sewing light bulb. See fig. C. 5. Reattach the face plate and fasten the screw as shown in fig. D. 0 Bulb CO Loosen ((.0 Tighten 4. amblela bombilla tatcomosemuestia enla fig. C. 5. Vuelva a colocarla cubierta yaprieteeltomillo tai como indica la fig. D. 0 Gambill° ® AtIojar ® Aprotar D I 53
-
 1
1 -
2
-
3
-
4
-
5
-
6
-
7
-
8
-
9
-
10
-
11
-
12
-
13
-
14
-
15
-
16
-
17
-
18
-
19
-
20
-
21
-
22
-
23
-
24
-
25
-
26
-
27
-
28
-
29
-
30
-
31
-
32
-
33
-
34
-
35
-
36
-
37
-
38
-
39
-
40
-
41
-
42
-
43
-
44
-
45
-
46
-
47
-
48
-
49
-
50
-
51
-
52
-
 53
53 -
 54
54 -
 55
55 -
 56
56 -
 57
57 -
 58
58 -
 59
59 -
 60
60 -
 61
61 -
 62
62 -
 63
63 -
64
-
65
-
66
-
67
-
68
-
69
-
70
-
71
-
72
 |
 |
Changing
the
Bulb
1.
Remove
the
power
supply
plug
from
the
outlet.
2.
Loosen
the
lace
plate
screw
as
shown
In
fig.
A.
3.
Remove
the
lace
plate
from
the
machine
as
Illustrated
in
fig.
B.
re
-
A
too
l
f
l
4.
Replace
the
sewing
light
bulb.
See
fig.
C.
5.
Reattach
the
face
plate
and
fasten
the
screw
as
shown
in
fig.
D.
0
Bulb
CO
Loosen
((.0
Tighten
53
Cambio
de
la
bombilla
1.
Desenchule
la
maquina.
2.
Alloje
el
tornillo
de
la
cubierta
de
la
maquina
tal
como
se
indica
en
la
fig.
A.
3.
Retire
la
cubierta
de
la
maquina
tat
como
se
indica
en
Pa
lig.
B.
B
4.
amble
la
bombilla
tat
como
se
muestia
en
la
fig.
C.
5.
Vuelva
a
colocar
la
cubierta
yapriete
el
tomillo
tai
como
indica
la
fi
g.
D.
0
Gambill°
®
AtIojar
®
Aprotar
D
I