Brother International XL-3200 Users Manual - English - Page 12
Using, needle, threader, enhebrador, Drawing, Lower, Thread, sacar, canilla
 |
View all Brother International XL-3200 manuals
Add to My Manuals
Save this manual to your list of manuals |
Page 12 highlights
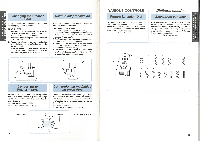
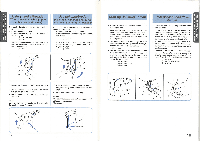
. • ONIM•N)I i t • - SEWING M , A . 1:13S00 30 vivinovw nS VOZON00 A , • • KN • Using needle threader (When the machine is equipped with a needle threader) The needle threader can be used to thread the needle more easily. 1. Lower the presser foot lever. Lowerthe threader slightly and position the thread under the guide. ® Needle threader O Guide 2. Move the threader to its lowest position and guide the thread under the hook which passes through the eye of the needle. 0) Hook Uso del enhebrador (Cuando la maquina esta provista de un enhebrador de aguja) Se puede usar el enhebrador para en hebrar la aguja mas facilmente. 1. Bajar la palanca de la pata prensatelas. Bajaren enhebradorsuavementeycolocarelhilo bajo la guia. 0 Enhebrador (2) Gufa 2. Mover elenhebradorhasta suposicion mas baja yguiarelhilopordebajo delgancho quepasapor el ojo de la aguja. ® Gancho 3 3. Release the threader and the thread at the same time. This causes the threader to deliver the thread through the eye of the needle. 4. Pull out about 5 cm (2 inches) of thread through the needle. NOTE: Some needle/thread combinations will not work with the needle threader. See page 21. 3. Soltar el enhebrador y el hilo al mismo tiempo. Esto provocara que el hilo salga por el ojo de la aguja. 4. Sacar unos 5 cm de hilo por la aguja. NOTA: Conalgunas combinaciones dehilo-aguja, nopuede utilizarse el enhebrador. Ver pagina 22. Drawing Up Lower Thread 1. Raise the presser foot and the needle to their highest positions. 2. With your left hand, hold the end of the upper thread. With your right hand, turn the balance wheel toward you (counterclockwise) until the needle moves down and back up again to its highest position. 3. The upper thread should have caught the lower thread in a loop. Pull the upper thread toward you and the lower thread will come up from the bobbin in a large loop. 4. Pull out about 15 cm (6") of both threads and place them between the toes of the presser foot to the right toward the back of the machine and pull toward the back of the machine straight behind the presser foot. (D Upper thread C) Lower thread loop ® Lower thread Para sacar el hilo de la canilla 1. Levante elprensatelasyla aguja a susposiciones mas elevadas. 2. Con la mano izquierda, sujete el extremo del hilo superior. Con la mano derecha, gire la ruedecilla hacia usted (en el sentido contrario al de las manecillas de un reloj) hasta que la aguja vaya hacia abajo y suba a su posicion mas alta. 3. El hilo superior debe haber enganchado el hilo inferior y hacer una lazada. Tire del hilo superior hacia ustedy elhilo inferior saldra de la canilla en una baga larga. 4. Tire unos 15 cm (6') de cada uno de los hilos y paselos entre los salientes del prensatelas, a la derecha, hacia la parte posterior de la maquina. Luego tirehacia atrasjusto detras delprensatelas. ® Hilo superior 0 Bagas en el hilo inferior C3) Hilo inferior \ ( 1 0 2 C) 1 C, 3 C, 17 18
-
 1
1 -
2
-
3
-
4
-
5
-
6
-
 7
7 -
 8
8 -
 9
9 -
 10
10 -
 11
11 -
 12
12 -
 13
13 -
 14
14 -
 15
15 -
 16
16 -
 17
17 -
18
-
19
-
20
-
21
-
22
-
23
-
24
-
25
-
26
-
27
-
28
-
29
-
30
-
31
 |
 |
