Brother International XL-3200 Users Manual - English - Page 17
RiagtHAIIMilliE, EPIIIIMPililiffINR
 |
View all Brother International XL-3200 manuals
Add to My Manuals
Save this manual to your list of manuals |
Page 17 highlights
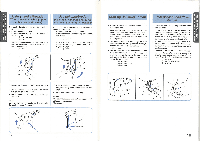
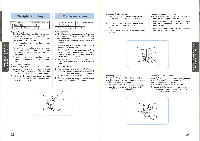
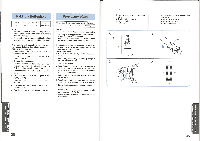
Blind Hem Stitching Pattern 4 (Blind Hem Stitch) 7 (Stretch Blind Stitch) Stitch Length Stitch Width F-2 3-5 F-1.5 The Blind Hem Stitch is used to finish the edge of a project like the bottom of a pair of pants without the stitch showing. Use the Blind Hem Stitch (4) for any non-stretching fabrics and the Stretch Blind Stitch (7) for stretch fabrics. Puntadas invisibles Namero de puntada 4 (Puntada Invisible) 7 (Puntada Invisible Elastica) Largo de puntada Ancho de puntada F-2 3-5 F-1,5 La puntada de dobladillo invisible se usa para terminarla orilla de una obra, talcomo elborde inferior de unos pantalones, sin que se vean las puntadas. Utilice la Puntada Invisible (4) para cualquier tejido que no se estire y la Puntada Invisible Elastica (7) para los tejidos elasticos. Shell Tuck Stitching Pattern 5 (Shell Tuck Stitch) Stitch Length Stitch Width F-3 3-5 The Shell Tuck Stitch can be used to sew a picot (lace like) edge on a lightweight fabric. 1. Set the Pattern Selection Dial to 5. 2. Sew the fabric on the bias, placing it under the presser foot so that the straight stitches are sewn on the seamline and the zigzag stitches are sewn slightly over the folded edge. 3. This stitch requires a tighter thread tension than normal. 4. Sew at a slow speed. Puntada Ondas Altimero de puntada 5 (Puntada Ondas) Largo de puntada Ancho de puntada F-3 3-5 La Puntada Ondas puede usarse para coser una puntilla (como encaje) en un tejido fino. 1. Ponga el selector de puntadas en 5. 2. Cosa el tejido en el sesgo, situandolo debajo del prensatelas de tal forma que la puntada recta se cosa en 'Maas formando costura y que las puntadas zigzag cosan las puntillas de los dobladillos. 3. Este trabajo requiere aumentar un poco mas la tension de hilo que en condiciones normales. 4. Coser a velocidad lenta. StfOtiliOdklOONI SVOVINI1d RiagtHAIIMilliE EPIIIIMPililiffINR PUNTADAS INCORPORADAS 1. Both the threads should be the same color as the fabric. 2. Fold back the fabric to the desired location of the hem as shown in fig. A. Then, fold the edge of the fabric as in fig. B. Leave a 6 mm (1/4") overlap at the edge. 3. Set the Pattern Selection Dial to either 4 or 7 and set the stitch length and width. 4. Sew on the fold as in fig. C. 5. When the fabric is unfolded you will have a Blind Stitch hem as shown in fig. D. NOTE: The Stretch Blind Stitch is useful for stretch fabrics. B 1. Ambos hilos deben ser del mismo color que el tejido. 2. Doble el tejido segan la orilla que desee hacer tal como ilustra la fig. A. Luego, dele la vuelta tal como indica la fig. B. Deje unos 6 mm (1/4') sin coser para esconderlos. 3. Ponga el selector de puntadas en 4 6 7 y ajuste el largo y ancho de la puntada. 4. Cosa en el pliegue tal como muestra la fig. C. 5. Al desdoblar el tejido, tendra un dobladillo con puntada invisible tal como lo muestra la fig. D. NOTA: La Puntada Invisible Elastica se recomienda para tejidos elasticos. C 27 28
-
 1
1 -
2
-
3
-
4
-
5
-
6
-
7
-
8
-
9
-
10
-
11
-
 12
12 -
 13
13 -
 14
14 -
 15
15 -
 16
16 -
 17
17 -
 18
18 -
 19
19 -
 20
20 -
 21
21 -
 22
22 -
23
-
24
-
25
-
26
-
27
-
28
-
29
-
30
-
31
 |
 |
