Brother International XL-3200 Users Manual - English - Page 16
Zigzag, Stitching
 |
View all Brother International XL-3200 manuals
Add to My Manuals
Save this manual to your list of manuals |
Page 16 highlights
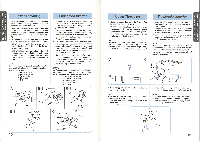
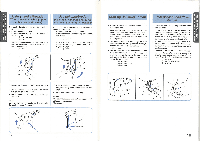
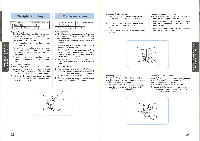
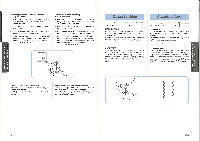
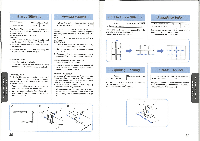
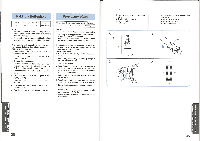
OVZOIZ A Sit103kI SVCIV_LNRd DNIHaLlIS OVZDIZ aNY 1HDIVHIS STRAIGHT AND ZIGZAG STITCHING PUNTADAS RECTAS Y ZIGZAG Removing the Material from the Machine 1. Stop the machine. 2. Raise the needle to its highest position and make sure that the thread take-up lever is also in its highest position. 3. Lift the presser foot and pull the fabric out gently to the left side. 4. Cut both threads using the thread cutter located on the back of the presser foot bar. 5. To prepare the machine for the next seam, pull about 10 cm (4") of thread through the toes of the presser foot toward the back of the machine. @ Thread cutter Para retirar el tejido de la maquina 1. Pare la maquina. 2. Levante la aguja a su posiciOn mas alta y asegarese de quelapalanca tirahiloseste tambien en su posicion mas elevada. 3. Levante el prensatelas y saque suavemente el tejido por la izquierda. 4. Corte ambos hilos usando el cortador que se encuentra detras de la barra del prensatelas. 5. Con el fin de dejar la maquina preparada para la pi-6)(1nm costura, tire unos 10 cm (4") del hilo inferiorypaseloporlos salientes delprensatelas hacia la parte posterior de la maquina. Cortador de hilos 0 0 0 Zigzag Stitching Pattern 3 (Zigzag Stitch) Stitch Length Stitch Width F-4 0-5 ZIGZAG STITCH Select the Zigzag Stitch (3) using the Pattern Selection Dial. Then, select the Stitch Length and the Stitch Width. It is recommended to sew using the Straight Stitch at the beginning and end of the Zigzag Stitches. Puntadas zigzag Maier° de puntada 3 (Puntada Zigzag) Largo de puntada Ancho de puntada F-4 0-5 Puntada zigzag Con el selector de puntadas, escoja la puntada zigzag(3). Luego, seleccione ellargo y el ancho de la puntada. Se recomienda coser conpuntada recta alprincipio y al final de unas puntadas zigzag. SATIN STITCH When the Zigzag Stitch length is set in the "F" range, it produces a Satin Stitch (a close Zigzag Stitch). The Satin Stitch can be used for making buttonholes and decorative stitches. Select the Zigzag Stitch (3), then set the stitch length in the "F" range and the stitch width. Puntada de realce Cuando se define el largo de la puntada en la parte "F", se coseran puntadas tupidas (puntada zigzag muy cerradas) que pueden servir para hacer ojales ocomopuntadas decorativas. Seleccionelapuntada zigzag (3). Luego, ponga el largo de puntada en la zona "F" y ajuste el ancho de puntada deseado. Top Stitching and Stretch Materials No. 2 (Straight Stitch) is used for top stitching and sewing lightweight fabrics. No.15 (Triple Stretch Stitch) is used for stretch fabrics. Puntadas en derecho y tejidos elasticos LapuntadaNo2(Puntadarecta)seusapara costuras en el lado derecho y de materiales ligeros. La puntada No 15 (Triple Puntada Pespunto) se usa para los tejidos elasticos. I 25 26
-
 1
1 -
2
-
3
-
4
-
5
-
6
-
7
-
8
-
9
-
10
-
 11
11 -
 12
12 -
 13
13 -
 14
14 -
 15
15 -
 16
16 -
 17
17 -
 18
18 -
 19
19 -
 20
20 -
 21
21 -
22
-
23
-
24
-
25
-
26
-
27
-
28
-
29
-
30
-
31
 |
 |
