Brother International XR9550 Operation Manual - Page 14
not pulled taut or held at an angle, injuries
 |
View all Brother International XR9550 manuals
Add to My Manuals
Save this manual to your list of manuals |
Page 14 highlights
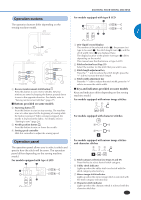
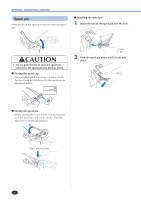
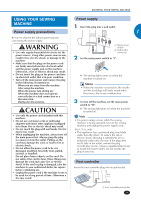
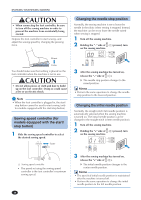
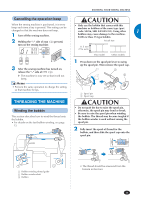
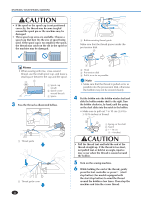
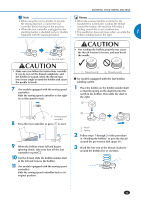
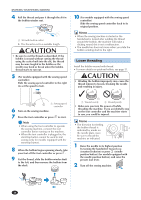
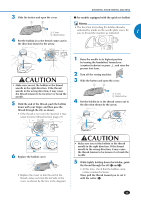
KNOWING YOUR SEWING MACHINE CAUTION • If the spool or the spool cap is not positioned correctly, the thread may become tangled around the spool pin or the machine may be damaged. • Three spool cap sizes are available. Choose a spool cap that best fits the size of spool being used. If the spool cap is too small for the spool, the thread may catch on the slit in the spool or the machine may be damaged. 3 Bobbin-winding thread guide Make sure that the thread passes under the pre-tension disk. 4 Memo • When sewing with fine, cross-wound thread, use the small spool cap, and leave a small space between the cap and the spool. 3 2 1 1 Spool cap (small) 2 Spool (crosswound thread) 3 Space 3 Pass the thread as illustrated bellow. 5 6 4 Hook 5 Pre-tension disk 6 Pull it in as far as possible. Note • Make sure that the thread is pulled as far as possible into the pre-tension disk, otherwise the bobbin may not be wound cleanly. 4 Put the bobbin onto the bobbin winder shaft and slide the bobbin winder shaft to the right. Turn the bobbin clockwise, by hand, until the spring on the shaft slides into the notch in the bobbin. • Make sure to pull out 7 to 10 cm (2-3/4 to 3-15/16 inches) of thread. 1 Thread guide 2 Thread guide cover 12 1 Spring on the shaft 2 Notch 3 7 - 10 cm (3 - 4 inches) CAUTION • Pull the thread taut and hold the end of the thread straight up. If the thread is too short, not pulled taut or held at an angle, injuries may occur when the thread is wound around the bobbin. 5 Turn on the sewing machine. 6 While holding the end of the thread, gently press the foot controller or press (start/ stop button) (for models equipped with the start/stop button) to wind the thread around the bobbin a few times. Then stop the machine and trim the excess thread.
-
 1
1 -
2
-
3
-
4
-
5
-
6
-
7
-
8
-
 9
9 -
 10
10 -
 11
11 -
 12
12 -
 13
13 -
 14
14 -
 15
15 -
 16
16 -
 17
17 -
 18
18 -
 19
19 -
20
-
21
-
22
-
23
-
24
-
25
-
26
-
27
-
28
-
29
-
30
-
31
-
32
-
33
-
34
-
35
-
36
-
37
-
38
-
39
-
40
-
41
-
42
-
43
-
44
-
45
-
46
-
47
-
48
-
49
-
50
-
51
-
52
-
53
-
54
-
55
-
56
-
57
-
58
-
59
-
60
-
61
-
62
-
63
-
64
-
65
-
66
-
67
-
68
-
69
-
70
-
71
-
72
-
73
-
74
-
75
-
76
 |
 |
