Brother International XR9550 Operation Manual - Page 17
For models equipped with the quick-set bobbin
 |
View all Brother International XR9550 manuals
Add to My Manuals
Save this manual to your list of manuals |
Page 17 highlights
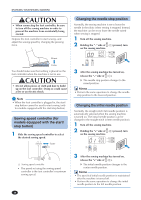
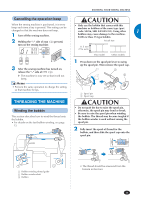
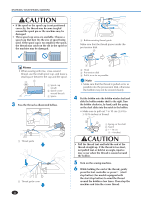
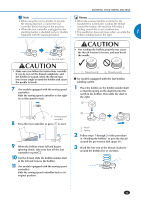
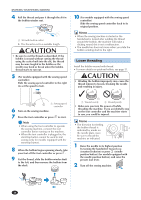
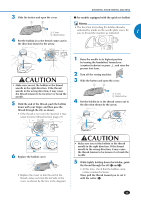
3 Slide the button and open the cover. 1 2 1 Cover 2 Slide button 4 Put the bobbin in so the thread comes out in the direction shown by the arrow. KNOWING YOUR SEWING MACHINE ■■For models equipped with the quick-set bobbin Memo • The direction for feeding the bobbin thread is indicated by marks on the needle plate cover. Be sure to thread the machine as indicated. 1 CAUTION • Make sure you set the bobbin so the thread unrolls in the right direction. If the thread unrolls in the wrong direction, it may cause the thread tension to be incorrect or break the needle. 5 Hold the end of the thread, push the bobbin down with your finger, and then pass the thread through the slit, as shown. • If the thread is not correctly inserted, it may cause incorrect thread tension (page 27). 1 Raise the needle to its highest position by turning the handwheel toward you (counterclockwise) or press , and raise the presser foot lever. 2 Turn off the sewing machine. 3 Slide the button and open the cover. 1 2 1 Cover 2 Slide button 4 Put the bobbin in so the thread comes out in the direction shown by the arrow. 6 Replace the bobbin cover. • Replace the cover so that the end of the thread comes out from the left side of the cover (as shown by the line in the diagram). CAUTION • Make sure you set the bobbin so the thread unrolls in the right direction. If the thread unrolls in the wrong direction, it may cause the thread tension to be incorrect or break the needle. 5 While lightly holding down the bobbin, guide the thread through the slit (1 and 2). • At this time, check that the bobbin easily rotates counterclockwise. Then, pull the thread toward you to cut it with the cutter (3). 15
-
 1
1 -
2
-
3
-
4
-
5
-
6
-
7
-
8
-
9
-
10
-
11
-
 12
12 -
 13
13 -
 14
14 -
 15
15 -
 16
16 -
 17
17 -
 18
18 -
 19
19 -
 20
20 -
 21
21 -
 22
22 -
23
-
24
-
25
-
26
-
27
-
28
-
29
-
30
-
31
-
32
-
33
-
34
-
35
-
36
-
37
-
38
-
39
-
40
-
41
-
42
-
43
-
44
-
45
-
46
-
47
-
48
-
49
-
50
-
51
-
52
-
53
-
54
-
55
-
56
-
57
-
58
-
59
-
60
-
61
-
62
-
63
-
64
-
65
-
66
-
67
-
68
-
69
-
70
-
71
-
72
-
73
-
74
-
75
-
76
 |
 |
