Canon 70 MC DIGITAL VIDEO SOLUTION DISK Ver.5 Software Instruction Manual - Page 37
The PhotoRecord Window
 |
UPC - 013803024128
View all Canon 70 MC manuals
Add to My Manuals
Save this manual to your list of manuals |
Page 37 highlights
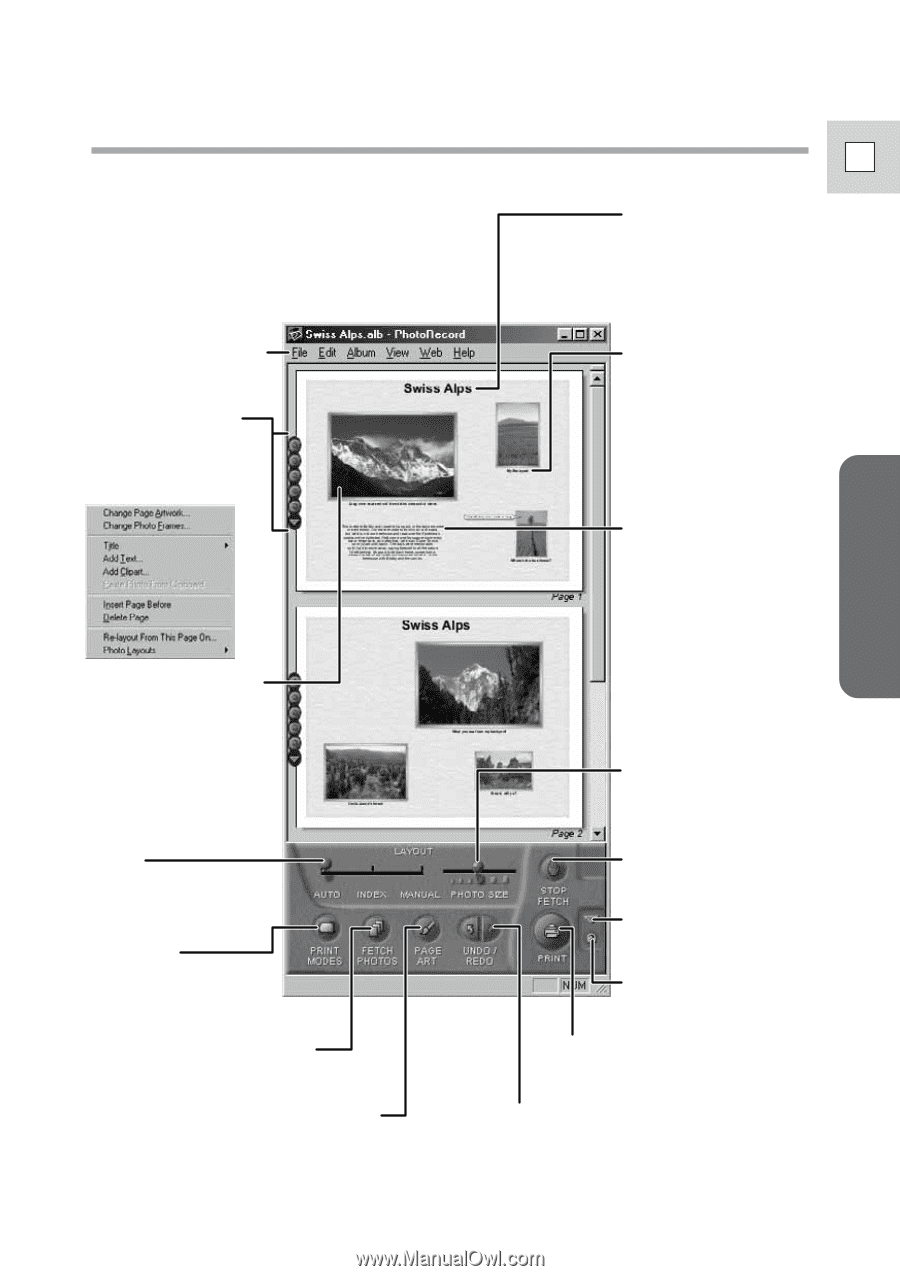
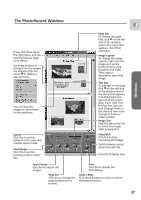
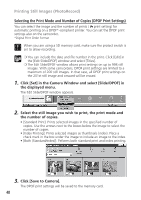
The PhotoRecord Window E Windows If you click [Save As] on the [File] menu, you can save the laid out page as an album. Use these buttons to change how the images are aligned. Click the arrow ▼ to display a pop-up menu. You can drag the images to move them to new positions. Layout Click this to switch between auto index and manual layout mode. Print Modes Click this to set the printing mode or paper size. Page title To change the page title, click ▼ on the left side of the window and on the menu that appears, click [Title] and [Edit]. Image caption To change the image caption, right-click the image and, on the shortcut menu, click [Caption] and [Edit]. Then, type a description about the image. Text box To add text to the page, click ▼ on the left side of the window and on the menu that appears, click [Add Text] and type what you want. Also, if you right-click the text box, you can click [Change Text] on the shortcut menu and change its frame or other artwork. Image Size Slide this tab to the left to shrink the image, right to expend it. Stop Fetch Click this to stop importing still images. Switch between control panel sizes with this. Click this to display Help. Fetch Photos Click this to import still images. Page Art Click this to change the page background or borders. Print Click this to display the Print Dialog. Undo / Redo Click these buttons to undo or restore the previous action. 37
-
 1
1 -
2
-
3
-
4
-
5
-
6
-
7
-
8
-
9
-
10
-
11
-
12
-
13
-
14
-
15
-
16
-
17
-
18
-
19
-
20
-
21
-
22
-
23
-
24
-
25
-
26
-
27
-
28
-
29
-
30
-
31
-
 32
32 -
 33
33 -
 34
34 -
 35
35 -
 36
36 -
 37
37 -
 38
38 -
 39
39 -
 40
40 -
 41
41 -
 42
42 -
43
-
44
-
45
-
46
-
47
-
48
-
49
-
50
-
51
-
52
-
53
-
54
-
55
-
56
-
57
-
58
-
59
-
60
-
61
-
62
-
63
-
64
-
65
-
66
-
67
-
68
-
69
-
70
-
71
-
72
-
73
-
74
-
75
-
76
-
77
-
78
-
79
-
80
-
81
-
82
-
83
-
84
-
85
-
86
-
87
-
88
-
89
-
90
-
91
-
92
-
93
-
94
-
95
-
96
-
97
-
98
-
99
-
100
 |
 |