Canon C50i Instruction Manual - Page 13
Installing the Product - vc vc c50ir
 |
UPC - 013803054415
View all Canon C50i manuals
Add to My Manuals
Save this manual to your list of manuals |
Page 13 highlights
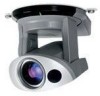
Before You Use the Product ENGLISH Installing the Product VC-C50i Installation Install in a flat and stable location. VC-C50iR Installation Firmly tighten the 2 screws (not supplied). Mounting plate Screw VC-C50iR Screw (Installation) • Distance between tapped holes: 114 mm (4.49 in.) • Tapped hole diameter: 6 mm (0.24 in.) • Mounting plate thickness: 1 mm (0.04 in.) aWARNING Install the camera securely. ● When installing the camera on the ceiling, contact your Canon dealer. ● When installing the camera on the ceiling, check that the ceiling is strong enough to bear the weight of the camera including the installation bracket. Installation in a weak location could result in the camera falling and causing serious injury. ● At least once a year, check for looseness in the camera installation mount. (If the optional wide-angle converter is used, check the converter mount also.) * The Wide-angle Converter WL-37 cannot be used on the VC-C50iR. The permissible camera installation angles are ±20° from the horizontal. (±15° when the optional wide-angle converter is used.) NOTE Using a Tripod The screw mount for a tripod is located in the center of the underside of the camera. ● Do not overtighten the mounting screw. If excessive force is used to tighten the NOTE mounting screw, camera head movement may be impeded, or other malfunctions may result. ● Always use a tripod mounting screw that is less than 6.0 mm (0.24 in.) in length. The use of screws 6.0 mm (0.24 in.) long or longer could damage the camera. Also, the tripod seat used should be at least 30 mm (1.18 in.) in diameter. 30 mm (1.18 in.) or wider Less than 6.0 mm (0.24 in.) Mounting screw 13
-
 1
1 -
2
-
3
-
4
-
5
-
6
-
7
-
 8
8 -
 9
9 -
 10
10 -
 11
11 -
 12
12 -
 13
13 -
 14
14 -
 15
15 -
 16
16 -
 17
17 -
 18
18 -
19
-
20
-
21
-
22
-
23
-
24
-
25
-
26
-
27
-
28
-
29
-
30
-
31
-
32
-
33
-
34
-
35
-
36
-
37
-
38
-
39
-
40
-
41
-
42
 |
 |
