Canon CanoScan 4200F CanoScan 4200F Quick Start Guide - Page 6
Connect the Scanner - ac adapter
 |
View all Canon CanoScan 4200F manuals
Add to My Manuals
Save this manual to your list of manuals |
Page 6 highlights
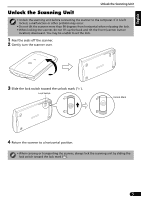
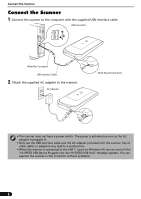
Connect the Scanner Connect the Scanner 1 Connect the scanner to the computer with the supplied USB interface cable. USB Connector Wide Flat Connector USB Interface Cable 2 Attach the supplied AC adapter to the scanner. AC Adapter Small Square Connector • The scanner does not have a power switch. The power is activated as soon as the AC adapter is plugged in. • Only use the USB interface cable and the AC adapter provided with the scanner. Use of other cables or adapters may lead to a malfunction. • When the scanner is connected to the USB 1.1 port on Windows XP, do not worry if the "HI-SPEED USB Device Plugged into non-HI-SPEED USB Hub" message appears. You can operate the scanner in this condition without problems. 6
-
 1
1 -
 2
2 -
 3
3 -
 4
4 -
 5
5 -
 6
6 -
 7
7 -
 8
8 -
 9
9 -
 10
10 -
 11
11 -
 12
12 -
13
-
14
-
15
-
16
-
17
 |
 |

Connect the Scanner
6
Connect the Scanner
1
Connect the scanner to the computer with the supplied USB interface cable.
2
Attach the supplied AC adapter to the scanner.
• The scanner does not have a power switch. The power is activated as soon as the AC
adapter is plugged in.
• Only use the USB interface cable and the AC adapter provided with the scanner. Use of
other cables or adapters may lead to a malfunction.
• When the scanner is connected to the USB 1.1 port on Windows XP, do not worry if the
"HI-SPEED USB Device Plugged into non-HI-SPEED USB Hub" message appears. You can
operate the scanner in this condition without problems.
USB Interface Cable
Wide Flat Connector
Small Square Connector
USB Connector
AC Adapter