Canon CanoScan D646U CanoScan D646U Toolbox2.2 for Win Guide - Page 6
Place the CanoScan Setup Utility CD-ROM in the drive. - software
 |
View all Canon CanoScan D646U manuals
Add to My Manuals
Save this manual to your list of manuals |
Page 6 highlights
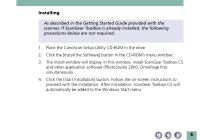
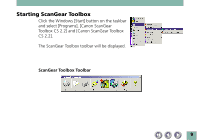
Installing As described in the Getting Started Guide provided with the scanner, if ScanGear Toolbox is already installed, the following procedures below are not required. 1. Place the CanoScan Setup Utility CD-ROM in the drive. 2. Click the [Install the Software] button in the CD-ROM's menu window. 3. The Install window will display. In this window, install ScanGear Toolbox CS and other application software (PhotoStudio 2000, OmniPage Pro) simultaneously. 4. Click the [Start Installation] button. Follow the on-screen instructions to proceed with the installation. After installation, ScanGear Toolbox CS will automatically be added to the Windows Start menu. 6
-
 1
1 -
 2
2 -
 3
3 -
 4
4 -
 5
5 -
 6
6 -
 7
7 -
 8
8 -
 9
9 -
 10
10 -
 11
11 -
 12
12 -
13
-
14
-
15
-
16
-
17
-
18
-
19
-
20
-
21
-
22
-
23
-
24
-
25
-
26
-
27
 |
 |

6
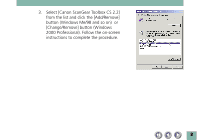
Installing
As described in the Getting Started Guide provided with the
scanner, if ScanGear Toolbox is already installed, the following
procedures below are not required.
1.
Place the CanoScan Setup Utility CD-ROM in the drive.
2.
Click the [Install the Software] button in the CD-ROM’s menu window.
3.
The Install window will display. In this window, install ScanGear Toolbox CS
and other application software (PhotoStudio 2000, OmniPage Pro)
simultaneously.
4.
Click the [Start Installation] button. Follow the on-screen instructions to
proceed with the installation. After installation, ScanGear Toolbox CS will
automatically be added to the Windows Start menu.