Canon DC22 DC22 Instruction Manual - Page 60
Using the Multi-Image Screen
 |
UPC - 013803063660
View all Canon DC22 manuals
Add to My Manuals
Save this manual to your list of manuals |
Page 60 highlights
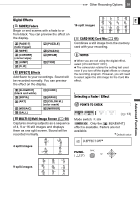
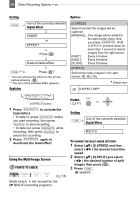
60 Other Recording Options Setting FUNC. Icon of the currently selected Digital Effect FADER or EFFECT Press ( ) Desired fader/effect. FUNC. ** Press ( )* * You can preview the effect on the screen before pressing ( ). ** The icon of the selected effect appears. Applying Options [S.SPEED] Select how fast the images will be captured. [MANUAL]: One image will be added to the split screen every time you press D.EFFECTS . Hold D.EFFECTS pressed down for more than 1 second to delete images from the split screen. [FAST]: Every 4 frames [MOD.]: Every 6 frames [SLOW]: Every 8 frames [S.SPLIT] Select how many images in the split screen: [4], [9], [16]. Default value D.EFFECT OFF D.EFFECTS button 1 Press D.EFFECTS to activate the fader/effect. • To fade in, press D.EFFECTS before you start recording, then press Start/Stop to start recording. • To fade out, press D.EFFECTS while recording, then press Start/Stop to pause the recording. 2 Press D.EFFECTS again to deactivate the fader/effect. Using the Multi-Image Screen POINTS TO CHECK ( 13) Mode switch: (except for the [ NIGHT] recording program). FUNC. ( 27) Setting FUNC. Icon of the currently selected Digital Effect MULTI-S TO CHANGE THE MULTI-IMAGE SETTINGS 1 Select ( ) [S.SPEED] and then select ( ) the desired transition speed. 2 Select ( ) [S.SPLIT] and select ( ) the desired number of split images then press ( ). 3 Press FUNC. . appears.
-
 1
1 -
2
-
3
-
4
-
5
-
6
-
7
-
8
-
9
-
10
-
11
-
12
-
13
-
14
-
15
-
16
-
17
-
18
-
19
-
20
-
21
-
22
-
23
-
24
-
25
-
26
-
27
-
28
-
29
-
30
-
31
-
32
-
33
-
34
-
35
-
36
-
37
-
38
-
39
-
40
-
41
-
42
-
43
-
44
-
45
-
46
-
47
-
48
-
49
-
50
-
51
-
52
-
53
-
54
-
 55
55 -
 56
56 -
 57
57 -
 58
58 -
 59
59 -
 60
60 -
 61
61 -
 62
62 -
 63
63 -
 64
64 -
 65
65 -
66
-
67
-
68
-
69
-
70
-
71
-
72
-
73
-
74
-
75
-
76
-
77
-
78
-
79
-
80
-
81
-
82
-
83
-
84
-
85
-
86
-
87
-
88
-
89
-
90
-
91
-
92
-
93
-
94
-
95
-
96
-
97
-
98
-
99
-
100
-
101
-
102
-
103
-
104
-
105
-
106
-
107
-
108
-
109
-
110
-
111
-
112
-
113
 |
 |
