Canon DS810 Photo Printing Guide - Page 11
Operation Panel - photo printer
 |
UPC - 013803049121
View all Canon DS810 manuals
Add to My Manuals
Save this manual to your list of manuals |
Page 11 highlights
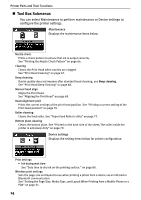
Printer Parts and Their Functions „ Operation Panel POWER lamp Off: the printer is off. Lighting: the printer is ready to print, is currently printing, or is currently initializing. Flashing: the printer is preparing to turn on or off. POWER button Press to turn on the printer or off. See "Turning On the Printer" on page 16. Back button Allows you to return to the previous screen. Trimming button Allows you to trim the photo displayed on the screen. See "Printing a Specified Area- Trimming" on page 34. Settings button Menu button Allows you to set the Page size, Media type, and Bordered/ Borderless printing. See "Changing the Print Settings" on page 24. Displays menu options on the LCD. See "Menu Screen" on page 11. buttons Press to enlarge or reduce the photo being displayed on the screen. Pressing this button in trimming mode allows you to enlarge/reduce Alarm lamp Indicates that an error has occurred. An error message is displayed on the LCD. the area to be trimmed. See "Printing a Specified Area- Trimming" on page 34. Print button Search button Looks up target photos in the memory card using the shooting date as the search key. See "Searching for Photos with the Shooting Date-Search" on page 32. Press to start printing according to the settings displayed on the LCD. STW X buttons Use these buttons, shown as arrows on the LCD, to select a menu item or photo, to specify the number of copies to print, to Stop/Reset button make print settings, or to scroll the screen. Additionally, use these buttons in trimming Allows you to reset the print settings mode to move the trimming area. you made. Also, to cancel printing in progress, press this button. OK button Allows you to make a selection. For example, selecting a photo to be printed, selecting a menu item or other settings. Also, press to resume printing once an error has been resolved. The printer will then initialize ready for printing. 9
-
 1
1 -
2
-
3
-
4
-
5
-
 6
6 -
 7
7 -
 8
8 -
 9
9 -
 10
10 -
 11
11 -
 12
12 -
 13
13 -
 14
14 -
 15
15 -
 16
16 -
17
-
18
-
19
-
20
-
21
-
22
-
23
-
24
-
25
-
26
-
27
-
28
-
29
-
30
-
31
-
32
-
33
-
34
-
35
-
36
-
37
-
38
-
39
-
40
-
41
-
42
-
43
-
44
-
45
-
46
-
47
-
48
-
49
-
50
-
51
-
52
-
53
-
54
-
55
-
56
-
57
-
58
-
59
-
60
-
61
-
62
-
63
-
64
-
65
-
66
-
67
-
68
-
69
-
70
-
71
-
72
-
73
-
74
-
75
-
76
-
77
-
78
-
79
-
80
-
81
-
82
-
83
-
84
-
85
-
86
-
87
-
88
-
89
-
90
-
91
-
92
-
93
-
94
-
95
-
96
 |
 |
