Canon EOS 5D EOS DIGITAL Software Instruction Manual Macintosh - Page 11
Downloading JPEG Images Using the PTP Function, Cameras other than EOS-1D Series, Cameras - mark ii firmware version 1 2 4
 |
UPC - 013803057232
View all Canon EOS 5D manuals
Add to My Manuals
Save this manual to your list of manuals |
Page 11 highlights
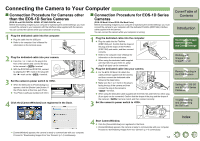
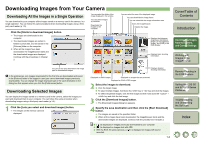
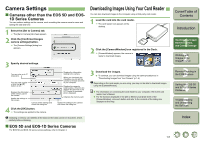
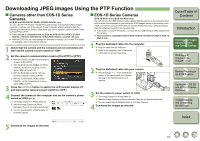
Downloading JPEG Images Using the PTP Function „ Cameras other than EOS-1D Series Cameras (EOS 5D and EOS DIGITAL REBEL XT/350D DIGITAL etc.) You can use the PTP (Picture Transfer Protocol) function and download JPEG images saved on a memory card in the camera to your computer without having to start the software provided on the Solution Disk, when you set the camera's communication mode to [Print/PTP] or [PTP]. O This function is compatible with the EOS 5D, EOS DIGITAL REBEL XT/350D DIGITAL, EOS 20D, EOS DIGITAL REBEL/300D DIGITAL and EOS 10D only. O With the EOS 10D, you must change the firmware to version 2.0.0 or later. For details on changing, refer to the Canon web site. 1 Check that the camera and the computer are not connected and then set the camera's power switch to . 2 Set the camera's communication mode to [Print/PTP] or [PTP]. O With the EOS 5D, set [ Communication] in menu to [Print/PTP]. O With the EOS DIGITAL REBEL XT/350D DIGITAL, set [Communication] in menu option [ ] to [Print/PTP]. O With the EOS 20D and EOS 10D, set [Communication] in menu to [PTP]. O With the EOS DIGITAL REBEL/300D DIGITAL, set [Communication] in menu option [ ] to [PTP]. 3 Press the < > button to switch the LCD monitor display off and then set the camera's power switch to . 4 Connect the camera to the computer and set the camera's power switch to (p.1-2). ¿ The Image Capture or iPhoto starts up. O Start the Image Capture or iPhoto manually if they do not start automatically. O You can specify which software starts up in Image Capture. „ EOS-1D Series Cameras (EOS-1D Mark II N and EOS-1Ds Mark II etc.) You can connect the USB interface cable supplied with the camera to the camera's direct print terminal, and download to your computer JPEG images saved on the memory card inside your camera using the PTP (Picture Transfer Protocol) function, without having to start the software provided on the Solution Disk. O If you want to use the PTP function, connect with the USB interface cable supplied with the camera. O This function is compatible with the EOS-1D Mark II N, EOS-1Ds Mark II, EOS-1D Mark II only. 1 Plug the dedicated cable into the computer. O Plug the cable into the USB port. O Refer to the computer User's Manual for information on the terminal areas. 2 Plug the dedicated cable into your camera. O Face the plug's < > mark towards the bottom of the camera and then connect the plug to the camera's direct print terminal. 3 Set the camera's power switch to . ¿ The Image Capture or iPhoto starts up. O Start the Image Capture or iPhoto manually if they do not start automatically. O You can specify which software starts up in Image Capture. 4 Download the images as directed. Cover/Table of Contents Introduction 1 Downloading Images from the Camera, and Camera Settings 2 Working with Images in the ImageBrowser 3 Remote Shooting in the EOS Capture 4 Setting the EOS 5D and EOS-1D Series Cameras 5 Troubleshooting and Uninstalling the Software Index 5 Download the images as directed. 1-6
-
 1
1 -
2
-
3
-
4
-
5
-
 6
6 -
 7
7 -
 8
8 -
 9
9 -
 10
10 -
 11
11 -
 12
12 -
 13
13 -
 14
14 -
 15
15 -
 16
16 -
17
-
18
-
19
-
20
-
21
-
22
-
23
-
24
-
25
-
26
-
27
-
28
-
29
-
30
-
31
-
32
-
33
-
34
-
35
-
36
-
37
-
38
-
39
-
40
-
41
-
42
-
43
-
44
-
45
-
46
-
47
-
48
-
49
-
50
-
51
 |
 |
