Canon FAXPHONE L170 FAXPHONE L180 Software Guide - Page 33
Windows 2000/XP Add Printer Wizard, Double-click the [Add Printer] icon in Windows XP - driver windows 8
 |
UPC - 013803038477
View all Canon FAXPHONE L170 manuals
Add to My Manuals
Save this manual to your list of manuals |
Page 33 highlights
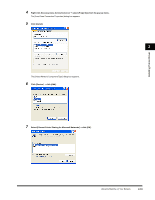
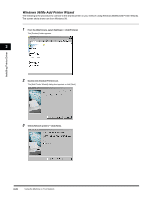
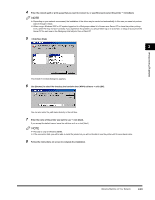
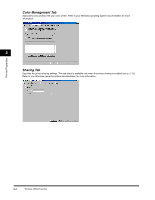
Installing Printer Driver Windows 2000/XP Add Printer Wizard The following is the procedure to connect to the shared printer on your network using Windows 2000/XP. IMPORTANT Be sure that you have logged on as a member of Administrators. The full control access right for the printer is necessary for the installation of CARPS. 1 From the [Start] menu, select [Settings] ➞ click [Printers] (in Windows XP, select [Printers and Faxes] from [Start] menu). The [Printers] (in Windows XP, [Printers and Faxes]) folder appears. 2 2 Double-click the [Add Printer] icon (in Windows XP, click [Add a printer] in [Printer Tasks]). The [Add Printer Wizard] dialog box appears. ➞ click [Next]. 3 Select [Network printer] (in Windows XP, select [A network printer, or a printer attached to another computer)] ➞ click [Next]. The [Locate Your Printer] (in Windows XP, [Specify a Printer]) dialog box appears. 4 Enter the name of the printer you want to connect to ➞ click [Next]. If you do not know the name of the printer, click [Next] without entering the name to proceed to the [Browse for Printer] dialog box. In this dialog box, select the printer ➞ click [Next]. NOTE • If the printer name is invalid, it means the client cannot connect to the shared printer. • If a suitable driver is not found, it probably means the server is a Windows 98/Me computer. 5 Follow the instructions on screen to complete the installation. 2-24 Using the Machine on Your Network
-
 1
1 -
2
-
3
-
4
-
5
-
6
-
7
-
8
-
9
-
10
-
11
-
12
-
13
-
14
-
15
-
16
-
17
-
18
-
19
-
20
-
21
-
22
-
23
-
24
-
25
-
26
-
27
-
 28
28 -
 29
29 -
 30
30 -
 31
31 -
 32
32 -
 33
33 -
 34
34 -
 35
35 -
 36
36 -
 37
37 -
 38
38 -
39
-
40
-
41
-
42
-
43
-
44
-
45
-
46
-
47
-
48
-
49
-
50
-
51
-
52
-
53
-
54
-
55
-
56
-
57
-
58
-
59
-
60
-
61
-
62
-
63
-
64
-
65
-
66
-
67
-
68
-
69
-
70
-
71
-
72
-
73
-
74
-
75
-
76
-
77
-
78
-
79
-
80
-
81
-
82
-
83
-
84
-
85
-
86
-
87
-
88
-
89
-
90
-
91
-
92
 |
 |
