Canon HF100 VIXIA HF10/VIXIA HF100 Instruction Manual - Page 42
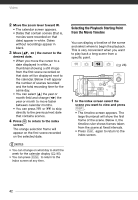
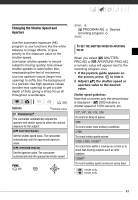
Selecting the Playback Starting Point, from the Movie Timeline
 |
UPC - 013803092004
View all Canon HF100 manuals
Add to My Manuals
Save this manual to your list of manuals |
Page 42 highlights
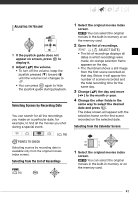
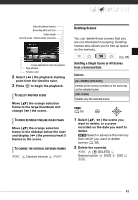
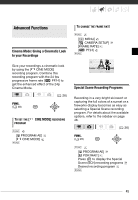
Video 2 Move the zoom lever toward W. • The calendar screen appears. • Dates that contain scenes (that is, movies were recorded on that date) appear in white. Dates without recordings appear in black. 3 Move ( , ) the cursor to the desired date. • When you move the cursor to a date displayed in white, a thumbnail showing a still image from the first scene recorded on that date will be displayed next to the calendar. Below it will appear the number of scenes recorded and the total recording time for the same day. • You can select ( ) the year or month field and change ( ) the year or month to move faster between calendar months. • You can press or to skip directly to the previous/next date that contains scenes. 4 Press to return to the index screen. The orange selection frame will appear on the first scene recorded on the selected date. NOTES • You can change on what day to start the week for the calendar display ( 95). • You can press FUNC. to return to the index screen at any time. Selecting the Playback Starting Point from the Movie Timeline You can display a timeline of the scene and select where to begin the playback. This is very convenient when you want to play back a long scene from a specific point. ( 26) 1 In the index screen select the scene you want to view and press DISP. . • The timeline screen appears. The large thumbnail will show the first frame of the scene. Below it, the timeline ruler shows frames taken from the scene at fixed intervals. • Press DISP. again to return to the index screen. 42
-
 1
1 -
2
-
3
-
4
-
5
-
6
-
7
-
8
-
9
-
10
-
11
-
12
-
13
-
14
-
15
-
16
-
17
-
18
-
19
-
20
-
21
-
22
-
23
-
24
-
25
-
26
-
27
-
28
-
29
-
30
-
31
-
32
-
33
-
34
-
35
-
36
-
 37
37 -
 38
38 -
 39
39 -
 40
40 -
 41
41 -
 42
42 -
 43
43 -
 44
44 -
 45
45 -
 46
46 -
 47
47 -
48
-
49
-
50
-
51
-
52
-
53
-
54
-
55
-
56
-
57
-
58
-
59
-
60
-
61
-
62
-
63
-
64
-
65
-
66
-
67
-
68
-
69
-
70
-
71
-
72
-
73
-
74
-
75
-
76
-
77
-
78
-
79
-
80
-
81
-
82
-
83
-
84
-
85
-
86
-
87
-
88
-
89
-
90
-
91
-
92
-
93
-
94
-
95
-
96
-
97
-
98
-
99
-
100
-
101
-
102
-
103
-
104
-
105
-
106
-
107
-
108
-
109
-
110
-
111
-
112
-
113
-
114
-
115
-
116
-
117
-
118
-
119
-
120
-
121
-
122
-
123
-
124
-
125
-
126
-
127
-
128
-
129
 |
 |