Canon MF3240 imageCLASS MF3200 Series Software Guide - Page 176
Creating an Original Cover Sheet, Inserting Text
 |
UPC - 013803059915
View all Canon MF3240 manuals
Add to My Manuals
Save this manual to your list of manuals |
Page 176 highlights
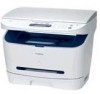
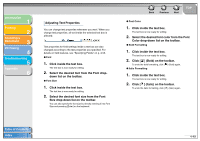
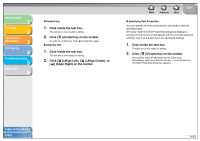
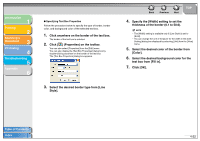
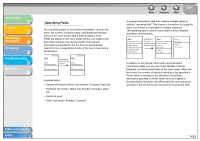
Introduction 1 Printing 2 Scanning a Document 3 PC Faxing 4 Troubleshooting 5 Appendix 6 ● Closing a File Follow the procedure below to close a currently open cover sheet without exiting the Canon Cover Sheet Editor. 1. Click the lower [ ] (Close) at the top-right corner of the Canon Cover Sheet Editor main window. Alternatively, select [Close] from the [File] menu. NOTE If you close a cover sheet that has not been saved after editing, a message appears asking whether you want to save the changes. Click [Yes] to save the changes, or [No] if you do not want to save changes. Click [Cancel] if you do not want to close the cover sheet. Back Previous Next TOP ■ Creating an Original Cover Sheet This section explains how to insert text, adjust text properties, specify fields, create objects, adjust objects, and specify grid options in order to create an original cover sheet. Inserting Text You can insert text and numbers into the cover page. The properties of any text or the text box itself can also be changed. To edit the text, change to the edit mode by clicking anywhere inside of a text box, and then place the cursor on the text that you want to edit. 1. Click [ ] (Text Box) on the toolbar. Alternatively, select [Text Box] from the [Insert] menu. 2. Drag the pointer on the area of the cover sheet to insert text. A square or rectangular text box appears. 3. Click inside the text box. The cursor for editing text appears. 4. Enter the desired text. Table of Contents Index 4-48
-
 1
1 -
2
-
3
-
4
-
5
-
6
-
7
-
8
-
9
-
10
-
11
-
12
-
13
-
14
-
15
-
16
-
17
-
18
-
19
-
20
-
21
-
22
-
23
-
24
-
25
-
26
-
27
-
28
-
29
-
30
-
31
-
32
-
33
-
34
-
35
-
36
-
37
-
38
-
39
-
40
-
41
-
42
-
43
-
44
-
45
-
46
-
47
-
48
-
49
-
50
-
51
-
52
-
53
-
54
-
55
-
56
-
57
-
58
-
59
-
60
-
61
-
62
-
63
-
64
-
65
-
66
-
67
-
68
-
69
-
70
-
71
-
72
-
73
-
74
-
75
-
76
-
77
-
78
-
79
-
80
-
81
-
82
-
83
-
84
-
85
-
86
-
87
-
88
-
89
-
90
-
91
-
92
-
93
-
94
-
95
-
96
-
97
-
98
-
99
-
100
-
101
-
102
-
103
-
104
-
105
-
106
-
107
-
108
-
109
-
110
-
111
-
112
-
113
-
114
-
115
-
116
-
117
-
118
-
119
-
120
-
121
-
122
-
123
-
124
-
125
-
126
-
127
-
128
-
129
-
130
-
131
-
132
-
133
-
134
-
135
-
136
-
137
-
138
-
139
-
140
-
141
-
142
-
143
-
144
-
145
-
146
-
147
-
148
-
149
-
150
-
151
-
152
-
153
-
154
-
155
-
156
-
157
-
158
-
159
-
160
-
161
-
162
-
163
-
164
-
165
-
166
-
167
-
168
-
169
-
170
-
 171
171 -
 172
172 -
 173
173 -
 174
174 -
 175
175 -
 176
176 -
 177
177 -
 178
178 -
 179
179 -
 180
180 -
 181
181 -
182
-
183
-
184
-
185
-
186
-
187
-
188
-
189
-
190
-
191
-
192
-
193
-
194
-
195
-
196
-
197
-
198
-
199
-
200
-
201
-
202
-
203
-
204
-
205
-
206
-
207
-
208
-
209
-
210
-
211
-
212
-
213
-
214
-
215
-
216
-
217
-
218
-
219
-
220
-
221
-
222
-
223
-
224
-
225
-
226
 |
 |
