Canon MP830 Service Manual - Page 11
Camera Direct Printing., the automatic print head alignment will - service manual
 |
UPC - 013803052725
View all Canon MP830 manuals
Add to My Manuals
Save this manual to your list of manuals |
Page 11 highlights
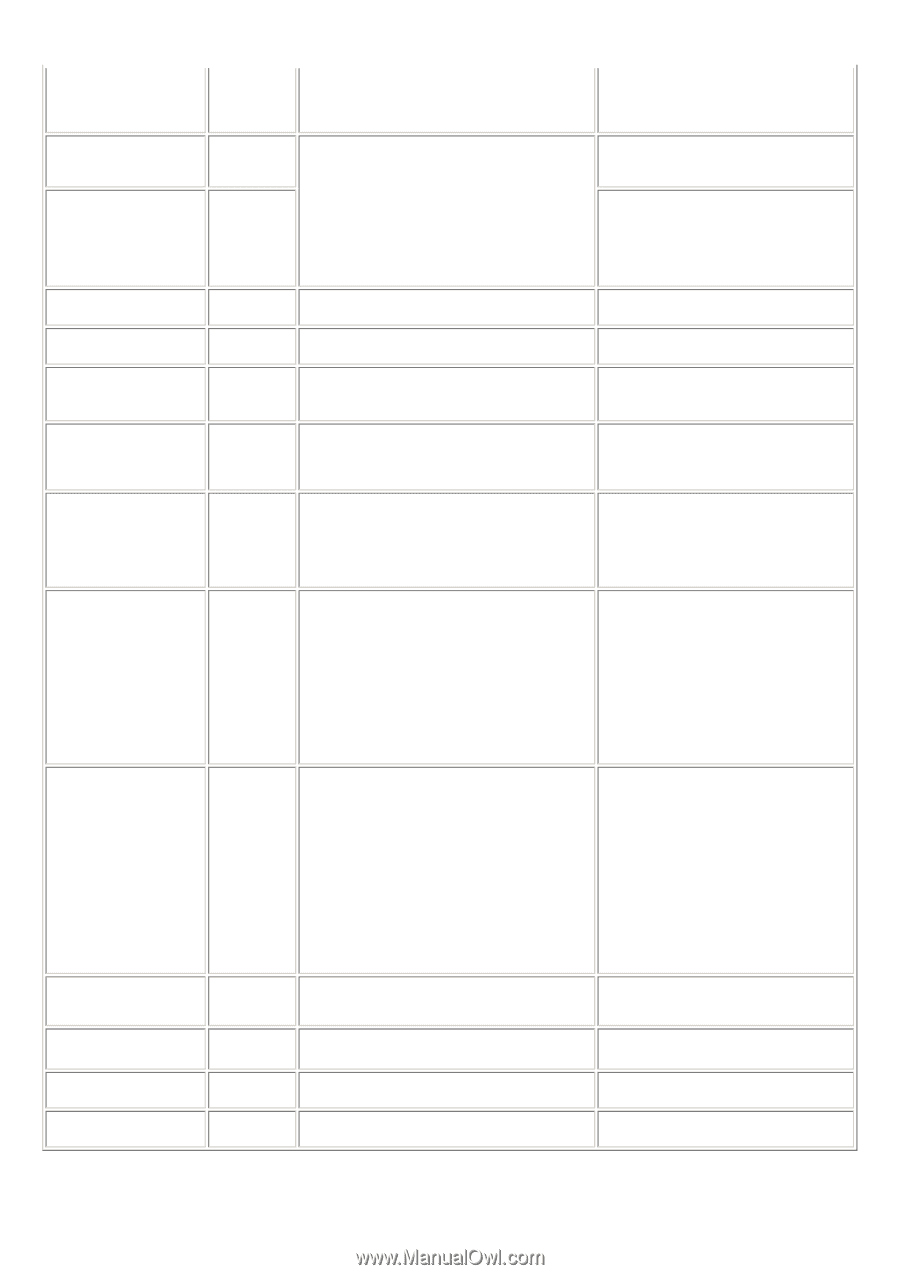
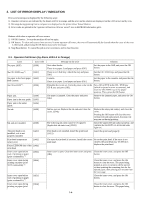
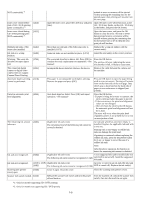
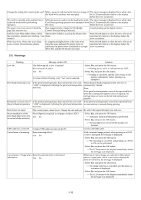
NOT continuable).*1 printed at error occurrence will be ejected without printing the remaining data for the ejected paper, then printing will resume from the next page. Inner cover closed before [1850] start of CD / DVD printing (print continuable).*1 Open the inner cover, place the CD-R tray and press Open the inner cover which functions as the [OK]. CD / DVD tray feeder, set the CD / DVD tray in the feeder, and press the OK button. Inner cover closed during CD / DVD printing (print NOT continuable).*1 [1855] Open the inner cover, and press the OK button to clear the error. The CD or DVD being printed at error occurrence will be ejected without printing the remaining data for the ejected CD or DVD, then the next print job will be done. Multiple ink tanks of the same color installed. [1681] More than one ink tank of the following color is installed. (U075) Replace the wrong ink tank(s) with the correct one(s). Ink tank in a wrong position. [1680] Some ink tanks are not installed in place. (U072) Install the ink tank(s) in the correct position. Warning: The waste ink absorber becomes almost full. [1700] The waste ink absorber is almost full. Press [OK] to Press the OK button. continue but early replacement recommended. ink absorber is full, is likely to occur soon. The connected digital camera or digital video camera does not support Camera Direct Printing. [2001] Incompatible device detected. Remove the device. Remove the cable between the camera and the machine. Automatic duplex printing [1310] cannot be performed. This paper is not compatible with duplex printing. Remove the paper and press [OK]. Press the OK button to eject the paper being used at error occurrence. Printing will resume from on the front side of the next page. Data which was to be printed on the back side of paper at error occurrence is skipped (not printed). Failed in automatic print head alignment. [2500] Auto head align has failed. Press [OK] and repeat operation. Press the OK button. - If paper is being fed at error occurrence, the error is indicated after the paper is ejected. - If the error occurs, the print head alignment values are not changed. - After exit from the error by the OK button, the automatic print head alignment will not be re-done. The error will occur when the print head alignment pattern is not printed due to no ink or non-ejection of ink. The remaining ink amount [1683] unknown. (Applicable ink tank icon) The remaining level of the following ink cannot be correctly detected. An ink tank which has once been empty is installed. Replace the applicable ink tank with a new one. Printing with a once-empty or refilled ink tank can damage the print head. If printing is continued without replacing the refilled ink tank, press the Stop/Reset button for 5 sec. or longer to record the use of a refilled ink tank. Note: After the above operation, the function to detect the remaining ink amount is disabled. Ink tank not recognized. [1684] (Applicable ink tank icon) A non-supported ink tank is installed (the ink The following ink tank cannot be recognized. (U140) tank LED is turned off). Install the supported ink tanks. Ink tank not recognized. [1410 to 1419] (Applicable ink tank icon) An error occurred in an ink tank (the ink tank [1682] The following ink tank cannot be recognized. (U150) LED is turned off). Replace the ink tank(s). Scanning unit (printer cover) open. [1200] Cover is open. Close the cover. Close the scanning unit (printer cover). Scanner lock switch locked. [5020] Release the scanner lock switch and turn the power Turn the machine off, unlock the scanner lock off and back on. switch, then turn the machine on again. *1: Only for models supporting CD / DVD printing *2: Only for models not supporting CD / DVD printing 1-5
-
 1
1 -
2
-
3
-
4
-
5
-
 6
6 -
 7
7 -
 8
8 -
 9
9 -
 10
10 -
 11
11 -
 12
12 -
 13
13 -
 14
14 -
 15
15 -
 16
16 -
17
-
18
-
19
-
20
-
21
-
22
-
23
-
24
-
25
-
26
-
27
-
28
-
29
-
30
-
31
-
32
-
33
-
34
-
35
-
36
-
37
-
38
-
39
-
40
-
41
-
42
-
43
-
44
-
45
-
46
-
47
-
48
-
49
-
50
-
51
-
52
-
53
-
54
-
55
-
56
-
57
-
58
-
59
-
60
-
61
-
62
-
63
-
64
-
65
-
66
-
67
-
68
-
69
-
70
-
71
-
72
-
73
-
74
-
75
-
76
-
77
-
78
-
79
-
80
-
81
-
82
-
83
-
84
-
85
 |
 |