Canon MultiPASS F20 MultiPASS F20 Basic Guide - Page 73
Aligning the printhead
 |
View all Canon MultiPASS F20 manuals
Add to My Manuals
Save this manual to your list of manuals |
Page 73 highlights
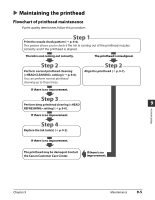
Aligning the printhead To align the printhead after you have just installed it, follow the procedure in the Setup Sheet. If you have printed the nozzle check pattern ( p. 9-6) and determined that the printhead needs aligning, align it from the operation panel or from the MultiPASS Suite software. Aligning the printhead from the operation panel Follow this procedure to align the printhead from the operation panel: 1 Load letter- or A4-size plain paper in the multi-purpose tray. 2 Press [Menu] repeatedly until is displayed. Ex: 7 . M A I N T E N A N C E NOZZLE CHECK 3 Use [2] or [3] to select . 4 Press [Set]. • The machine prints a horizontal line pattern. CHANGE H VALUE A0 5 In column A on the printout, note which box has the most solid image. Note the value next to this box and use [2] or [3] to enter it. BAD SAMPLE 9 Maintenance Least solid box GOOD SAMPLE Most solid box 6 Press [Set]. 7 Repeat steps 5 and 6 for columns B to F. Aligning the printhead from the MultiPASS Suite Follow this procedure to align the printhead from the MultiPASS Suite software: 1 Load letter- or A4-size plain paper in the multi-purpose tray. 2 On the Windows desktop, click [Start], point to [Settings], then click [Printers] (Windows XP: Click [Start], then click [Printers and Faxes]). Chapter 9 Maintenance 9-7
-
 1
1 -
2
-
3
-
4
-
5
-
6
-
7
-
8
-
9
-
10
-
11
-
12
-
13
-
14
-
15
-
16
-
17
-
18
-
19
-
20
-
21
-
22
-
23
-
24
-
25
-
26
-
27
-
28
-
29
-
30
-
31
-
32
-
33
-
34
-
35
-
36
-
37
-
38
-
39
-
40
-
41
-
42
-
43
-
44
-
45
-
46
-
47
-
48
-
49
-
50
-
51
-
52
-
53
-
54
-
55
-
56
-
57
-
58
-
59
-
60
-
61
-
62
-
63
-
64
-
65
-
66
-
67
-
 68
68 -
 69
69 -
 70
70 -
 71
71 -
 72
72 -
 73
73 -
 74
74 -
 75
75 -
 76
76 -
 77
77 -
 78
78 -
79
-
80
-
81
-
82
-
83
-
84
-
85
-
86
-
87
-
88
-
89
-
90
-
91
-
92
-
93
-
94
-
95
-
96
-
97
-
98
-
99
-
100
-
101
-
102
-
103
-
104
-
105
-
106
-
107
-
108
-
109
-
110
 |
 |
