Canon PIXMA MP160 User's Guide - Page 14
Operation Panel - alarm
 |
View all Canon PIXMA MP160 manuals
Add to My Manuals
Save this manual to your list of manuals |
Page 14 highlights
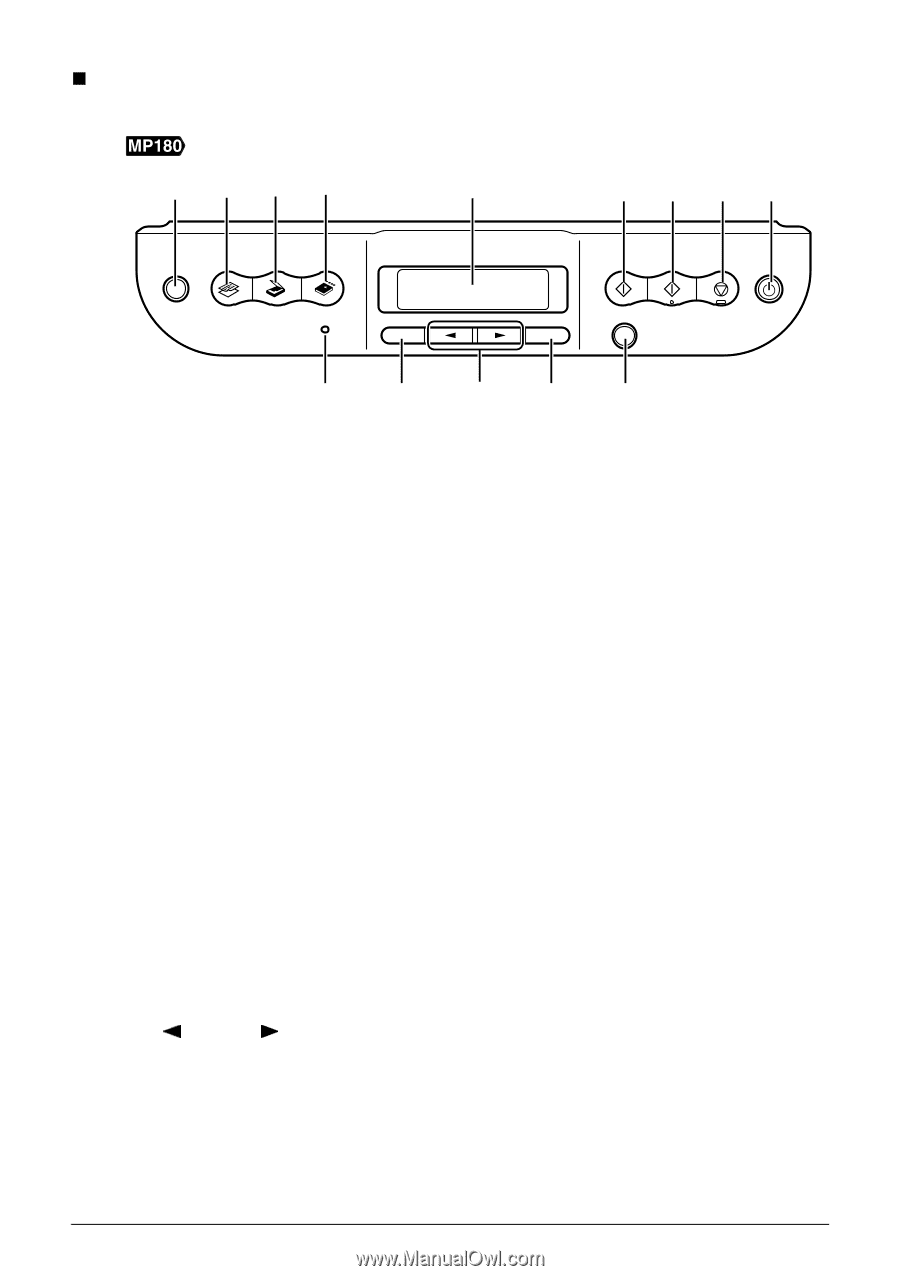
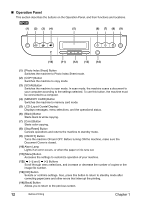
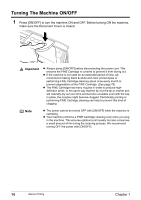
„ Operation Panel This section describes the buttons on the Operation Panel, and their functions and locations. (1) (2) (3) (4) (5) (6) (7) (8) (9) (10) (11) (12) (13) (14) (1) [Photo Index Sheet] Button Switches the machine to Photo Index Sheet mode. (2) [COPY] Button Switches the machine to copy mode. (3) [SCAN] Button Switches the machine to scan mode. In scan mode, the machine scans a document to your computer according to the settings selected. To use this button, the machine must be connected to a computer. (4) [MEMORY CARD] Button Switches the machine to memory card mode. (5) LCD (Liquid Crystal Display) Displays messages, menu selections, and the operational status. (6) [Black] Button Starts black & white copying. (7) [Color] Button Starts color copying. (8) [Stop/Reset] Button Cancels operations and returns the machine to standby mode. (9) [ON/OFF] Button Turns the machine ON and OFF. Before turning ON the machine, make sure the Document Cover is closed. (10) Alarm Lamp Lights if an error occurs, or when the paper or ink runs out. (11) [Menu] Button Accesses the settings to customize operation of your machine. (12) [ (-)] and [ (+)] Buttons Scroll through menu selections, and increase or decrease the number of copies or the image file number. (13) [OK] Button Selects or confirms settings. Also, press this button to return to standby mode after correcting paper jams and other errors that interrupt the printing. (14) [Back] Button Allows you to return to the pervious screen. 12 Before Printing Chapter 1
-
 1
1 -
2
-
3
-
4
-
5
-
6
-
7
-
8
-
 9
9 -
 10
10 -
 11
11 -
 12
12 -
 13
13 -
 14
14 -
 15
15 -
 16
16 -
 17
17 -
 18
18 -
 19
19 -
20
-
21
-
22
-
23
-
24
-
25
-
26
-
27
-
28
-
29
-
30
-
31
-
32
-
33
-
34
-
35
-
36
-
37
-
38
-
39
-
40
-
41
-
42
-
43
-
44
-
45
-
46
-
47
-
48
-
49
-
50
-
51
-
52
-
53
-
54
-
55
-
56
-
57
-
58
-
59
-
60
-
61
-
62
-
63
-
64
-
65
-
66
-
67
-
68
-
69
-
70
-
71
-
72
-
73
-
74
-
75
-
76
-
77
-
78
-
79
-
80
-
81
-
82
-
83
-
84
-
85
-
86
-
87
-
88
-
89
-
90
-
91
-
92
-
93
-
94
-
95
-
96
-
97
-
98
-
99
-
100
-
101
-
102
-
103
-
104
-
105
-
106
-
107
-
108
-
109
-
110
-
111
-
112
-
113
-
114
-
115
-
116
-
117
-
118
-
119
-
120
-
121
-
122
-
123
-
124
-
125
-
126
-
127
-
128
 |
 |