Canon PIXMA MP160 User's Guide - Page 91
Ink Does Not Come Out/Printing Is Blurred/Colors, Are Wrong/White Streaks/Straight Lines Are, - windows 7 driver
 |
View all Canon PIXMA MP160 manuals
Add to My Manuals
Save this manual to your list of manuals |
Page 91 highlights
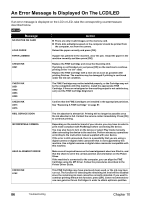
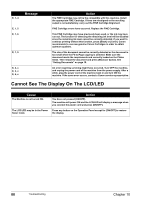
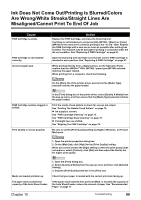
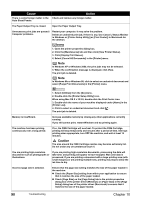
Ink Does Not Come Out/Printing Is Blurred/Colors Are Wrong/White Streaks/Straight Lines Are Misaligned/Cannot Print To End Of Job Cause FINE Cartridge is empty. FINE Cartridge is not installed correctly. Incorrect paper type. Action Replace the FINE Cartridge, and close the Scanning Unit. If printing is not finished yet, just press [OK] (MP180) / [Black] or [Color] (MP160) on the machine to continue printing in the "no ink" state. Replace the FINE Cartridge with a new one as soon as possible after printing has finished. The machine may be damaged if printing is continued under the ink out condition. See "Replacing A FINE Cartridge" on page 67. Open the Scanning Unit and make sure that the correct FINE Cartridge is inserted in each position. See "Replacing A FINE Cartridge" on page 67. When printing directly from a digital camera, on the Operation Panel, confirm that the (MP180) / paper type (MP160) selected matches the paper loaded. When printing from a computer, check the following. On the [Main] tab of the printer driver, ensure that the [Media Type] selected matches the paper loaded. FINE Cartridge nozzles clogged or shifted. Print Quality is not set properly. In the [Print] dialog box of the printer driver, select [Quality & Media] from the pop-up menu, and then ensure that the [Media Type] selected matches the paper loaded. Print the nozzle check pattern to check for uneven ink output. See "Printing The Nozzle Check Pattern" on page 76. z ink supply is uneven. See "FINE Cartridge Cleaning" on page 78. See "FINE Cartridge Deep Cleaning" on page 78. z If straight lines are shifted. See "Aligning The FINE Cartridge" on page 79. Be sure to set the [Print Quality] setting to [High] in Windows, or [Fine] in Macintosh. 1. Open the printer properties dialog box. 2. On the [Main] tab, click [High] for the [Print Quality] setting. When you cannot choose the [High] setting or when the print quality does not improve, select [Custom], click [Set] and then adjust the Quality bar for higher print quality. Media not loaded printside up. The paper stack exceeds the capacity of the Auto Sheet Feeder. 1. Open the [Print] dialog box. 2. Select [Quality & Media] from the pop-up menu and then click [Detailed Setting]. 3. Drag the [Print Quality] slide bar to the [Fine] end. Check that your paper is loaded with the correct print side facing up. If the paper stack exceeds the Load Limit Mark, or exceeds the capacity of the Auto Sheet Feeder, reduce the amount of paper. See "Recommended Paper" on page 17. Chapter 10 Troubleshooting 89
-
 1
1 -
2
-
3
-
4
-
5
-
6
-
7
-
8
-
9
-
10
-
11
-
12
-
13
-
14
-
15
-
16
-
17
-
18
-
19
-
20
-
21
-
22
-
23
-
24
-
25
-
26
-
27
-
28
-
29
-
30
-
31
-
32
-
33
-
34
-
35
-
36
-
37
-
38
-
39
-
40
-
41
-
42
-
43
-
44
-
45
-
46
-
47
-
48
-
49
-
50
-
51
-
52
-
53
-
54
-
55
-
56
-
57
-
58
-
59
-
60
-
61
-
62
-
63
-
64
-
65
-
66
-
67
-
68
-
69
-
70
-
71
-
72
-
73
-
74
-
75
-
76
-
77
-
78
-
79
-
80
-
81
-
82
-
83
-
84
-
85
-
 86
86 -
 87
87 -
 88
88 -
 89
89 -
 90
90 -
 91
91 -
 92
92 -
 93
93 -
 94
94 -
 95
95 -
 96
96 -
97
-
98
-
99
-
100
-
101
-
102
-
103
-
104
-
105
-
106
-
107
-
108
-
109
-
110
-
111
-
112
-
113
-
114
-
115
-
116
-
117
-
118
-
119
-
120
-
121
-
122
-
123
-
124
-
125
-
126
-
127
-
128
 |
 |