Canon PIXMA MP800R Setup Guide - Page 69
Description of service, Name or IP address, External Port number for this service, TCP/UDP, Internal
 |
View all Canon PIXMA MP800R manuals
Add to My Manuals
Save this manual to your list of manuals |
Page 69 highlights
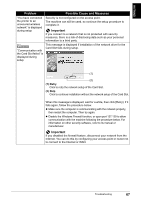
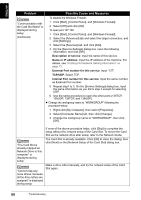
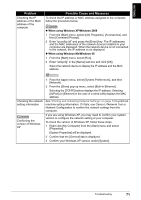
ENGLISH Problem Possible Cause and Measures To disable the Windows Firewall: "Communication with the Card Slot failed" is displayed during setup (Continued) 1 Click [Start], [Control Panel], and [Windows Firewall]. 2 Select [Off] and click [OK]. To open port 137:139: 1 Click [Start], [Control Panel], and [Windows Firewall]. 2 Select the [Advanced] tab and select the target connection, and click [Settings]. 3 Select the [Services] tab, and click [Add]. 4 On the [Service Settings] dialog box, input the following information, and click [OK]. Description of service: Input the name of this service. Name or IP address: Input the IP address of the machine. For details, see "Printing Out Network Setting Information" on page 72. External Port number for this service: Input "137". TCP/UDP: Select TCP. Internal Port number for this service: Input the same number as External Port number. 5 Repeat step1 to 3. On the [Service Settings] dialog box, input the same information as you did in step 4 except for selecting UDP. 6 Use the same procedure to open the other ports (138TCP, 138UDP, 139TCP, and 139UDP). z Change the workgroup name to "WORKGROUP" following the procedure below. 1 Right-click [My Computer], then select [Properties]. 2 Select [Computer Name] tab, then click [Change]. 3 Change the workgroup name to "WORKGROUP", then click [OK]. If none of the above procedure helps, click [Skip] to complete the setup without the network setup of the Card Slot. To mount the Card Slot as the network drive after setup, refer to the Network Guide. "The Card Slot is already mapped as Network Drive to this computer" is displayed during setup The Card Slot is already available. Click [OK] to close the dialog, then click [Next] on the [Network Setup of the Card Slot] dialog box. "Cannot map any more drives, because all the drive letters are assigned" is displayed during setup Make a drive letter manually, and try the network setup of the Card Slot again. 68 Troubleshooting
-
 1
1 -
2
-
3
-
4
-
5
-
6
-
7
-
8
-
9
-
10
-
11
-
12
-
13
-
14
-
15
-
16
-
17
-
18
-
19
-
20
-
21
-
22
-
23
-
24
-
25
-
26
-
27
-
28
-
29
-
30
-
31
-
32
-
33
-
34
-
35
-
36
-
37
-
38
-
39
-
40
-
41
-
42
-
43
-
44
-
45
-
46
-
47
-
48
-
49
-
50
-
51
-
52
-
53
-
54
-
55
-
56
-
57
-
58
-
59
-
60
-
61
-
62
-
63
-
 64
64 -
 65
65 -
 66
66 -
 67
67 -
 68
68 -
 69
69 -
 70
70 -
 71
71 -
 72
72 -
 73
73 -
 74
74 -
75
-
76
-
77
-
78
 |
 |