Canon PIXMA MX850 Quick Start Guide - Page 164
Cannot Print Properly through Bluetooth Communication, Error Message On, PictBridge Compliant, Device - power supply
 |
View all Canon PIXMA MX850 manuals
Add to My Manuals
Save this manual to your list of manuals |
Page 164 highlights
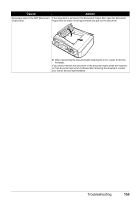
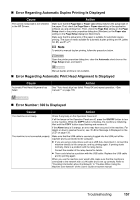
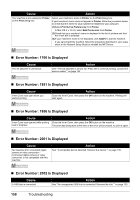
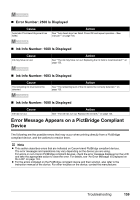
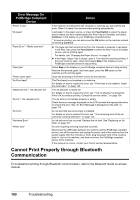
Error Message On PictBridge Compliant Device "Printer in use" "No paper" "Paper Error" / "Media type error" "Paper jam" "Printer cover open" "No Print Head" "Waste tank full" / "Ink absorber full" "No ink" / "Ink cassette error" "Ink Error" "Hardware Error" "Printer error" Action If the machine is printing from the computer or warming up, wait until the job ends. When it is ready, the machine starts printing automatically. Load paper in the paper source, or press the Feed Switch to select the paper source where you have loaded paper (the Rear Tray or Cassette), and select Continue* in the display on your PictBridge compliant device. * To resume printing, you can also press the OK button on the machine instead of selecting Continue. z The page size that cannot be fed from the Cassette is selected. Load paper in the Rear Tray, press the Feed Switch to select the Rear Tray as the paper source, and try printing again. For details, see "Changing the Paper Source" on page 25. z If the Paper Output Tray is closed, open it. The machine resumes printing. If the Inner Cover is open, close it and select Stop in the display on your PictBridge compliant device to stop printing. Select Stop in the display on your PictBridge compliant device to stop printing. Remove the jammed paper, load new paper, press the OK button on the machine and try printing again. Close the Scanning Unit (Printer Cover) on the machine. The Print Head is not installed or is defective. For details on how to resolve the error, see ""Print head is not installed. Install the print head."" on page 133. The ink absorber is nearly full. For details on how to resolve the error, see ""The ink absorber is almost full. Press OK to continue printing. Contact the service center."" on page 134. The ink tank is not installed properly or empty. Check the error message displayed on the LCD and take the appropriate action to resolve the error. See "An Error Message Is Displayed on the LCD" on page 133. An ink tank that was once empty is installed. For details on how to resolve the error, see ""The remaining level of the ink cannot be correctly detected."" on page 133. An ink tank error has occurred. Replace the ink tank. See "Replacing an Ink Tank" on page 107. An error requiring servicing may have occurred. Disconnect the USB cable between the machine and the PictBridge compliant device, turn off the machine, and unplug the power cord of the machine from the power supply. After five minutes or more, plug the power cord of the machine back in, turn on the machine, and then reconnect the PictBridge compliant device to the machine. If the same error occurs, contact your Canon service representative. Cannot Print Properly through Bluetooth Communication To troubleshoot printing through Bluetooth communication, refer to the Bluetooth Guide on-screen manual. 160 Troubleshooting
-
 1
1 -
2
-
3
-
4
-
5
-
6
-
7
-
8
-
9
-
10
-
11
-
12
-
13
-
14
-
15
-
16
-
17
-
18
-
19
-
20
-
21
-
22
-
23
-
24
-
25
-
26
-
27
-
28
-
29
-
30
-
31
-
32
-
33
-
34
-
35
-
36
-
37
-
38
-
39
-
40
-
41
-
42
-
43
-
44
-
45
-
46
-
47
-
48
-
49
-
50
-
51
-
52
-
53
-
54
-
55
-
56
-
57
-
58
-
59
-
60
-
61
-
62
-
63
-
64
-
65
-
66
-
67
-
68
-
69
-
70
-
71
-
72
-
73
-
74
-
75
-
76
-
77
-
78
-
79
-
80
-
81
-
82
-
83
-
84
-
85
-
86
-
87
-
88
-
89
-
90
-
91
-
92
-
93
-
94
-
95
-
96
-
97
-
98
-
99
-
100
-
101
-
102
-
103
-
104
-
105
-
106
-
107
-
108
-
109
-
110
-
111
-
112
-
113
-
114
-
115
-
116
-
117
-
118
-
119
-
120
-
121
-
122
-
123
-
124
-
125
-
126
-
127
-
128
-
129
-
130
-
131
-
132
-
133
-
134
-
135
-
136
-
137
-
138
-
139
-
140
-
141
-
142
-
143
-
144
-
145
-
146
-
147
-
148
-
149
-
150
-
151
-
152
-
153
-
154
-
155
-
156
-
157
-
158
-
 159
159 -
 160
160 -
 161
161 -
 162
162 -
 163
163 -
 164
164 -
 165
165 -
 166
166 -
 167
167 -
 168
168 -
 169
169 -
170
-
171
-
172
-
173
-
174
-
175
-
176
-
177
-
178
-
179
-
180
-
181
-
182
-
183
-
184
-
185
-
186
-
187
-
188
 |
 |