Canon PIXMA MX850 Quick Start Guide - Page 35
Feed Switch, Rear Tray, Envelope, Media Type, DL Env., Comm. Env. #10, Size, Landscape - support
 |
View all Canon PIXMA MX850 manuals
Add to My Manuals
Save this manual to your list of manuals |
Page 35 highlights
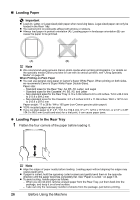
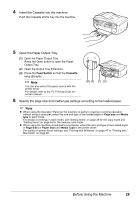
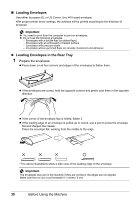
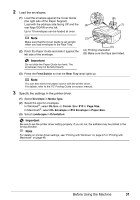
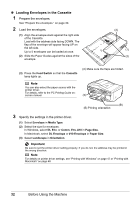
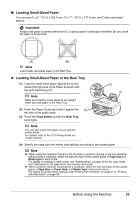
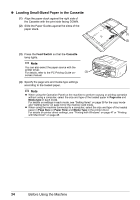
2 Load the envelopes. (1) Load the envelope against the Cover Guide (the right side of the Paper Support). Load with the address side facing UP and the (2) rear flaps DOWN on the left. Up to 10 envelopes can be loaded at once. (B) (1) Note Make sure that the Cover Guide is set upright when you load envelopes in the Rear Tray. (2) Pinch the Paper Guide and slide it against the left side of the envelope. Important Do not slide the Paper Guide too hard. The envelopes may not be fed properly. (3) (A) (A) Printing orientation (B) Make sure the flaps are folded. (3) Press the Feed Switch so that the Rear Tray lamp lights up. Note You can also select the paper source with the printer driver. For details, refer to the PC Printing Guide on-screen manual. 3 Specify the settings in the printer driver. (1) Select Envelope in Media Type. (2) Select the size for envelopes. In Windows®, select DL Env. or Comm. Env. #10 in Page Size. In Macintosh®, select DL Envelope or #10 Envelope in Paper Size. (3) Select Landscape in Orientation. Important Be sure to set the printer driver setting properly. If you do not, the address may be printed in the wrong direction. Note For details on printer driver settings, see "Printing with Windows" on page 47 or "Printing with Macintosh" on page 48. Before Using the Machine 31
-
 1
1 -
2
-
3
-
4
-
5
-
6
-
7
-
8
-
9
-
10
-
11
-
12
-
13
-
14
-
15
-
16
-
17
-
18
-
19
-
20
-
21
-
22
-
23
-
24
-
25
-
26
-
27
-
28
-
29
-
 30
30 -
 31
31 -
 32
32 -
 33
33 -
 34
34 -
 35
35 -
 36
36 -
 37
37 -
 38
38 -
 39
39 -
 40
40 -
41
-
42
-
43
-
44
-
45
-
46
-
47
-
48
-
49
-
50
-
51
-
52
-
53
-
54
-
55
-
56
-
57
-
58
-
59
-
60
-
61
-
62
-
63
-
64
-
65
-
66
-
67
-
68
-
69
-
70
-
71
-
72
-
73
-
74
-
75
-
76
-
77
-
78
-
79
-
80
-
81
-
82
-
83
-
84
-
85
-
86
-
87
-
88
-
89
-
90
-
91
-
92
-
93
-
94
-
95
-
96
-
97
-
98
-
99
-
100
-
101
-
102
-
103
-
104
-
105
-
106
-
107
-
108
-
109
-
110
-
111
-
112
-
113
-
114
-
115
-
116
-
117
-
118
-
119
-
120
-
121
-
122
-
123
-
124
-
125
-
126
-
127
-
128
-
129
-
130
-
131
-
132
-
133
-
134
-
135
-
136
-
137
-
138
-
139
-
140
-
141
-
142
-
143
-
144
-
145
-
146
-
147
-
148
-
149
-
150
-
151
-
152
-
153
-
154
-
155
-
156
-
157
-
158
-
159
-
160
-
161
-
162
-
163
-
164
-
165
-
166
-
167
-
168
-
169
-
170
-
171
-
172
-
173
-
174
-
175
-
176
-
177
-
178
-
179
-
180
-
181
-
182
-
183
-
184
-
185
-
186
-
187
-
188
 |
 |
