Canon PIXMA iP6700D Quick Start Guide - Page 47
POWER Lamp and Alarm Lamp Flash Alternately - ink absorber
 |
View all Canon PIXMA iP6700D manuals
Add to My Manuals
Save this manual to your list of manuals |
Page 47 highlights
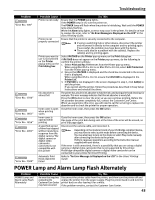
Troubleshooting Problem "Error No.: 300" "Error No.: 1700" "Error No.: 1851" "Error No.: 1856" "Error No.: 2001" "Error No.: 2500" Possible Cause Printer is not ready Printer is not properly connected Printer you want to use is not selected on the Printer popup menu on the Print dialog box Ink absorber is almost full Inner cover is open when printing starts Inner cover is opened while printing A specified period of time has elapsed without receiving a response from the digital camera/The digital camera or digital video camcorder connected is not compatible with this printer Automatic Print Head alignment failed Try This Ensure that the POWER lamp lights. If the POWER lamp is off, turn the printer on. The POWER lamp will flash when the printer is initializing. Wait until the POWER lamp stops flashing. When the Alarm lamp lights, an error may occur in the printer. For details on how to resolve the error, refer to "An Error Message is Displayed on the LCD" in the Direct Printing Guide. Ensure that the printer is securely connected to the computer. If using a switching hub or other device, disconnect the printer and reconnect it directly to the computer and try printing again. If successful, the problem may have been with the device. There could also be a problem with the cable(s). Replace the cable(s) and try printing again. Select iP6700D on the Printer pop-up menu on the Print dialog box. If iP6700D does not appear on the Printer pop-up menu, do the following to confirm the printer settings: 1. Select Print and Fax Preferences from the Printer pop-up menu. When using Mac OS X v.10.3.x or Mac OS X v.10.2.8, select Edit Printer List from the Printer pop-up menu. 2. Ensure that iP6700D is displayed and the check box is selected in the screen that is displayed. When using Mac OS X v.10.2.8, ensure that iP6700D is displayed in the Printer List. 3. If iP6700D is not displayed in the screen displayed in step 2, click Add(+) to add the printer. If you cannot add the printer, follow the procedures described in Easy Setup Instructions and reinstall the driver. The printer has a built-in ink absorber to hold the ink used during print head cleaning, for example. This error message indicates that this ink absorber is nearly full. Press the OK button to clear the error so you can continue printing. Before the ink absorber becomes completely full, contact the Customer Care Center. When you experience this error, you will need to call for servicing to replace ink absorber and to check the printer for proper operation. Close the inner cover, then press the OK button. Close the inner cover, then press the OK button. One page of the print data being sent at the time of the error will be erased, so print that page again. Disconnect the camera cable, and reconnect it. Depending on the model or brand of your PictBridge compliant device, you may have to select a print mode before connecting the device. You may also have to turn on the device or select Play mode manually after connecting the device to the printer. Perform necessary operations according to the instruction manual supplied with your device. If the error is still unresolved, there is a possibility that you are using a digital camera or digital video camcorder that is not supported by this printer. PictBridge-compatible digital camera or digital video camcorder can be connected to your printer for Direct Printing. Refer to "An Error Message is Displayed on the LCD" in the Direct Printing Guide. POWER Lamp and Alarm Lamp Flash Alternately Problem POWER Lamp and Alarm Lamp Flash Alternately Possible Cause Try This An error that requires Disconnect the printer cable from the printer, and then turn the printer off and contacting the unplug the printer from the power supply. Plug the printer back in and turn the Customer Care Center printer back on after leaving it for a while. may have occurred If the problem remains, contact the Customer Care Center. 43
-
 1
1 -
2
-
3
-
4
-
5
-
6
-
7
-
8
-
9
-
10
-
11
-
12
-
13
-
14
-
15
-
16
-
17
-
18
-
19
-
20
-
21
-
22
-
23
-
24
-
25
-
26
-
27
-
28
-
29
-
30
-
31
-
32
-
33
-
34
-
35
-
36
-
37
-
38
-
39
-
40
-
41
-
 42
42 -
 43
43 -
 44
44 -
 45
45 -
 46
46 -
 47
47 -
 48
48 -
 49
49 -
 50
50 -
 51
51 -
 52
52 -
53
-
54
-
55
-
56
-
57
-
58
-
59
-
60
 |
 |
